CHAPTER 28 Working with Network Computers
When people talk about living in a “wired world,” they’re most often musing about life in a time when most folks (at least in developed countries) are connected to the Internet at home, at work, or even on the road via Wi-Fi hookups and cellular connections. But that “wired” adjective also applies to another trend that has happened over the same time frame, although with far less fanfare: Almost all of us are connected to local networks, certainly at work, but increasingly at home, as well.
This means that many of us have become de facto network administrators charged with installing network hardware, setting up routers and wireless access points, running network cables, connecting PCs, and fixing network problems. In this chapter and the next three, my goal is to provide you with a few useful tweaks that I trust will help you with these networking chores and will help you get more out of your networked computers.
Give a Computer a Static IP Address
![]()
Your network’s router also acts as a Dynamic Host Control Protocol (DHCP) server, which means that it provides a unique IP address to each device that connects to the router. In most cases that IP address expires after 24 hours, and when the expiration time approaches the client asks for a new IP address. In small networks, the DHCP server often assigns each client the same IP address each time, but that’s not guaranteed. In your day-to-day Windows work you rarely need to know a connection’s IP address, so a changing IP address is no big deal the vast majority of the time.
However, there are times when a constantly changing IP address can be a big problem. For example, when you learn how to access your desktop over the Internet in Chapter 30, “Making Remote Connections,” you see that a dynamic IP address makes it much harder to make the connection. You can fix this problem by assigning a static IP address to your computer.
• See “Connect to Your Desktop via the Internet,” p. 354.
When you use a dynamic IP address, in most cases you also use dynamic DNS (domain name system) addresses, which are supplied by your Internet service provider. (The DNS enables computers and servers connected to the Internet to find resources using domain names rather than IP addresses.) When you switch your computer to a static IP address (as described later), Windows also disables the feature that allows it to obtain DNS addresses automatically. In other words, when you specify a static IP address, you must also specify static DNS addresses.
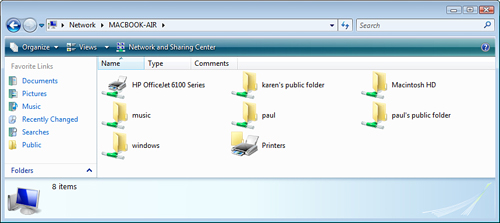
Therefore, before performing the procedure for converting Windows to a static IP address, you need to determine your ISP’s current DNS addresses. To find out the current DNS addresses for a network connection, open Command Prompt, type ipconfig /all | more and press Enter. Windows displays information about each network connection, including the IP addresses of your ISP’s DNS servers, as shown in the following (partial) example output:
You’re now just about ready to assign a static IP address to your computer. The last bit of information you need to know is the IP address to use. This is important because you don’t want to use an address that your router has already assigned to another computer. The easiest way to do this is to choose an address outside of the DHCP server’s range. For example, if your DHCP server is configured to assign addresses from the range 192.168.1.100 to 192.168.1.150, an address such as 192.168.1.50 or 192.168.1.200 will work. (Remember, too, not to use the address assigned to your router.)
With an IP address in hand, follow these steps to assign it to a network connection in Windows Vista:
1. Open the Network Connections window:
• Windows Vista—Select Start, type network, click Network and Sharing Center, and then click Manage Network Connections.
• Windows XP—Select Start, All Programs, Accessories, Communications, Network Connections.
2. Right-click the connection you want to work with and then click Properties. In Vista, the User Account Control dialog box appears.
3. (Windows Vista only) Enter your UAC credentials to continue.
4. In the connection’s Properties dialog box, display the Networking tab.
5. In the list of items, select Internet Protocol Version 4 (TCP/IPv4).
6. Click Properties to display the Properties dialog box for Internet Protocol Version 4.
7. Click to activate the Use the Following IP Address option.
8. Use the IP Address box to type the IP address you want to use.
9. Use the Subnet Mask box to type the IP addresses for the subnet mask. (Windows Vista should fill this in for you automatically; the most common value is 255.255.255.0.)
10. Use the Default Gateway box to type the IP address of your network’s router.
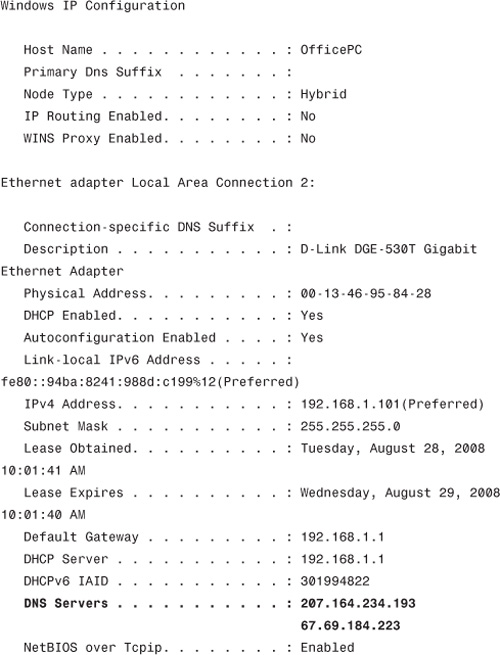
11. Use the Preferred DNS Server and Alternate DNS Server boxes to type the IP addresses of your ISP’s DNS servers. Figure 28.1 shows a completed version of the dialog box.
FIGURE 28.1 You can assign a static IP address to a network connection on a Windows computer.
12. Click OK to return to the connection’s Properties dialog box.
13. Click Close.
Make XP Computers Appear in Vista’s Network Map
![]()
Windows Vista comes with a new Network Map feature that gives you a bird’s-eye view of everything your computer is connected to: network connections (wired and wireless), ad hoc (computer-to-computer) connections, Internet connections, and the devices associated with these connections (such as a router and/or a switch). Network Map also gives you a visual display of the connection status so that you can easily spot problems.
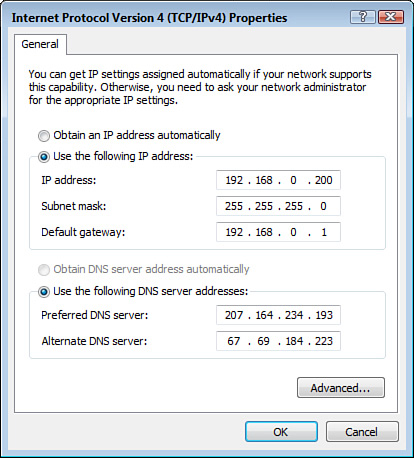
Select Start, type network, and then click Network and Sharing Center. In the Network and Sharing Center window that shows up, the top part of the window displays your local portion of the network map, and the layout depends on your current connections. You always see an icon for your computer on the left. If your computer is connected to a network, a green line joins the computer icon and the network icon. If the network is connected to the Internet, another green line joins the network icon and the Internet icon on the right (see Figure 28.2). If there is no connection, you see a red X through the connection line.
FIGURE 28.2 The top part of the Network and Sharing Center window displays your local portion of the network map.
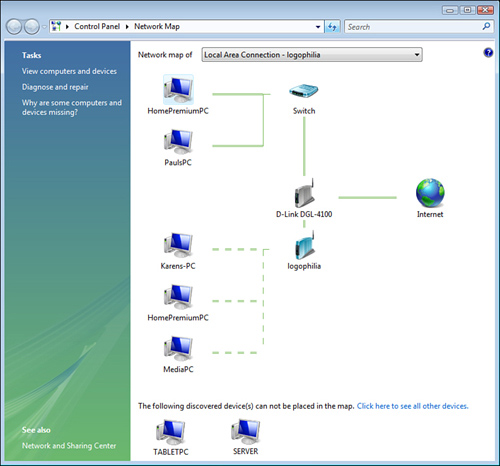
The Network and Sharing Center also comes with a more detailed version of Network Map. To view it, click the View Full Map link. Figure 28.3 shows an example of the full network map. If you have multiple network connections, use the Network Map Of list to select a different connection and see its map.
Notice in Figure 28.3 that there’s a problem with the Network Map: There are two icons at the bottom—TABLETPC and SERVER—that Network Map claims “can not [sic] be placed in the map.” Here the TABLETPC icon represents a Windows XP computer, and the SERVER icon represents a Windows Home Server machine. These machines don’t get along with Network Map, because this feature requires a protocol called Link Layer Topology Discovery (LLTD). LLTD is baked into every version of Windows Vista, but it’s not part of Windows XP (or Windows Home Server). This means that XP PCs either don’t show up at all in the Network Map, or they get relegated to the limbo at the bottom of the map.
FIGURE 28.3 The full version of the Network Map.
To fix this in XP, you have two choices:
• If you’re running XP with Service Pack 2 or earlier, download and install the Link Layer Topology Discovery (LLTD) Responder package, which is available from Microsoft:
www.microsoft.com/downloads/details.aspx?FamilyId=4F01A31D-EE46-481E-BA11-37F485FA34EA
• If you’re running XP with Service Pack 3, Microsoft has not yet released a hotfix for this problem. Check the following Knowledge Base article to see if the hotfix is ready:
http://support.microsoft.com/kb/922120
If there’s no hotfix in sight, all is not lost. You can load the LLTD Responder package, but it takes quite a bit of extra work, unfortunately. Here are the steps:
1. Download the LLTD Responder package and save it to your hard drive.
2. Open the folder containing the LLTD Responder package, right-drag the file (that is, hold down the right mouse button and drag the file), drop it inside the same folder, and then click Create Shortcuts Here.
3. Right-click the new shortcut and then click Properties.
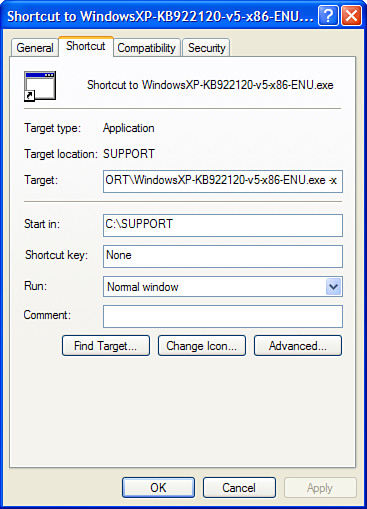
4. In the Shortcut tab, click inside the Target text box and add a space followed by -x, as shown in Figure 28.4. Click OK.
FIGURE 28.4 In the Target text box, you need to add a space and -x to the existing command.
5. Double-click the shortcut. XP prompts you for a folder location to extract the files (the default is the current folder).
6. Type a folder path (or leave the current path as is), and click OK. XP extracts the files in the package.
7. Locate the extracted files and open the SP2GDR folder.
8. Copy the rspndr.exe file and paste it in %SystemRoot%System32 (where $SystemRoot% is usually C:Windows).
9. Copy the rspndr.sys file and paste it in %SystemRoot%System32drivers.
10. Open the ic subfolder.
11. Copy the rspndr.inf file and paste it in %SystemRoot%inf.
12. Start a Command Prompt session and enter the following command:
%SystemRoot%System32 spndr.sys -i
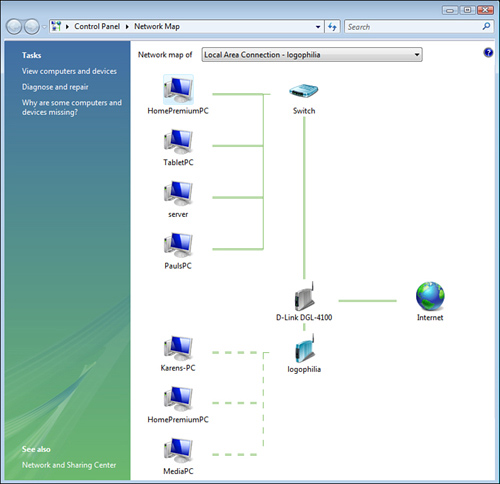
Windows XP installs the LLTD Responder package. Your XP SP 3 computer will now appear properly in the Windows Vista Network Map, as shown in Figure 28.5. (If you still have problems, reboot the XP machine.)
FIGURE 28.5 With the LLTD Responder package installed, the XP computer (TabletPC) appears properly in the Network Map.
Access Mac Shares via Windows
![]()
One of the important networking layers used by all Microsoft networks—including, of course, your Windows Home Server network—is called Server Message Block (SMB). It is via SMB that Windows PCs can share folders on the network and access folders that other Windows PCs have shared. In a very real sense, SMB is the network.
SMB’s central role in Windows networking is good news if you have a Mac in your household. That’s because all versions of OS X support SMB natively, so you can use your Mac not only to view the Windows shares, but also to open and work with files on those shares (provided, of course, that you have permission to access the share and that OS X has an application that’s compatible with whatever file you want to work with).
SMB not only lets your Mac see shares on the Windows Home Server network, it also can let Windows PCs see folders shared by the Mac, and that’s what this tweak is all about. This feature is turned off by default in OS X, but you can follow these steps to turn it on:
1. Click the System Preferences icon in the Dock.
2. In the Internet & Network group, click Sharing to open the Sharing preferences.
3. In the list of services, activate the check box beside File Sharing.
4. Click Options.
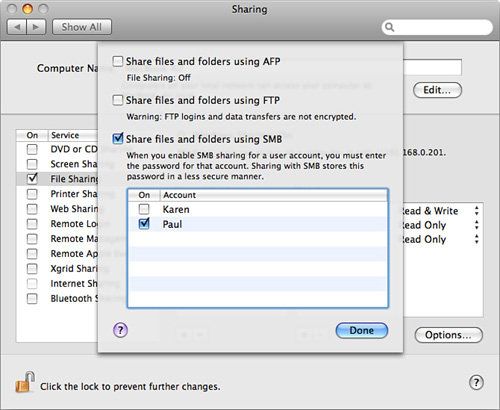
5. Deactivate the Share Files and Folders Using AFP and activate the Share Files and Folders Using SMB check boxes, as shown in Figure 28.6.
FIGURE 28.6 Deactivate AFP sharing and activate SMB sharing.
6. Activate the check box for each user account you want to give access, and then click Done.
7. To share a folder, click the + icon under Shared Folders, select the folder, and then click Add.
8. Click the folder in the Shared Folders list, click + under Users, select a user, and then click Add.
9. Click a user in the Users list and then click the permission level you want to assign: Read & Write, Read Only, or Write Only.
10. Repeat steps 7–9 to share other folders and set other user permissions. Figure 28.7 shows the Sharing preferences with several folders and users.
FIGURE 28.7 The Sharing preferences with Windows Sharing activated.
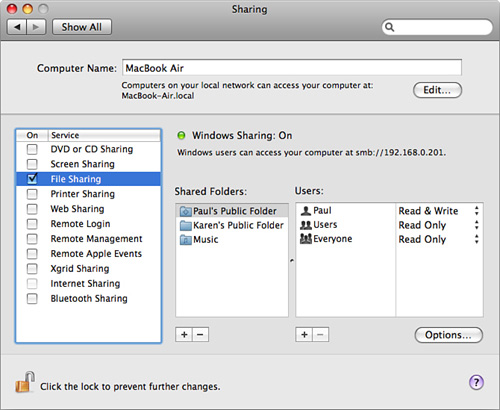
11. Select System Preferences, Quit System Preferences.
One way to access the Mac shares from a Windows PC is to enter the share address directly, using either the Run dialog box or Windows Explorer’s Address bar. You have two choices:
\IPuser
\Computeruser
Here IP is the IP address shown in the OS X Sharing window (see Figure 28.7), Computer is the Mac’s computer name (also shown in the OS X Sharing window), and in both cases user is the username of the account enabled for Windows Sharing. For example, I can use either of the following addresses to access my Mac:
\192.168.1.119paul
\MacBook-Airpaul
Alternatively, open your workgroup and look for the icon that has the same name as the Mac’s computer name. Double-click that icon.
Unless you’re logged on to Windows with the same username and password as the Mac, you’re prompted for the username and password of the Mac account that you enabled for Windows Sharing. For the username, use the form ComputerUserName, where Computer is the name of your Mac and UserName is the name of the Windows Sharing account. Figure 28.8 shows a Mac share opened in Windows Vista.
FIGURE 28.8 A shared Mac folder opened in Windows Vista.