
CHAPTER W5 Enhancing Security and Privacy at Shutdown
Computer security and personal privacy are major concerns these days, and they’ve been a major theme in this book: Chapter 2, “Crucial Security Tweaks”; Chapter 7, “Keeping the Bad Guys at Bay”; Chapter 8, “Configuring Internet Security”; Chapter 9, “Maintaining Your Privacy on the Web”; Chapter 10, “Tweaking Windows for Safe and Fun Family Use”; Chapter 13, “Crucial Password Hacks”; and Chapter 29, “Tightening Network Security.” Is this paranoia? I don’t think so. Wallis Simpson, the Duchess of Windsor, famously said, “You can never be too rich or too thin.” But I think the 21st century version of that should be, “You can never be too secure or too private.”
To that end, this chapter presents a few more tweaks related to security and privacy. In particular, you learn how to tweak Windows to perform a few security chores automatically when you shut down or restart your PC.
Enhance Privacy by Automatically Clearing Recent Items at Shutdown
![]()
Back in Chapter 15, “Streamlining the Start Menu,” I showed you how to enhance privacy by preventing Windows from displaying a list of more recent documents on the Start menu. That’s a good tweak, for sure, but you might find that you miss having that list of recent documents because it’s a convenient way of returning to some recent work.
• See “Convert Start Menu Links to Menus,” p. 175.
One solution would be to enable the group policy that clears the list of recently opened documents each time you restart or shut down the PC. The only problem with this method is that Windows not only clears the recent documents list, but it also clears the list of items in the Run dialog box as well as the list of URLs that you’ve typed in the Internet Explorer Address bar (although it does not clear your Internet Explorer history). Now that’s private! If this is what you want, follow these steps to enable this policy:
1. In Vista, select Start, type gpedit.msc, press Enter, and then enter your User Account Control credentials. (In XP, select Start, Run, type gpedit.msc, and then click OK. Windows opens the Group Policy Editor.)
2. Open the User Configuration branch.
3. Open the Administrative Templates branch.
4. Click Start Menu and Taskbar.
5. Double-click the Clear History of Recently Opened Documents on Exit policy.
6. Select the Enabled option.
7. Click OK.
If you don’t have access to the Group Policy Editor, open the Registry Editor and create a DWORD setting named ClearRecentDocsOnExit with the value 1 in the following key:
HKCUSoftwareMicrosoftWindowsCurrentVersionPoliciesExplorer
Automatically Clear Just Recent Documents
![]()
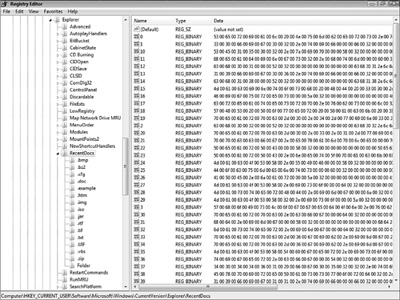
Okay, but what if you want to clear only the Recent Items list (My Recent Documents list in XP)? In that case, you need to use a script. First, note that Windows maintains its list of recent documents in the following Registry key (see Figure W5.1):
HKCUSoftwareMicrosoftWindowsCurrentVersionExplorerRecentDocs
FIGURE W5.1 Windows stores your most recent documents in the RecentDocs Registry key.
To clear the recent documents list without clearing anything else, you need to delete the settings in the RecentDocs key. Listing W5.1 presents a script that does this for you.
Listing W5.1 A Script That Deletes the Windows Recent Documents List
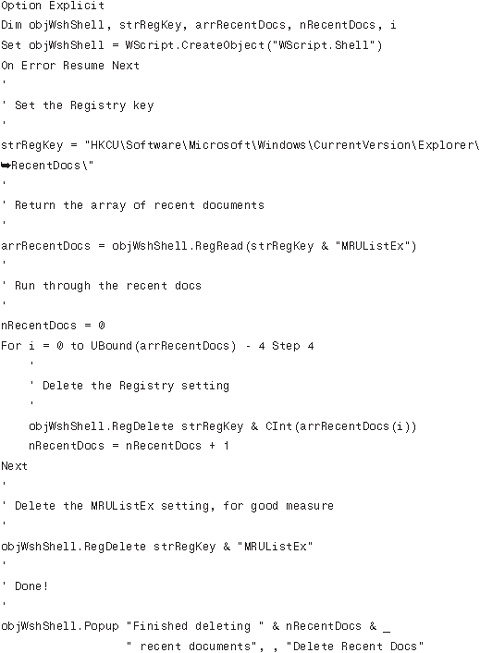
This script begins by reading the value of the MRUListEx setting, which is a list of the numbers associated with each recent document, in the order that you opened them. Because the number keys are not necessarily sequential, we need to use the values in MRUListEx to know for sure which settings to delete. Reading MRUListEx returns an array of hex values, so the script uses a For...Next loop to run through the array. (I added Step 4 to the For statement because each is 4 bytes long, and we need only the first byte.) The script uses the CInt function to convert the value to an integer, and then RegDelete deletes the key.
Automatically Clear Recent Documents at Logoff
![]()
The script in the previous tweak would be even better if we could tweak Windows to run it automatically when you log off, restart, or shut down your computer. Fortunately, this is easier done than said, as the following steps show:
1. Select Start, Run, type gpedit.msc, and then click OK. Windows opens the Group Policy Editor.
2. Open the User Configuration branch.
3. Open the Windows Settings branch.
4. Click Scripts (Logon/Logoff).
5. Double-click the Logoff policy. The Logoff Properties dialog box appears.
6. Click Add to open the Add a Script dialog box.
7. Click Browse, select the script file, and then click Open.
8. Click OK to return to the Logoff Properties dialog box.
9. Click OK.
If you don’t have access to the Group Policy Editor, open the Registry Editor and create a DWORD setting named ClearRecentDocsOnExit with the value 1 in the following key:
HKCUSoftwareMicrosoftWindowsCurrentVersionPoliciesExplorer
Clear the Paging File at Shutdown for Added Security
![]()
As you use your computer throughout the day, Windows uses the virtual memory paging file to store often-used data, which improves performance because it saves Windows the trouble of retrieving that data from the hard disk. The paging file contains bits of both program files and your data files, but it may also contain sensitive information such as passwords. Because of this, you might want to consider having Windows clear the paging file at shutdown. This reduces shutdown performance, but that might not be a concern if, for instance, you’re leaving the office for the night.
Here are the steps to follow:
1. In Vista, select Start, type secpol.msc, press Enter, and then enter your User Account Control credentials. (In XP, select Start, Run, type secpol.msc, and then click OK. Windows opens the Group Policy Editor.)
2. Open the Local Policies branch.
3. Click Security Options.
4. Double-click the Shutdown: Clear Virtual Memory Pagefile policy. The policy’s property sheet appears.
5. Click Enabled.
6. Click OK.