CHAPTER 26 Building Better Backups
Most technical writers would open a backup-related chapter with an appeal to the reader to please, please make regular backups because you never know when disaster could strike, it’s happened to me, the sky is falling, yadda yadda yadda. However, even though I’ve written a few of those rants myself, I’ll spare you the spiel this time around because this chapter is about building better backups. That is, I’m assuming right up front that you’re already doing backups and what you really want are some pointers to make backups easier and faster.
I hear you! So you won’t find any backup-your-computer-now-or-else lectures from me in this chapter. Instead, you just get a few of my favorite backup-related tweaks and techniques that I hope will help you build better backups.
Back Up to a Network Location
![]()
The biggest hurdle facing would-be backer-uppers is the sheer size of the data we all carry around these days. With all our MP3 files, photos, video files, email stores, and other documents, we’re talking tens or even hundreds of gigabytes of data. Nobody with a lick of sense wants to back up all that data to multiple media (such as writable optical discs or USB flash drives), so the backup destination-of-choice these days is a second hard drive that has enough storage capacity to handle a full backup. With 500GB external hard drives available for about 20 cents a gigabyte, and 750GB hard drives only slightly more expensive (and with affordable terabyte drives just around the corner), you can add an easy-to-use backup medium to your computer.
Backing up to an attached hard drive is a useful solution, but it’s by no means a perfect one. For example, if your computer is stolen, the second hard drive might get stolen along with it, and then you’re in big trouble. Similarly, a fire in your office or den could torch both the computer and the second hard drive.
A solution that avoids both of these problems is to use the network as your backup location:
• You can back up to a folder on a network share that has lots of free space.
• You can add a large hard drive to a network computer, share that drive, and then back up to the drive.
• You can add a network-attached storage (NAS) device to the network and back up to that device.
Even better, the backup features in Windows Vista and Windows XP support backing up to a network share. In Vista, after you configure the backup program, backing up is completely automated, particularly if you back up to a resource that has plenty of room to hold your files (such as a roomy network share).
Back Up to a Network in Windows Vista
In Windows Vista, you use the Back Up Files Wizard to set up your backups. Follow these steps to configure a network share as the backup location and activate Vista’s Automatic File Backup feature:
1. Select Start, type backup, and then click Backup Status and Configuration.
2. You have two choices (you need to enter your User Account Control credentials after either one):
• If you’ve never configured backups in Vista, click Set Up Automatic File Backup.
• If you’ve previously configured backups in Vista, click Change Backup Settings.
3. In the first Back Up Files Wizard dialog box, select the On a Network option.
4. Use the On a Network text box to type the network address of the share you want to use as the backup destination. Figure 26.1 shows an example. (Alternatively, click Browse to use the Browse for Folder dialog box to select the shared network folder.)
FIGURE 26.1 Activate the On a Network option, and then type the network address of the shared folder you want to use as the backup location.

5. Click Next. If your user account doesn’t have access to the network folder, the Connect to Share dialog box appears (where Share is the network address you typed in step 4).
6. Use the User Name and Password text boxes to type the credentials you need to access the shared folder, and then click OK.
7. If your system has multiple hard drives, the wizard asks you to select which of them you want to include in the backup. Deactivate the check box beside any drive you don’t want to include in the backup (you can’t exclude the system drive, however), and then click Next.
8. The next dialog box provides you with a long list of file types to back up, including documents, pictures, videos, and email. You probably want to leave all of these check boxes activated. Click Next when you’re ready to continue.
9. The next wizard dialog box asks you to set up a backup schedule:
How Often Select Daily, Weekly, or Monthly.
What Day If you chose Weekly, select the day of the week you want the backups to occur; if you chose Monthly, select the day of the month you want the backups to occur.
What Time Select the time of day you want the backup to run. (Choose a time when you won’t be using your computer.)
10. Click Save Settings and Start Backup to save your configuration and launch the backup. Windows Backup lets you know that it will perform a full backup of your system now.
11. Click Yes.
12. When the backup is done, click Close.
Back Up to a Network in Windows XP
In the Backup program that comes with Windows XP, a backup job is a file that defines your backup. It includes three things:
• A list of the files you want to include in your backup.
• The Backup options you selected, including the type of backup you want to use.
• The destination for the backed-up files. In our case, we want the destination to be a shared folder on the network.
Here are the steps to follow to define and run a backup job:
1. Select Start, All Programs, Accessories, System Tools, Backup. The Backup or Restore Wizard appears.
2. Click the Advanced Mode link to display the Backup Utility window.
3. Select the Backup tab.
4. Select Tools, Options to display the Options dialog box, and then set the following options, as desired (click OK when you’re done):
• To specify the backup type, display the Backup Type tab and then use the Default Backup Type list to select the backup type you want to use.
• To verify that the backed-up data contains no errors, display the General tab and activate the Verify Data After the Backup Operation check box. Note, however, that this roughly doubles the length of the backup operation.
• To exclude files based on the file type, display the Exclude Files tab and click Add New (the one under the Files Excluded for All Users list) to display the Add Excluded Files dialog box. In the Registered File Type list, select the file type you want to exclude and click OK.
5. Use the folder and file lists to activate the check boxes for the drives, folders, and files you want to include in the backup job.
6. In the Backup Destination list, choose File. (This list will be disabled if you don’t have any backup drives attached to your system, but that’s okay because File is the default choice.)
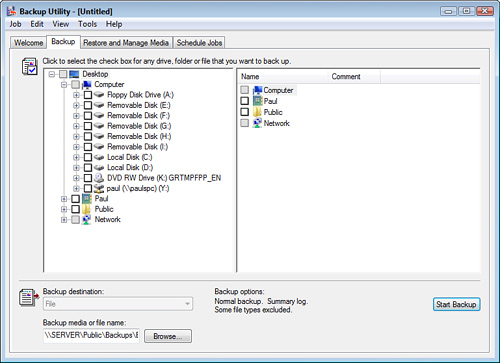
7. Use the Backup Media or File Name text box to enter the path of the shared network folder you want to use, as well as a filename for the backup file, as shown in Figure 26.2.
8. Select Job, Save Selections. If you’re creating a new backup job, enter a name in the Save As dialog box and then click Save.
9. Click Start Backup to perform the backup.
FIGURE 26.2 Specify a shared network folder for your backup file.
Create a Backup of Your Entire Computer
![]()
The worst-case scenario for PC problems is a system crash that renders your hard disk or system files unusable. Your only recourse in such a case is to start from scratch with either a reformatted hard disk or a new hard disk. This usually means that you have to reinstall Windows and then reinstall and reconfigure all your applications. In other words, you’re looking at the better part of a day or, more likely, a few days, to recover your system. However, Windows Vista and Windows XP have features that take most of the pain out of recovering your system. In Vista it’s called Complete PC Backup, and in XP it’s called Automated System Recovery. I show you how to use both tools a bit later in this chapter (see “Recover from Disaster Using Your Complete PC Backup”). For now, the next couple of sections show you how to prepare for disaster.
Back Up Your Entire Computer in Windows Vista
The safety net used by Vista’s Complete PC Backup is actually a complete backup of your Windows Vista installation; this is called a system image. It takes a long time to create a system image (at least several hours, depending on how much stuff you have), but it’s worth it for the peace of mind. Here are the steps to follow to create the system image:
1. Select Start, type backup, and then click Backup Status and Configuration.
2. Select Complete PC Backup.
3. Click Create a Backup Now and enter your UAC credentials to launch the Windows Complete PC Backup Wizard.
4. The wizard asks you to specify a backup destination. You have two choices (click Next when you’re ready to continue):
• On a Hard Disk—Select this option if you want to use a disk drive on your computer. If you have multiple drives, use the list to select the one you want to use.
• On One or More DVDs—Select this option if you want to use DVDs to hold the backup.
5. Windows Complete PC Backup automatically includes your internal hard disk in the system image, and you can’t change that. However, if you also have external hard drives, you can add them to the backup by activating their check boxes. Click Next. Windows Complete PC Backup asks you to confirm your backup settings.
6. Click Start Backup. Windows Complete PC Backup creates the system image.
7. When the backup is complete, click Close.
Back Up Your Entire Computer in Windows XP
XP’s Automated System Recovery utility requires a little advance planning on your part, but it’s worth it because it can help you recover from a crash in just a few steps. What kind of advance planning is required? Just two things:
• You must run the Automated System Recovery Preparation Wizard. This wizard backs up your system files and creates a floppy disk that enables you to restore your system.
• You must run a full backup of all your data and application files.
Because your system, application, and data files change regularly, to ensure a smooth recovery, you must do both of these things regularly.
Here are the steps to following to run the Automated System Recovery Preparation Wizard:
1. Select Start, All Programs, Accessories, System Tools, Backup. The Backup or Restore Wizard appears.
2. Click the Advanced Mode link to display the Backup Utility window.
3. In the Welcome tab, click the Automated System Recovery Wizard button. Alternatively, select Tools, ASR Wizard. The Automated System Recovery Preparation Wizard appears.
4. Click Next. The wizard prompts you for a backup destination for your system files.
5. Choose the Backup Media Type and then enter the backup media name or filename. Click Next.
6. Click Finish. The wizard backs up your system files. When it’s done, it prompts you to insert a floppy disk in drive A.
7. Insert a blank, formatted disk and click OK. The wizard copies the files Asr.sif, Asrpnp.sif, and Setup.log to the disk and lets you know when it has finished.
8. Click OK.
Recover from Disaster Using Your Complete PC Backup
![]()
If nothing can get Windows up and running again, you have no choice but to start with a clean slate. This means either formatting the %SystemDrive% partition or, if hard disk errors are the culprit, replacing your hard disk. Ouch! Wait until the initial panic subsides, recall that you’ve got your entire PC backed up (from reading the previous tweak), breathe a sigh of relief, and then follow the steps in the next two sections (depending on your Windows version) to get your system back on its feet.
Recover from Disaster in Windows Vista
Here’s how to restore your Windows Vista computer from a Complete PC backup:
1. Insert the Windows Vista DVD.
2. Restart your computer. If your system prompts you to boot from the DVD, press the required key or key combination.
3. In the initial Install Windows screen, click Next.
4. Click Repair Your Computer.
5. In the Operating System list, click your Windows Vista operating system and then click Next. The System Recovery Options window appears, as shown in Figure 26.3.
FIGURE 26.3 Use the System Recovery Options window to restore your Complete PC backup.

6. If you backed up your computer to an external hard drive, make sure that drive is connected and turned on; if you backed up to DVDs, remote the Vista Install disc and insert the first backup disc.
7. Click Windows Complete PC Restore. Setup scans your system for backup disks and then displays the Restore Your Entire Computer from a Backup dialog box with the most likely backup displayed.
8. You have two choices:
• If the displayed backup is the one you want to use, click the Restore the Following Backup option and then click Next.
• Otherwise, click the Restore a Different Backup option, click Next, select the backup you want to use, and then click Next.
9. If you’ve installed a new hard drive, activate the Format and Repartition Disks check box; if you’re restoring to the original hard drive, you can leave this check box deactivated to speed up the restore.
10. Click Finish. Windows Complete PC Restore asks you to confirm.
11. Activate the I Confirm That I Want to Erase All Existing Data and Restore the Backup check box, and then click OK. Windows Complete PC Restore begins the restore process.
Recover from Disaster in Windows XP
Follow these steps to recover your XP system using the Automated System Recovery (ASR) utility:
1. Insert the Windows XP Professional CD-ROM.
2. Restart your computer. If your system prompts you to boot from the CD, press the required key or key combination. Watch the bottom of the screen for the following prompt:
Press F2 to run Automated System Recovery (ASR)...
3. Press F2. Setup asks you to insert the ASR disk.
4. Insert the disk and then press any key. Setup continues the Windows XP installation. Note that, along the way, Setup automatically formats the %SystemDrive% partition.
From here, the Setup program proceeds normally, except that it uses the information on the ASR disk to restore your system files and settings from the backup you made using the ASR Preparation Wizard. If you also backed up your application and data files, use the Backup utility to restore them now.
Restore an XP Backup to Vista
![]()
Here’s a conundrum faced by many a former XP user who has recently switched to Vista: You’re missing a file or two that you know are sitting in an XP backup file, but you can’t get at them because Vista’s backup utility doesn’t recognize XP backups. You need those files, but they seem to be stuck in backup limbo. What to do?
You could install XP’s Backup utility in Vista as described in the next tweak, but that might be overkill if you just need a file or two. Fortunately, Microsoft offers a useful alternative: the Windows NT Backup-Restore Utility. This simple program installs on a Vista system and enables you to view and work with XP backup files.
Before installing the program, note that it requires a Vista feature called Removable Storage Management, which is likely not installed on your system. Follow these steps to install it:
1. Select Start, type features into the Search box, and then click Programs and Features.
2. Click the Turn Windows Features On or Off link. The User Account Control dialog box appears.
3. Enter your UAC credentials to continue. The Windows Features dialog box appears.
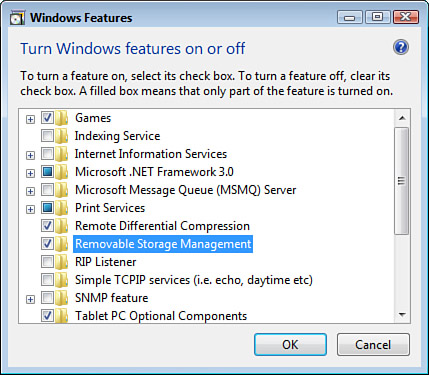
4. Activate the Removable Storage Management check box, as shown in Figure 26.4.
FIGURE 26.4 To use the Windows NT Backup-Restore utility, you need to install the Removable Storage Management feature.
5. Click OK. Vista installs Removable Storage Management.
Now open your web browser and head for the following address to download and then install the program:
www.microsoft.com/downloads/details.aspx?familyid=7DA725E2-8B69-4C65-AFA3-2A53107D54A7
After the program is installed, run it by selecting Start, All Programs, Windows NT Backup-Restore Utility, NtBackup-Restore Utility. If you see the User Account Control dialog box, click Allow.
You can either click Restore Wizard in the Welcome tab to use a wizard to restore your files, or you can follow these steps:
1. Display the Restore and Manage Media tab.
2. Select Tools, Catalog a Backup File. The Open Backup File dialog box appears.
3. Click Browse, use the Select File to Catalog dialog box to select your XP backup file, click Open, and then click OK.
4. Open the folder branches until you find the folder that contains the file you want to restore to Vista.
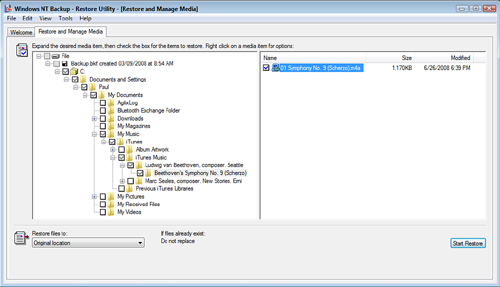
5. Activate the check box beside the file, as shown in Figure 26.5.
6. Repeat steps 4 and 5 to select the other files you want to restore.
7. Click Start Restore.
FIGURE 26.5 Activate the check box beside the file you want to restore to Vista.
Use XP’s Backup Utility in Vista
![]()
You can argue the merits of Windows Vista versus Windows XP until you’re blue in the face (a distressingly common occurrence on the Web these days, unfortunately), but there’s one thing almost everyone agrees on: The Vista backup feature is utterly lame compared to XP’s. Why? The main reason is that Vista’s backup doesn’t let you select specific folders and files to back up. Instead, you have to back up “Pictures” or “Music,” which means all your pictures and all your music. That’s fine for novices who don’t want to sweat the details, but for everyone else it’s a real pain to have to back up everything all the time.
If you want more control over your backups, and you still have either an XP Professional installation disc or a computer running XP Pro, you can grab the files for the XP Backup Utility and add them to your Vista system. This will enable you to back up your Vista computer using the XP Backup Utility.
Your first chore is to create a folder to hold the Backup Utility files. Use Windows Explorer to open the Program Files folder in your system drive (usually drive C:). Select Organize, New Folder, enter your User Account Control credentials, type a name for the new folder (such as XPBackup), and press Enter.
How you proceed from here depends on whether you have an XP Professional installation disc or a computer running XP Pro. The latter is the easier method, so let’s start with that.
On your XP Pro computer, launch Windows Explorer and do two things:
• Open the %SystemRoot%System32 folder (where %SystemRoot% is usually C:Windows) and copy the following files to the folder you just created on your Vista PC:
ntbackup.exe
ntmsapi.dll
vssapi.dll
• Open the %SystemRoot%Help folder and copy the following files to the folder you created on your Vista PC:
ntbackup.chm
ntbackup.hlp
If you just have the XP Pro installation disc, you need to use Vista’s EXPAND tool to extract the compressed Backup Utility files from the disc. Insert the disc and then launch Command Prompt under the Administrator account as described in Chapter 36, “Running the Command Prompt.”
• See “Running Command Prompt as the Administrator,” p. 427.
At the command line, run the following command to switch to the folder you created earlier to store the XP Backup Utility files (where folder is the name of the folder):
cd %programfiles%folder
Now you need to run the following five commands (where D is the letter of the drive that contains the XP installation disc):
expand D:i386
tbackup.ex_ ntbackup.exe
expand D:i386
tmsapi.dl_ ntmsapi.dll
expand D:i386vssapi.dl_ vssapi.dll
expand D:i386
tbckupw.ch_ ntbackup.chm
expand D:i386
tbackup.hl_ ntbackup.hlp
To use the XP Backup Utility in Vista, open the folder you created earlier to store the program’s files, and then double-click the ntbackup.exe file. Figure 26.6 shows the Backup Utility running on a Vista system.
FIGURE 26.6 Windows XP’s Backup Utility running on a Windows Vista PC.