CHAPTER 32 Running Programs
One of the hats that Windows wears is labeled “Application Launcher.” That is, unless you have Windows lurking in the background, you can’t do all that much with your computer because you can’t run any programs. (Notable exceptions are the BIOS Setup program that you can launch when your computer first boots and software that runs directly from a CD or DVD at startup, such as the Ubuntu Linux operating system.) Conversely, just because you have Windows running, it doesn’t mean your computer will do anything interesting because Windows itself doesn’t do anything interesting. To get your PC out of boat anchor mode, you must run a program or three.
Now you might not think that there’s much to say about launching programs. After all, you click a Start menu icon or perhaps type an executable file path into the Run dialog box, and off the program goes. That’s true, but even this seemingly simple aspect of Windows is tweakable, as you see in this chapter.
Use the Windows Key to Start Quick Launch Programs in Vista

The Quick Launch toolbar is the collection of icons that appears to the right of the Start button on the Vista taskbar. (If you don’t see the Quick Launch toolbar, right-click an empty part of the taskbar and then select Toolbars, Quick Launch.) By default, Windows Vista adds icons for showing the desktop, activating Flip 3D, Internet Explorer, and Windows Media Player (this icon shows up after the first time you launch Media Player). Third-party programs will often toss an icon or two into Quick Launch, as well.
I’m a big fan of the Quick Launch toolbar because it offers the easiest way to launch a program: Just click the icon. However, even that easy-as-pie method is ever-so-slightly inconvenient when your hands are busy typing. It would be a tad more efficient if you could fire up Quick Launch icons from the comfort of your keyboard.
But wait, you can! In Windows Vista, you can use the Windows Logo key and the numbers across the top of your keyboard (not the ones on the numeric keypad) to press Quick Launch icons into service without having to reach all the way over to the mouse.
The trick here is that Vista numbers the Quick Launch icons starting at 1 for the leftmost icon, 2 for the icon to its right, and so on. The first nine icons are numbered from 1 to 9 (again, left to right), and if there’s a tenth icon it’s numbered as 0. To select a particular Quick Launch icon from the keyboard, hold down the Windows Logo key and press the corresponding icon number on the top row of the keyboard. For example, on most Vista systems, Internet Explorer is the third Quick Launch icon from the left, so you can start it by pressing Windows Logo+3.
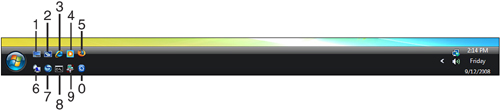
What if you have multiple rows of icons, as shown in Figure 32.1? In this case, the icons are numbered from left to right along the top row (1 to 5) and then left to right along the bottom row (6 to 9 and then 0).
FIGURE 32.1 If you have multiple rows of Quick Launch icons, they’re numbered from left to right and from top to bottom.
Make a Program Think It’s Running Under an Earlier Version of Windows
![]()
Most new software programs are certified as Windows Vista–compatible, meaning that they can be installed and run without mishap on any Windows Vista system. But what about older programs that were coded before Windows Vista was released? They can be a bit more problematic. Because Windows Vista is based on the code for Windows NT, programs that are compatible with that operating system and Windows XP will probably (although not definitely) be compatible with Windows Vista. But the real problems lie with programs written for Windows 9x and Me. Windows Vista—even Windows Vista Home—uses a completely different code base than the old consumer versions of Windows, so it’s inevitable that some of those legacy programs will either be unstable while running under Windows Vista or they won’t run at all.
Why do such incompatibilities arise? One common reason is that the programmers of a legacy application hardwired certain data into the program’s code. For example, installation programs often poll the operating system for its version number. If an application is designed for, say, Windows 98, the programmers might have set things up so that the application installs if and only if the operating system returns the Windows 98 version number. The program might run perfectly well under any later version of Windows, but this simplistic brain-dead version check prevents it from even installing on anything but Windows 98.
These types of problems might make it seem as though getting older programs to run under Windows Vista and Windows XP would be a nightmare. Fortunately, that’s not usually true because the Windows programmers did something very smart: Because many of these application incompatibilities are predictable, they gave both Vista and XP the capability to make allowances for them and to enable many older programs to run under Vista or XP without modification. In Vista and XP, application compatibility refers to a set of concepts and technologies that enable the operating system to adjust its settings or behavior to compensate for the shortcomings of legacy programs. In this tweak, you learn how to work with the Windows application compatibility tools.
To help you run programs under Vista and XP, especially those programs that worked properly in an earlier version of Windows, Windows offers a new way to run applications using compatibility layers. This means that Windows Vista runs the program by doing one or both of the following:
• Running the program in a compatibility mode—This involves emulating the behavior of previous version of Windows:
Windows Vista can emulate the behavior of Windows 95, Windows 98, Windows Me, Windows NT 4.0 with Service Pack 5, and Windows Millennium, as well as two more versions that are new to Windows Vista: Windows 2003 with Service Pack 1 and Windows XP with Service Pack 2.
Windows XP can emulate the behavior of Windows 95, Windows 98, Windows Me, Windows NT 4.0 with Service Pack 5, and Windows Millennium.
• Altering the display settings—This involves temporarily changing the system’s visual display so that it’s compatible with the program:
Windows Vista—There are five possibilities here: setting the color depth to 256 colors, changing the screen resolution to 640×480, disabling the Windows Vista visual themes, disabling desktop composition, and disabling displaying scaling on high-DPI settings.
Windows XP—There are three choices in XP: setting the color depth to 256 colors, changing the screen resolution to 640×480, and disabling the Windows XP visual themes.
These are the broad compatibility layers that Windows Vista and XP support. To set up a compatibility layer, follow these steps:
1. Right-click the program’s executable file or a shortcut to the file, and then click Properties. The program’s property sheet appears.
2. Display the Compatibility tab.
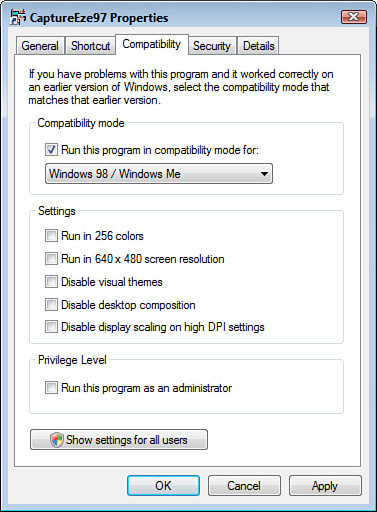
3. Activate the Run This Program in Compatibility Mode For check box (see Figure 32.2).
4. Use the list to choose the Windows version the program requires.
5. Use the check boxes in the Display Settings group to adjust the video mode that Windows will switch to when you use the program.
6. Click OK.
FIGURE 32.2 In the property sheet for an executable file, use the Compatibility tab to set the compatibility layer for the program.
Set Up a Program to Launch Automatically at Startup
![]()
If you have one or more programs that you use each day, or that you use as soon as Windows starts, you can save yourself the hassle of launching these programs manually by getting Windows to do it for you automatically at startup. Similarly, you can also get Windows to automatically launch scripts or batch files at startup. You can set up a program or script for automatic startup launch using the Startup folder, the Registry, and the Group Policy snap-in.
Using the Startup Folder
The Startup folder is a regular file folder, but it has a special place in Windows: You can get a program or script to run automatically at startup by adding a shortcut for that item to the Startup folder. Note that the Startup folder appears twice in the Windows interface:
• Via the Start menu (click Start, All Programs, Startup)
• Via Windows Explorer, as follows:
Windows Vista—In Vista, the Startup folder appears in each user profile:
d:UsersuserAppDataRoaming
MicrosoftWindowsStart
MenuProgramsStartup
Here, d is the system drive and user is the name of a user defined on the system. A shortcut placed in this folder will run automatically when this user logs on to the system.
Windows XP—In XP, the Startup folder appears in each user profile:
d:Documents and SettingsuserStart MenuProgramsStartup
Here, d is the system drive and user is the name of a user defined on the system. A shortcut placed in this folder will run automatically when this user logs on to the system. XP also defines two other Startup folders within d:Documents and Settings. A shortcut placed in the All UsersStart MenuProgramsStartup folder will run automatically when any user logs on to the system, and a shortcut placed in the Default UserStart MenuProgramsStartup folder will be automatically copied to a user’s Startup folder when you create a new user account. Note that only users with Administrator-level rights can access all three of these subfolder. Users with lesser privileges can work only with their own Startup folder. They can see the All Users version of the Startup folder, but Windows XP prevents them from adding files to it.
Using the Registry
The Startup folder method has two drawbacks: Users can easily delete shortcuts from their own Startup folders, and users can bypass Startup items by holding down the Shift key while Windows loads. To avoid both problems, you can use the Registry Editor to define your startup items. Assuming that you’re logged in as the user you want to work with, the Registry offers two keys:
HKCUSoftwareMicrosoftWindowsCurrentVersionRun—The values in this key run automatically each time the user logs on.
HKCUSoftwareMicrosoftWindowsCurrentVersionRunOnce—The values in this key run only the next time the user logs on; they are then deleted from the key. (This key might not be present in your Registry. In that case, you need to add this key yourself.)
If you want an item to run at startup no matter who logs on, use the following keys:
HKLMSoftwareMicrosoftWindowsCurrentVersionRun—The values in this key run automatically each time any user logs on.
HKLMSoftwareMicrosoftWindowsCurrentVersionRunOnce—The values in this key run only the next time any user logs on; they are then deleted from the key. Don’t confuse this key with the RunOnceEx key. RunOnceEx is an extended version of RunOnce that’s used by developers to create more robust startup items that include features such as error handling and improved performance.
To create a startup item, add a string value to the appropriate key, give it whatever name you like, and then set its value to the full pathname of the executable file or script file that you want to launch at startup.
Using Group Policies
If you prefer not to edit the Registry directly, or if you want to place a GUI between you and the Registry, the Group Policy snap-in can help. (See Chapter 35, “Controlling Windows with the Group Policy Editor,” for details on using this snap-in.) Note, however, that Group Policy doesn’t work directly with the Run keys in the HKLM and HKCU hives. Instead, these are considered to be legacy keys, meaning that they’re mostly used by older programs. The new keys (new as of Windows Millennium, that is) are the following:
HKLMSoftwareMicrosoftWindowsCurrentVersionpoliciesExplorerRun
HKCUSoftwareMicrosoftWindowsCurrentVersionPoliciesExplorerRun
These keys do not appear in Windows by default. You see them only after you specify startup programs in the Group Policy Editor, as discussed later. Alternatively, you can add these keys yourself using the Registry Editor.
As I mentioned, you can either add values to these keys via the Registry Editor or you can use the Group Policy snap-in. You have two choices:
• To work with startup programs for all users, select Computer Configuration, Administrative Templates, System, Logon. The items here will affect the Registry keys in the HKLM (all users) Registry hive.
• To work with startup programs for the current user, select User Configuration, Administrative Templates, System, Logon. The items here will affect the Registry keys in the HKCU (current user) hive.
Either way you’ll see at least the following three items:
• Run These Programs at User Logon—Use this item to add or remove startup programs using the PoliciesExplorerRun keys in the Registry. To add a program, double-click the item, select the Enabled option, and then click Show. In the Show Contents dialog box, click Add, enter the full pathname of the program or script you want to run at startup, and then click OK.
• Do Not Process the Run Once List—Use this item to toggle whether Windows Vista processes the RunOnce Registry keys (discussed in the previous section). Double-click this item and then activate the Enabled option to put this policy into effect; that is, programs listed in the RunOnce key are not launched at startup.
• Do Not Process the Legacy Run List—Use this item to toggle whether Windows Vista processes the legacy Run keys. Double-click this item and then activate the Enabled option to put this policy into effect; that is, programs listed in the legacy Run key are not launched at startup.
You also can use the Group Policy snap-in to specify script files to run at startup. You can specify script files at two places:
• Computer Configuration, Windows Settings, Scripts (Startup/Shutdown)—Use the Startup item to specify one or more script files to run each time the computer starts (and before the user logs on). Note that if you specify two or more scripts, Windows runs them synchronously. That is, Windows runs the first script, waits for it to finish, runs the second script, waits for it to finish, and so on.
• User Configuration, Windows Settings, Scripts (Logon/Logoff)—Use the Logon item to specify one or more script files to run each time any user logs on. Logon scripts are run asynchronously.
Finally, note that Windows has policies dictating how these scripts run. For example, you can see the startup script policies by selecting Computer Configuration, Administrative Templates, System, Scripts. Three items affect startup scripts:
• Run Logon Scripts Synchronously—If you enable this item, Windows Vista will run the logon scripts one at a time.
• Run Startup Scripts Asynchronously—If you enable this item, Windows Vista will run the startup scripts at the same time.
• Run Startup Scripts Visible—If you enable this item, Windows Vista will make the startup script commands visible to the user in a command window.
For logon scripts, a similar set of policies appears in the User Configuration, Administrative Templates, System, Scripts section.
Prevent Programs from Starting Automatically
![]()
If you find that your Windows startups are a lot slower than they used to be, the most likely culprit is an overly long list of programs and services that Windows has to load during startup. Depending on the startup programs your system is running, you can shave anywhere from 5 to 25 seconds off your boot time by disabling any startup programs that you know you don’t need.
I mentioned in the previous tweak that you can bypass all startup items by holding down Shift during the boot. That’s an easy way to go, but you might not want to disable everything that runs at startup.
The most straightforward way to disable only some of the startup items is to essentially use the opposite techniques that I showed you in the previous tweak. That is, use the Startup folder, the Registry Editor, or the Group Policy Editor to remove the startup items you don’t want to run at startup.
However, Windows also gives you two other methods:
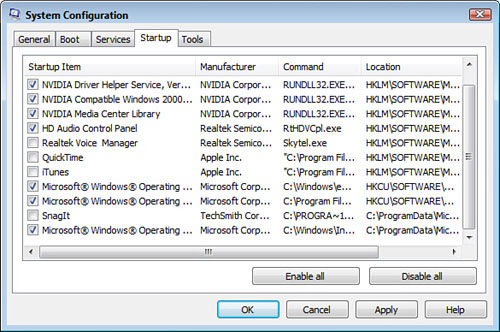
• System Configuration Utility—In Windows Vista, select Start, type msconfig, press Enter, and then enter your UAC credentials. (In Windows XP, select Start, Run to open the Run dialog box, type msconfig, and then click OK.) In the System Configuration Utility window that appears, display the Startup tab (see Figure 32.3) and then deactivate the check box beside any program you’re certain you don’t need. Do the same in the Services tab. In each case, if you’re not sure about disabling something leave it enabled.
FIGURE 32.3 In the System Configuration Utility, display the Startup tab and deactivate the check box for each item you want to prevent from loading.
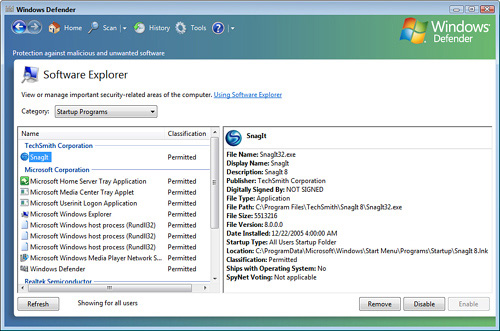
• Windows Defender—In Windows Vista, select Start, type defender, and then press Enter. (In Windows XP, select Start, All Programs, Windows Defender.) Click Tools, click Software Explorer, and then use the Category list to select Startup Programs. In Vista, click Show for All Users, and then enter your UAC credentials. Click the program you want to prevent from starting (see Figure 32.4), and then click Disable.
FIGURE 32.4 Using the Software Explorer in Windows Defender, you can disable those programs that you don’t want to load at startup.