
CHAPTER 24 Dealing with Disk Drives
Despite the timely demise of the floppy disk drive, these days we deal with disk drives more than ever. We still have internal hard drives to work with, of course, but with USB, IEEE 1394, and even eSATA (external SATA) ports commonplace on newer systems, external hard drives are all the rage. All systems have at least one optical (CD, DVD, or Blu-ray) drive, USB Flash drives are ubiquitous, and if your system has a memory card reader you probably have a half dozen or more extra drives to handle memory card formats such as CompactFlash, Memory Stick, and SD Card.
To help you handle this drive onslaught, and to help you keep the most important drive—your system’s internal hard drive—in top shape, this chapter offers several disk drive-related tweaks for your enjoyment.
Schedule Automatic Defrags in XP
![]()
One of the unheralded innovations in Windows Vista is automatic disk defragmentation. That is, right out of the box Vista is configured to run Disk Defragmenter automatically—the default schedule is weekly: every Sunday at 4:00 a.m. This is great because it means that you should never need to defragment your Vista system manually.
No such luck in Windows XP, which expects you to remember to defragment your system regularly. Most of us forget, of course, and the result is usually an XP system that does the whole molasses-in-January thing.
What’s a poor XP user to do? Why, tweak XP to work around the problem, of course! First, you need to know how to run a defrag using a command rather than the Disk Defragmenter GUI. To do this, you have to use the DEFRAG command-line tool. Here’s the syntax:
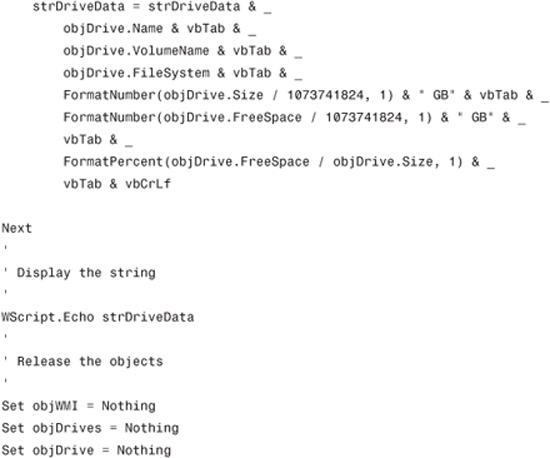
DEFRAG volume [-a] [-f] [-v]
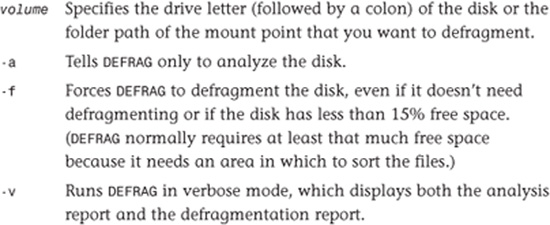
For example, to get an analysis report of the fragmentation of the C: drive, enter the following command:
defrag c: -a
If the volume isn’t too fragmented, you see a report similar to this:
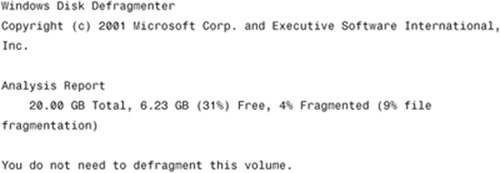
However, if the drive is quite fragmented, you see a report similar to the following:
In the latter example, notice that the volume only has 9 percent free disk space. If you try to defragment this volume, DEFRAG displays the following message:
Volume DATA has only 9% free space available for use by Disk Defragmenter.
To run effectively, Disk Defragmenter requires at least 15% usable free space.
There is not enough disk space to properly complete the operation.
Delete some unneeded files on your hard disk, and then try again.
If you can’t delete files from the volume, you can try running DEFRAG with the -f switch to force the operation:
defrag d: -f
With all that in mind, your next step is to set up a task to run the DEFRAG command automatically on a regular schedule. Here’s how it’s done:
1. Select Start, Accessories, System Tools, Scheduled Tasks. The Scheduled Tasks folder appears.
2. Double-click the Add Scheduled Task icon. The Scheduled Task Wizard appears.
3. Click Next. The wizard prompts you to choose the program you want to run.
4. Click Browse to open the Select a Program to Schedule dialog box.
5. Open the %SystemRoot%System32 folder (where %SystemRoot% is usually C:Windows), select defrag.exe, and click Open.
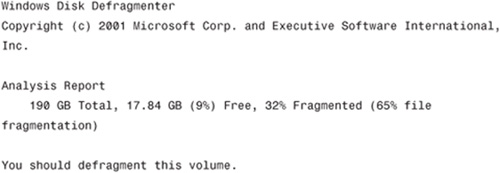
6. Type a name for the task (such as Weekly Disk Defrag), click the Weekly option (see Figure 24.1), and then click Next.
FIGURE 24.1 Name your task and choose the Weekly option.
7. Use the Start Time control to select a time to run the weekly defrag. I suggest a time when you won’t be using your computer, such as 3:00 a.m. (or, if you’re a dedicated night owl, 3:00 p.m.).
8. Activate the check box beside the day of the week you want the defrag to run (again, pick a day when you’re less likely to need your machine, such as Sunday), and then click Next.
9. Type your username and password (twice) and click Next.
10. Activate the Open Advanced Properties for This Task When I Click Finish check box and then click Finish. The task’s property sheet appears.
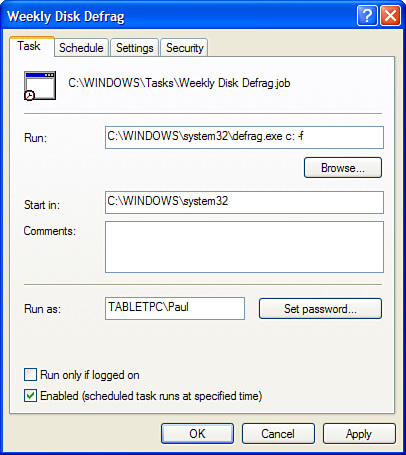
11. In the Task tab, use the Run text box to add the DEFRAG parameters and switches you want to use. For example, to force a defrag of the C: drive, you need to add c: -f to the Run text, as shown in Figure 24.2.
12. Click OK. Task Scheduler prompts you for your account data.
13. Type your username and password (twice) and click OK.
FIGURE 24.2 Use the Run text box to add your DEFRAG parameters and switches.
Divide Your Hard Drive into Two Partitions

In hard drive circles, a partition—it’s also called a volume—is a subset of a hard drive that you can access and work with as a separate entity. Most hard drives consist of just a single partition that takes up the entire disk, and that partition is almost always drive C. However, it’s possible to divide a single hard drive into two (or more) partitions and assign a drive letter to each—say, C and D.
Why would you want to do such a thing? Lots of reasons, but two are by far the most common:
• You want to install a second operating system on your computer and dual-boot between them. In this case, you need to create a second partition and install the other operating system to that partition.
• See Chapter W6, “Dual-Booting Windows with Other Operating Systems,” which is available at my website: www.mcfedries.com/cs/content/TweakItFreakIt.aspx.
• You want to separate your data from Windows. In this case, you need to create a second partition and move your data to that partition. This is a good idea because if you ever have to reinstall Windows from scratch, you can wipe drive C: without having to worry about your data.
In Windows versions prior to Vista, partitioning a hard drive required third-party software such as Partition Magic (www.symantec.com) or Partition Manager (www.acronis.com). Windows Vista changes that by offering the welcome ability to manage partitions without extra software. You can reduce the size of a partition, enlarge a partition, create a new partition, and delete an existing partition.
In this tweak, you learn how to divide a hard drive into two partitions. You do that by first shrinking the existing partition, and then creating the new partition in the freed-up disk space. Here are the steps to follow:
1. Select Start, right-click Computer, and then click Manage. The User Account Control dialog box appears.
2. Enter your UAC credentials to continue. The Computer Management snap-in appears.
3. Click Disk Management. The Disk Management snap-in appears, as shown in Figure 24.3.
FIGURE 24.3 Use the Disk Management snap-in to work with your hard drive partitions.

4. Right-click the drive you want to partition and then click Shrink Volume. Disk Management displays the Shrink D: dialog box (where D is the drive letter of the partition).
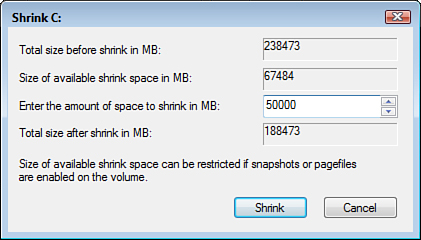
5. Use the Enter the Amount of Space to Shrink in MB text box to type the amount by which you want the partition size reduced, as shown in Figure 24.4. Keep in mind that this will be the approximate size of the new partition that you create a bit later.
FIGURE 24.4 Enter the amount by which you want the existing partition reduced.
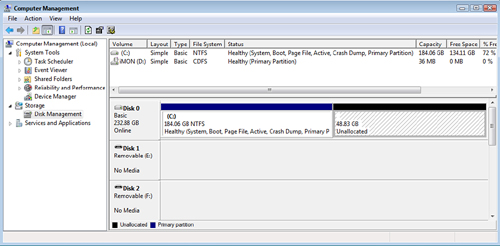
6. Click Shrink. Windows Vista shrinks the partition and displays the freed space as Unallocated, as you can see in Figure 24.5.
7. Right-click the Unallocated space and then click New Simple Volume. The New Simple Volume Wizard appears.
8. Click Next. The Specify Volume Size wizard appears.
9. Make sure that the Simple Volume Size in MB text box is set to the maximum value, and then click Next. The Assign Drive Letter or Path dialog box appears.
10. Select the Assign the Following Drive Letter option, use the list to select the drive letter you want to assign to the new partition, and then click Next.
FIGURE 24.5 The space removed from the existing partition now appears as Unallocated in the Disk Management snap-in.
11. Select the Format This Volume with the Following Settings option, leave the settings as is (you might want to change the Volume Label, however), and click Next.
12. Click Finish. Windows Vista formats the partition and assigns the drive letter.
Determine a Remote Computer’s Disk Drive Free Space
![]()
You know it’s important to keep an eye on the free disk space on your disks to avoid running low on space, which can cause all kinds of problems, particularly on the system drive. That’s easy enough on your local computer (open the Computer or My Computer window), but what about computers on your network? Assuming you don’t want to (or can’t) sit down in front of each computer, you need a remote way of checking free disk space. Sounds like a challenge, but you can do it using a Windows Management Instrumentation (WMI) script.
In the WMI examples you’ve seen so far, I’ve used localhost as the value of the strComputer variable, which connects to the local computer’s WMI service:
strComputer = “localhost”
Set objWMI = GetObject(“winmgmts:{impersonationLevel=impersonate}!\” & _ strComputer & “ ootcimv2”)
You could also use the name of your computer, like this:
strComputer = “MyPC”
Set objWMI = GetObject(“winmgmts:{impersonationLevel=impersonate}!\” & _ strComputer & “ ootcimv2”)
In this case, I used the name of the local computer—MyPC—instead of localhost. However, WMI scripting doesn’t restrict you to working only with the local machine. In fact, WMI was created so that IT types and network admins could manage remote computers on the network. This means that it’s almost trivial to configure a script to run on a network client:
• You change the value of the strComputer variable to the name of the remote computer you want to manage.
• You configure the network client’s firewall to accept remote administration traffic.
• For the details on configuring the remote administration firewall exception, see “Configure a Network Computer for Remote Administration,” p. 358.
Listing 24.1 shows a script that returns disk drive information from a remote computer.
Listing 24.1 A Script That Displays Disk Drive Data for a Remote Computer on the Network
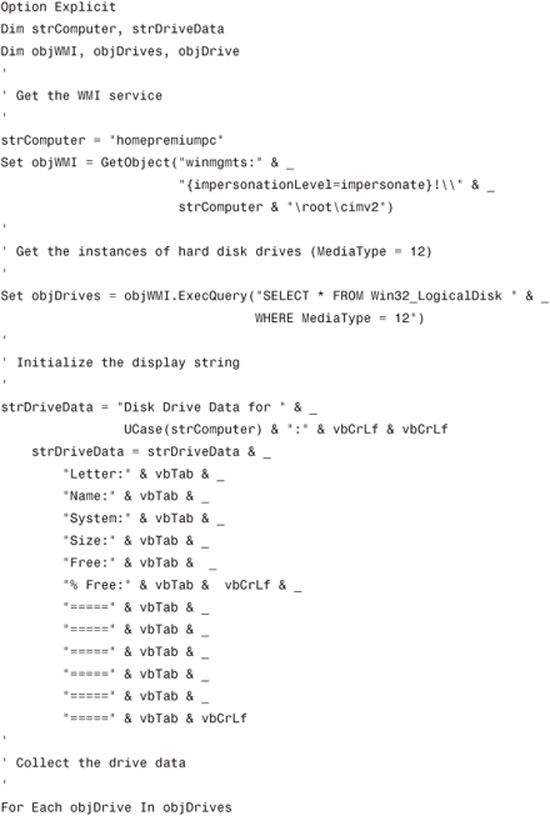
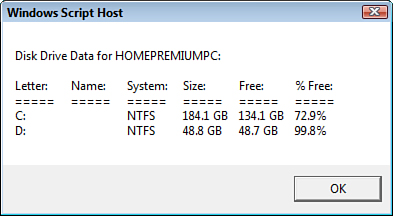
The script begins by setting the strComputer variable to homepremiumpc, which is the name of the client computer on my network. The script then gets the remote computer’s WMI service and uses it to return the instances of the remote computer’s Win32LogicalDisk class, which represents a computer’s logical disk drives. In this case, I’m interested only in the hard drives, so I use the WHERE clause to return only those disks where the MediaType property equals 12.
The script initializes the strDriveData display variable, and then it uses For Each...Next to loop through the hard drive instances. In each case, six values are added to the strDriveData string: the Name (drive letter), VolumeName, FileSystem, Size, and FreeSpace properties, and a calculation of the percentage of free space available.
The strDriveData string is then displayed using the Echo method. Figure 24.6 shows an example.
FIGURE 24.6 A remote computer’s disk drive data displayed by the script in Listing 24.1.
Create an Instant Restore Point
The System Restore feature in Vista and XP has a simple job: to take periodic snapshots—called restore points (or sometimes protection points)—of your system, each of which includes the currently installed program files, Registry settings, and other crucial system data. The idea is that if a program or device installation causes problems on your system, you use System Restore to revert your system to the most recent restore point before the installation.
System Restore automatically creates restore points under the following conditions:
• Every 24 hours
• Before installing certain applications
• Before installing a Windows Update patch
• Before installing an unsigned device driver
• Before restoring backed-up files
• Before reverting to a previous configuration using System Restore
It’s also possible to create a restore point manually using System Protection (in Vista) or System Restore (in XP). This is a good idea anytime you’re about to perform any relatively significant modification to your system, such as installing a program or updating a device driver.
However, if you do these kinds of things a lot, it can be a pain to load the programs and go through all the steps. A much faster way to go about this is to use a script that creates a restore point instantly. Listing 24.2 shows just such a script.
Listing 24.2 A Script That Creates a Restore Point
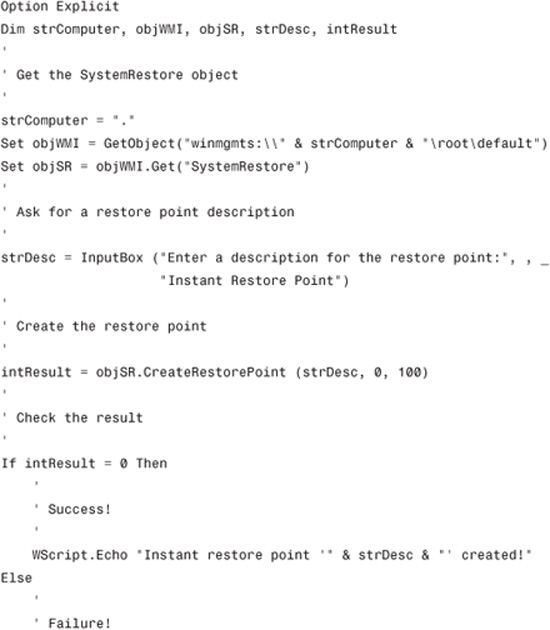
Note that you must run this script under the Administrator account, as described in Chapter 12.
• See “Run a Script as the Administrator,” p. 141.
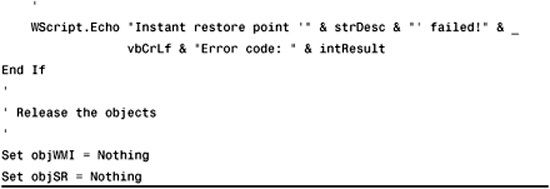
This script uses Windows Management Instrumentation (WMI) to return the SystemRestore class. The script displays a dialog box so that you can type a description of the restore point, and it then uses that description when it runs the CreateRestorePoint method. The script checks the result and displays a dialog box letting you know whether the restore point was created successfully.
Move the Paging File to a Faster Hard Drive
![]()
Your computer can address memory beyond the amount physically installed on the system. This nonphysical memory is called virtual memory and Windows implements it by setting up a piece of your hard disk to emulate physical memory. This hard disk storage is actually a single file called a paging file (or sometimes a swap file). When physical memory is full, Windows makes room for new data by taking some data that’s currently in memory and swapping it out to the paging file.
No matter how much main memory your system boasts, Windows still creates and uses a paging file for virtual memory. To maximize paging file performance, you should make sure that Windows is working optimally with the paging file. In particular, the location of the paging file can have a major impact on its performance. There are three things you should consider:
• If you have multiple physical hard disks, store the paging file on the hard disk that has the fastest access time—The faster the access time, the better the performance of virtual memory because Windows can move data to and from the paging file faster.
• Store the paging file on an uncompressed partition—Windows is happy to store the paging file on a compressed NTFS partition. However, as with all file operations on a compressed partition, the performance of paging file operations suffers because of the compression and decompression required. Therefore, you should store the paging file on an uncompressed partition.
• If you have multiple hard disks, store the paging file on the hard disk that has the most free space—Windows expands and contracts the paging file dynamically depending on the system’s needs. Storing the paging file on the disk with the most space gives Windows the most flexibility.
The paging file is named Pagefile.sys and it’s stored in the root folder of the %SystemDrive%. Here’s how to change the hard disk that Windows uses to store the paging file as well as the paging file sizes:
1. If necessary, defragment the hard disk that you’ll be using for the paging file.
2. Display the advanced system properties:
• Windows Vista—Select Start, right-click Computer, and then click Properties to display the System window. Click Advanced System Settings and then enter your User Account Control credentials.
• Windows XP—Select Start, right-click My Computer, click Properties, and click the Advanced tab.
3. In the Performance group, click Settings to display the Performance Options dialog box.
4. Display the Advanced tab.
5. In the Virtual Memory group, click Change. Windows displays the Virtual Memory dialog box.
6. (Vista only) Deactivate the Automatically Manage Paging File Size for All Drives check box. Vista enables the rest of the dialog box controls, as shown in Figure 24.7.
FIGURE 24.7 Use the Virtual Memory dialog box to select a different hard disk to store the paging file.
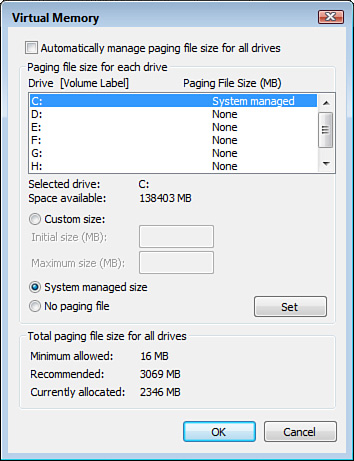
7. Use the Drive list to select the drive that currently has the paging file.
8. Select the No Paging File option.
9. Click Set and when Windows asks you to confirm, click Yes.
10. Use the Drive list to select the hard drive you want to use for the paging file.
11. Select a paging file size option:
• Custom Size—Activate this option to set your own paging file sizes using the Initial Size (MB) and Maximum Size (MB) text boxes. Ensure that Windows is able to resize the paging file dynamically, as needed, by entering a maximum size that’s larger than the initial size.
• System Managed Size—Activate this option to let Windows manage the paging file sizes for you.
12. Click Set.
13. Click OK in all the open dialog boxes.
14. Restart your computer to put the changes into effect.