
CHAPTER 1 Vital Performance Tweaks
The need for computing speed is seemingly infinite. I’ve never met any serious or semi-serious computer user who’s been satisfied with the performance of his or her PC. If you use your computer a lot, you probably spend at least a bit of time every day wishing you had a faster, more powerful, machine. This isn’t some newly formed flaw in the human condition. On the contrary, it’s just basic human nature. For example, certain apparently complex tasks happen almost instantly on most PCs. A good example is Word’s on-the-fly spelling and grammar checking: You misspell a word, and that squiggly red line appears under the offending term right away. Make a grammatical gaffe, and the green line shows up as soon as you press the period (.) to end the sentence. If these tasks are immediate, why does it often take an unholy amount of time to search for a file, open a program, or print a document?
It’s also true that even as computers have muscled up over the years, the software they have to work with has grown fatter. So, yes, your current PC is probably many times more powerful than your previous machines—and probably several hundred times more powerful than your first computer—but it doesn’t feel much faster because bloated software programs force the machine to work harder just to keep up.
We all want more performance, and as you’ll see in this chapter and elsewhere in this book, there are ways to tweak Windows to make it run a bit faster. Before getting to those tweaks, however, consider a few hardware upgrades that, budget permitting of course, are guaranteed to speed up your system:
• Add more memory—System RAM is always the first place to start when considering a hardware upgrade for better performance. RAM is relatively cheap and relatively easy to install, and an extra gigabyte or two in your system can make a whopping difference. Most modern Windows Vista and XP systems should have at least 2GB of RAM, and 3GB is better if you often deal with large files. (Don’t bother with 4GB, because 32-bit Windows machines can use only a small portion of that fourth gigabyte. If you have 64-bit Windows, you can add up to 8GB.)
• Get a bigger and faster hard drive—A fast hard drive (at least 7200 RPM) can do wonders for performance because the faster the drive, the less time Windows has to spend reading and writing data. A big hard drive also gives Windows lots of room to make the paging file—the area of the hard disk that Windows uses as a kind of memory extension to improve performance—as big as it needs.
• Upgrade to a video card with more memory—A modern-day graphics chip works as hard or sometimes even harder than the CPU, what with our monitors getting bigger, Windows requiring ever more graphical resources, and with games and other programs pushing pixels at an alarming rate. A video card with as much memory as you can afford will help push those pixels even faster.
• Take your network to the next level—If your Windows PC is part of a network and you use that connection to share files and other data, you owe it to yourself to set up the fastest network that you can afford. For wired connections, it’s time to step up to Gigabit Ethernet, which transfers data at a theoretical top speed of 1,000 megabits per second (Mbps). For wireless, go with devices that support 802.11n, the perpetually just-around-the-corner standard for the next generation of wireless connections. Just make sure you get devices that support “Draft 2.0” (or later) of the 802.11n standard.
No budget for such things? No worries. This chapter gives you four simple ways to give Windows a bit of boost without costing you a cent.
Silence the Graphical Bells and Whistles
![]()
Windows is a graphical operating system, so it’s chock full of visual flourishes. For example, when you click an item in a menu bar, the associated menu doesn’t just suddenly appear on the screen; instead, it slides into view as though you really did “pull down” the pull-down menu. What’s the point of such graphical shenanigans? Mostly to offer visual clues that help novice users figure out what the heck is going on. If an inexperienced user can “see” where the menu comes from, he or she will understand the pull-down menu concept that much faster. Microsoft has novice users in mind for most of these graphic goodies, including the effects you see when you minimize and maximize a window, open drop-down lists, and move a window.
That’s great for your average inexperienced user, but what about the rest of us? Do we really need drop-shadows on our desktop icons and sliding menus? Probably not. Personally, I don’t give a hoot what Windows effects Windows uses, but if they slow me down—either directly by hampering the performance of my PC or indirectly by making the interface harder or slower to navigate—then they’re out of there.
Before I show you how to turn off some or all of Windows’ graphical knickknacks, it’s important to put all this in some kind of perspective. Remember that for graphics in general, and for visual effects in particular, performance is mostly determined by the amount of memory on the video card. The more memory on the card, the faster it can process the visual effects. Most new computers have a decent amount of video card memory—at least 32MB—so turning off visual effects will have little impact on overall performance. If your adapter has 8MB or less, turning off visual effects can improve performance.
However, even if you’ve got scads of video RAM, you might find Windows easier to navigate and use with some or all of the effects turned off. For example, with the minimize and maximize effects turned off, windows disappear and reappear instantly, and even though this only saves you a few tenths of a second each time, it feels like the process is much faster.
Tuning Graphics Performance Using Visual Effects
Let’s begin with Windows biggest cache of graphics settings, the Visual Effects tab:
1. Open the Run dialog box, type sysdm.cpl, and click OK. (In Vista, you need to enter your User Account Control credentials to continue.) The System Properties dialog box appears.
2. Click the Advanced tab.
3. Click Settings to open the Performance Options dialog box with the Visual Effects tab displayed, as shown in Figure 1.1.
FIGURE 1.1 The Visual Effects tab is loaded with settings that control the appetite Windows has for graphical treats.
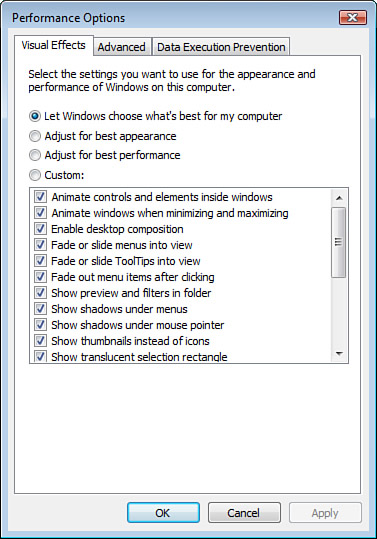
4. You’ve got three ways to proceed here:
• Adjust for Best Performance—Select this option to turn off every visual effect. This will give you a real minimalist interface.
• Let Windows Choose What’s Best for My Computer—This is the default option, and it tells Windows to activate or deactivate visual effects based on your computer’s hardware.
• Custom—Select this option to decide which effects you want to turn off. This is usually the best way to go because it lets you leave some or more useful visual effects turned on.
5. Click OK. Windows takes a few moments to save your work and recompose the window using the new visual settings. You end up back at the System Properties dialog box.
6. Click OK.
Tuning Graphics Performance in Windows Vista
![]()
If you’re running Vista’s Aero interface, I also recommend turning off the transparency effects. Why shun one of Vista’s most famous and iconic features? Two reasons: It serves no earthly purpose that I can discern, and the text and images that bleed through the transparent sections of windows are always distracting and often confusing. In short, transparency is nothing but eye candy of the worst kind, and shutting it down is one of the first things I do on any new Vista installation. Here’s how:
1. Right-click an empty section of the desktop and then click Personalize.
2. Click Window Color and Appearance.
3. Deactivate the Enable Transparency check box.
4. Click OK. Vista recomposes the screen with the transparency effects turned off.
Boost Vista Performance Using a Flash Drive

If you’ve purchased items from Amazon.com or iTunes, you’ve probably had those sites recommend books or music based on what you’ve purchased in the past. Vista and XP have a similar feature, although it won’t help you find new books or bands. Instead, the prefetcher, as it’s called, is a performance feature in XP that monitors how you use your system and tries to anticipate the data that you might use in the near future. The prefetcher then loads that data into memory ahead of time. If that data was indeed what your system required, performance would increase because Windows wouldn’t have to fetch the data from your hard disk (because it had been already “prefetched”).
Windows Vista introduced a new and improved version of the prefetcher: SuperFetch. This technology tracks the programs and data you use over time to create a kind of profile of your disk usage. Using the profile, SuperFetch can then make a much more educated guess about the data that you’ll require and, like the prefetcher, can then load that data into memory ahead of time for enhanced performance.
However, SuperFetch goes even further by taking advantage of Vista’s ReadyBoost technology. If you insert a USB flash drive, Vista may display the AutoPlay dialog box shown in Figure 1.2.
FIGURE 1.2 If you insert a certain kind of USB 2.0 flash drive into your system, SuperFetch can use it as its cache to improve system performance.
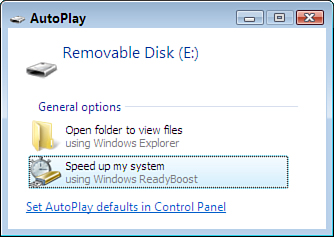
If you click Speed Up My System Using Windows ReadyBoost, SuperFetch uses that drive’s capacity as storage for the SuperFetch cache. On many systems, this gives a performance nudge because even though data access via the flash drive is slower than with system RAM, it’s still many times faster than even the fastest hard drive.
Note that ReadyBoost doesn’t work with all USB flash drives. Here are the criteria:
• The drive (and the USB port you plug it into) must support USB 2.0.
• The drive must have a total capacity of at least 256MB.
• The drive must have at least 235MB of free space.
• The drive must meet certain minimum performance requirements related to read and write speeds. According to Microsoft, the minimum speeds are as follows:
Reads—At least 2.5MB per second throughput for 4KB random reads across the drive.
Writes—At least 1.75MB per second throughput for 512KB sequential writes across the drive.
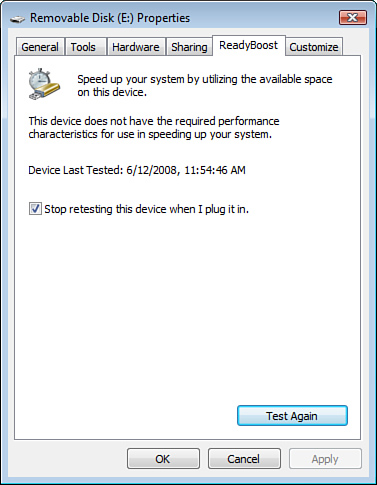
If a flash drive doesn’t meet these criteria, you don’t get the option of using ReadyBoost. If you check the device properties (click Start, Computer, right-click the device, and then click Properties), the ReadyBoost tab will show you the reason. In Figure 1.3, for example, you can see that this drive isn’t fast enough.
FIGURE 1.3 The ReadyBoost tab in the flash drive’s property sheet tells you why it’s not ReadyBoost ready.
Want more detailed info? Why not? Try this:
1. Click Start.
2. Type event into the Search box, click Event Viewer in the results, and then enter your User Account Control (UAC) credentials. The Event Viewer window appears.
3. Open the Applications and Services Log, Microsoft, Windows, ReadyBoost, Operational branch.
4. Click the event that was created when you inserted the flash drive.
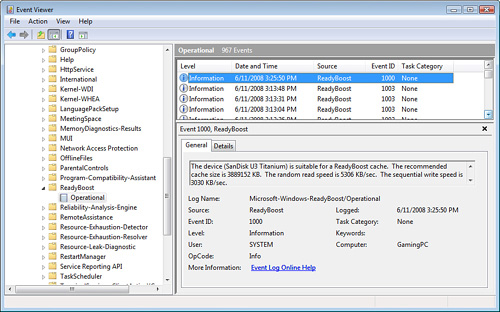
The event tells you why the drive was rejected. In Figure 1.4, for example, you can see that the device wasn’t fast across the entire drive (the “fast region”—the region that meets the minimum performance requirements—was just 120MB). In Figure 1.5, you see that when you insert a ReadyBoost-ready flash drive, Event Viewer details the drive’s performance characteristics.
FIGURE 1.4 The Event Viewer can give you more detail about why a flash drive was rejected for ReadyBoost.
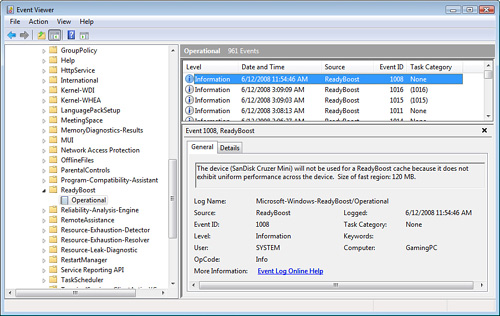
FIGURE 1.5 For a ReadyBoost-compliant drive, the Event Viewer tells you the drive’s performance characteristics.
How big should the flash drive be? Ideally, it should be between one and three times the size of the physical RAM installed on your system. Here are some examples:
• 512MB RAM—The flash drive should be no smaller than 512KB and no bigger than 1.5GB.
• 1GB RAM—The flash drive should be no smaller than 1GB and no bigger than 3GB.
• 2GB RAM—The flash drive should be no smaller than 2GB and no bigger than 4GB.
Note that this doesn’t mean you have to get a flash drive that exactly matches the cache size you want to use. For example, suppose you have 1GB RAM and you want to use 3GB for ReadyBoost. If you have a 4GB flash drive, you can tell Vista to use only 3GB for ReadyBoost. Here’s how:
1. Select Start, Computer to open the Computer window.
2. Right-click the flash drive and then click Properties to open the device’s property sheet.
3. Select the ReadyBoost tab, shown in Figure 1.6.
FIGURE 1.6 In the flash drive’s property sheet, use the ReadyBoost tab to set the maximum amount of memory that SuperFetch can use.
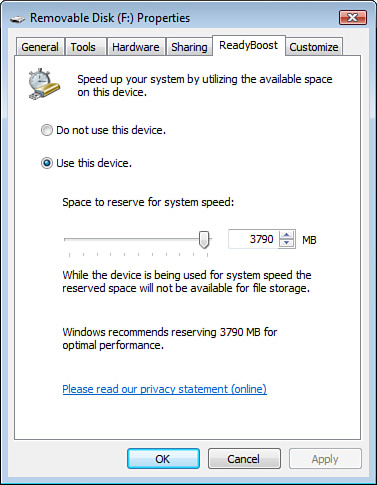
4. Click the Use This Device option to let SuperFetch access the flash memory.
5. Use the slider to set the maximum amount of memory SuperFetch can use.
6. Click OK.
Ensure Windows Is Optimized for Programs
![]()
You can set up Windows so that it’s optimized to run programs. This involves adjusting the processor scheduling, which determines how much time the processor allocates to the computer’s activities. In particular, processor scheduling differentiates between the foreground program—the program in which you’re currently working—and background programs—programs that perform tasks, such as printing or backing up, while you work in another program.
Optimizing programs means configuring Windows so that it gives more CPU time to your programs. This is the default in Vista and XP, but it’s worth your time to make sure that this default configuration is still the case on your system. Here are the steps to follow:
1. Open the Run dialog box, type sysdm.cpl, and click OK. (In Vista, you need to enter your UAC credentials to continue.) The System Properties dialog box appears.
2. Click the Advanced tab.
3. In the Performance group, click Settings to display the Performance Options dialog box.
4. Display the Advanced tab.
5. In the Processor Scheduling group, activate the Programs option.
6. Click OK.
7. When Windows tells you the changes require a restart, click OK to return to the System Properties dialog box.
8. Click OK. Windows asks whether you want to restart your system.
9. Click Yes.
Enable Your Hard Drive’s Advanced Performance Features
![]()
One of the slowest operations your computer performs is reading from and writing to the hard drive. So it makes more than a little sense that you can improve overall performance by reducing the amount of time that Windows has to spend reading from and writing to the hard drive. Fortunately, almost all hard drives come with a bit of onboard memory called the hard drive cache, and Windows can take advantage of that speedy cache to store frequently used chunks of data. That is, when Windows needs to read some data from the hard drive, it first checks the cache. If the data is there, great: Windows can retrieve the data many times faster than if it had to go directly to the hard disk’s platters.
The cache speeds up hard drive read operations, but Windows also has to write data back to the hard drive. Does the cache help with write operations, too? Theoretically, yes. This is called write caching, and it means that Windows stores changed data in the hard drive cache. Windows doesn’t write that changed data to the disk until the system is idle, which improves performance. You can get even more of a performance boost if your system uses a SATA (Serial Advanced Technology Attachment) hard drive, because SATA drives include extra cache features.
This hard drive performance improvement is theoretical because on most systems Windows doesn’t activate write caching. That’s because the downside of write caching is that a power outage or system crash means that the data never gets written, so the changes are lost. For regular write caching this isn’t a major concern, because changed data is flushed to the hard drive quite frequently. However, the more advanced SATA drive write caching is more aggressive, so losing data is a distinct possibility unless your system is protected by an uninterruptible power supply (UPS) or a battery backup.
To enable write caching on your system, follow these steps:
1. Select Start, right-click Computer (or My Computer in XP), and then click Manage. (In Vista you need to enter your UAC credentials at this point.) Windows displays the Computer Management window.
2. Click Device Manager.
3. Open the Disk Drives branch.
4. Double-click your hard disk to display its property sheet.
5. In the Policies tab, make sure that the Enable Write Caching on the Disk check box is activated.
6. For maximum performance with a SATA drive, activate the Enable Advanced Performance check box.
7. Click OK.