
CHAPTER 35 Controlling Windows with the Group Policy Editor
You’ve seen in many places throughout this book that you can perform some pretty amazing tweaks by using a tool that’s about as hidden as any Windows power tool can be: the Group Policy Editor. That Microsoft has buried this program in a mostly untraveled section of the Windows landscape isn’t the least bit surprising because in the wrong hands the Group Policy Editor can wreak all kinds of havoc on a system. It’s a kind of electronic Pandora’s Box that, if opened by careless or inexperienced hands, can loose all kinds of evil upon the Windows world.
Of course, none of this doom-and-gloom applies to you, dear reader, because you’re a cautious and prudent wielder of all the Windows power tools. This means that you’ll use the Group Policy Editor in a safe, prudent manner and that you’ll create a system restore point if you plan to make any major changes. I knew I could count on you.
As you see in this chapter, the Group Policy Editor isn’t even remotely hard to use. However, it’s such a powerful tool that it’s important for you to know exactly how it works, which will help ensure that nothing goes awry when you’re making your tweaks.
Understanding Group Policies
Put simply, group policies are settings that control how Windows works. You can use them to customize the Windows Vista interface, restrict access to certain areas, specify security settings, and much more.
Group policies are mostly used by system administrators who want to make sure that novice users don’t have access to dangerous tools (such as the Registry Editor), or who want to ensure a consistent computing experience across multiple machines. Group policies are also ideally suited to situations in which multiple users share a single computer. However, group policies are also useful on single-user standalone machines, as you’ve seen throughout this book.
Group Policy Editor and Windows Versions
The power of the Group Policy Editor is aptly illustrated not only by the fact that Microsoft hides the program deep in the bowels of the system, but most tellingly by the fact that Microsoft doesn’t even offer Group Policy Editor in the following Windows versions:
• Windows XP Home
• Windows Vista Home Basic
• Windows Vista Home Premium
In other words, those Windows versions that Microsoft expects novices to be using are the same Windows versions where Microsoft doesn’t even include the Group Policy Editor, just to be safe.
Of course, plenty of experienced users use these Windows versions, mostly because they’re cheaper than high-end versions such as XP Pro and Vista Ultimate. So what’s a would-be tweaker to do when faced with having no Group Policy Editor?
The short answer is: Don’t sweat it. That is, although the Group Policy Editor does provide an easy-to-use interface for many powerful settings, it’s not the only way to put those settings into effect. Most group policies correspond to settings in the Windows Registry, so you can get the identical tweak on any Windows Home system by modifying the appropriate Registry setting, instead. Throughout this book, I’ve tried to augment group policy tweaks with the corresponding Registry tweak, just in case you don’t have access to the Group Policy Editor.
Launching the Group Policy Editor
As I’ve said, you make changes to group policies using the Group Policy Editor, a Microsoft Management Console snap-in. To start the Group Policy Editor, follow these steps:
1. Press Windows Logo+R to open the Run dialog box. (In XP, you can also select Start, Run; in Vista, you can also select Start, All Programs, Accessories, Run.)
2. Type gpedit.msc.
3. Click OK.
4. In Vista, enter your administrator’s credentials to continue.
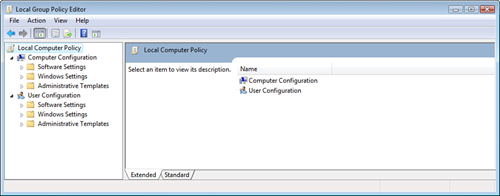
Figure 35.1 shows the Local Group Policy Editor window that appears. (The word “Local” refers to the fact that you’re editing group policies on your own computer, not on some remote computer.)
FIGURE 35.1 You use the Group Policy Editor to tweak group policies on your PC.
Working with Group Policies
The Group Policy window that appears is divided into two sections:
• Left pane—This pane contains a treelike hierarchy of policy categories, which is divided into two main categories: Computer Configuration and User Configuration. The Computer Configuration policies apply to all users and are implemented before the logon. The User Configuration policies apply only to the current user and, therefore, are not applied until that user logs on.
• Right pane—This pane contains the policies for whichever category is selected in the left pane.
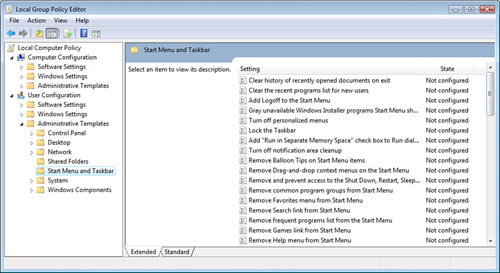
The idea, then, is to open the tree’s branches to find the category you want. When you click the category, its policies appear in the right pane. For example, Figure 35.2 shows the Group Policy window with the User Configuration, Administrative Templates, Start Menu and Taskbar category highlighted.
FIGURE 35.2 When you select a category in the left pane, the category’s policies appear in the right pane.
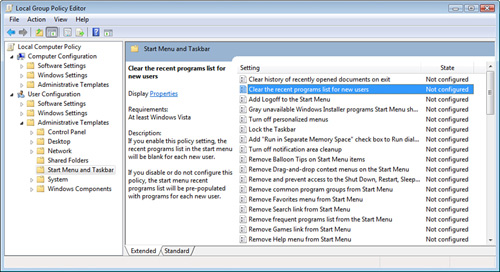
In the right pane, the Setting column tells you the name of the policy, and the State column tells you the current state of the policy. Click a policy to see its description on the left side of the pane, as shown in Figure 35.3. If you don’t see the description, click the Extended tab.
FIGURE 35.3 Click a policy to see its description.
To configure a policy, double-click it. The type of window you see depends on the policy:
• For simple policies, you see a window similar to the one shown in Figure 35.4. These kinds of policies take one of three states: Not Configured (the policy is not in effect), Enabled (the policy is in effect and its setting is enabled), and Disabled (the policy is in effect but its setting is disabled).
• Other kinds of policies require extra information when the policy is enabled. For example, Figure 35.5 shows the window for the Items Displayed in the Places Bar policy (described in detail in Chapter 19, “Useful and Fun Interface Mods”). When the Enabled option is activated, the various text boxes become enabled, and you use them to type paths for folders you want to display in the Places bar.
• See “Customize the Places Bar for Easier Navigation,” p. 222.
FIGURE 35.4 Simple policies are Not Configured, Enabled, or Disabled.
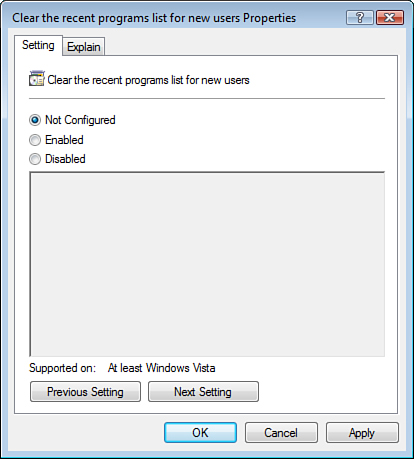
FIGURE 35.5 More complex policies also require extra information, such as a list of folders to display in the Places bar.
