CHAPTER 19 Useful and Fun Interface Mods
Throughout this book I’ve tried to provide you with tweaks that would, even in a small way, make your life with Windows Vista or XP easier, faster, more efficient, or more secure. In other words, my emphasis has been on practical tweaks rather than on frivolous ones. In this chapter I give in a teensy tiny bit to frivolity and show you some tweaks that I think are quite fun. However, my practical side refuses to wait in the wings, so although the first tweak is pure fun, you can use (if you want to, that is) the next two tweaks to boost your Windows efficiency, so they have more than a whiff of practicality about them.
Give Windows a Custom Logo
![]()
If you want to add a personal touch to your PC, you can tweak it to display a custom logo. In Windows XP, this logo appears in the General tab of the System Properties dialog box; in Windows Vista, the logo appears in Control Panel’s System window.
Give Windows XP a Custom Logo
In a few places in this book, I ask you to open up the Windows XP System Properties dialog box to make a tweak or two to your PC. In XP, here are the fastest ways to open System Properties:
• Press Windows Logo+Pause/Break.
• Click Start, right-click My Computer, and then click Properties.
• Select Start, Run, type sysdm.cpl, and click OK.
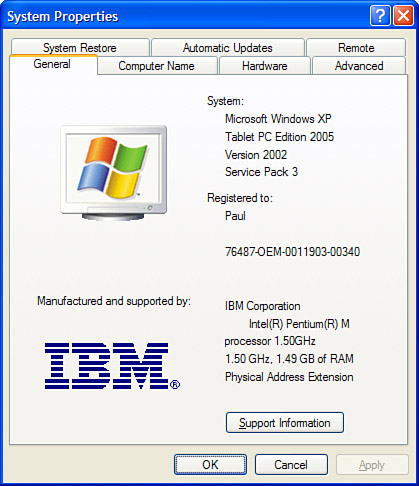
All three methods should land you on the General tab. (If not, click the General tab to display it.) If you purchased your XP PC from a manufacturer, chances are the company has customized the General tab with a logo and the company name. For example, Figure 19.1 shows the General tab for my trusty old ThinkPad; you can see that it displays the IBM logo, and it also says IBM Corporation above the processor info. You can also click the Support Information button to see a dialog box that displays technical support info for IBM.
FIGURE 19.1 Most manufacturers customize the System Properties General tab with a logo, company name, and support information.
Happily, the logo, company name, and even the support information are all fully customizable. You can also add a “model” name below the company, which could be your PC’s actual model name, or perhaps a nickname.
Let’s start with the logo. Here are the steps to follow:
1. Create a new logo or modify an existing logo so that the resulting image is no more than 180 pixels wide and no more than 114 pixels high.
2. Select File, Save As to open the Save As dialog box.
3. In the Save As Type (or File Type) list, choose 256 Color Bitmap.
4. In the File Name text box, type oeminfo.bmp.
5. Open the %SystemRoot%System32 folder.
6. Click Save.
7. If the program asks whether you want to replace the existing file, click Yes.
Now follow these steps to customize the company name, model name, and support info:
1. Select Start, Run to open the Run dialog box.
2. Type %systemroot%system32 and then click OK.
3. If XP tells you that the files are hidden, click Show the Contents of This Folder.
4. You now have two ways to proceed:
• If your General tab already has a custom company name and support info, locate the oeminfo.ini file and then double-click it to open it in Notepad.
• If you’re creating custom info from scratch, select File, New, Text Document, type oeminfo.ini, press Enter, and then click Yes when XP asks you to confirm the extension change. Press Enter again to open the new file in Notepad.
5. For the company name and model name, add or edit the following lines:
[general]
Manufacturer=CompanyName
Model=ModelName
6. For the support info, add or edit the following lines:
[Support Information]
Line1=First line
Line2=Secondline [etc.]
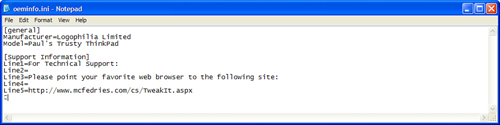
7. Select File, Save to save your work. Figure 19.2 shows a sample oeminfo.ini file.
FIGURE 19.2 A custom oeminfo.ini file.
The next time you open the System Properties dialog box, the General tab shows the custom logo, company name, and model name, as shown in Figure 19.3. Click the Support Information button to display your custom support text, as shown in Figure 19.4.
FIGURE 19.3 The General tab showing the custom logo, manufacturer, and model.
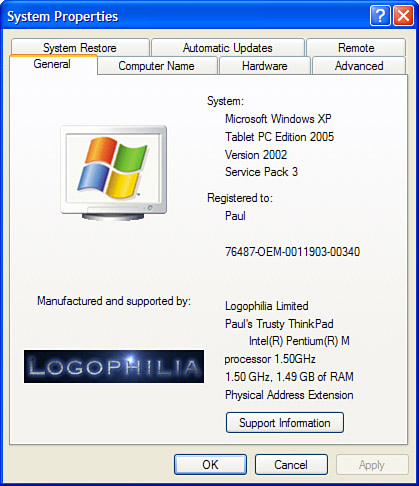
FIGURE 19.4 Click the Support Information button to see your custom support text.

Give Windows Vista a Custom Logo
Windows Vista still has the System Properties dialog box, but the General tab is gone. Instead, Vista offers the System window, which is part of Control Panel’s System and Maintenance category. Here are the three easiest ways to display the System window:
• Press Windows Logo+Pause/Break.
• Click Start, right-click Computer, and then click Properties.
• Select Start, type system, and then click System in the search results.
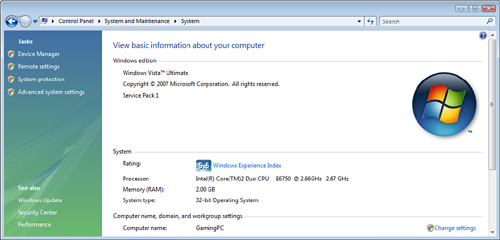
Figure 19.5 shows an uncustomized version of the System window. You can add a logo to the System section, and you can add support information in a new section that appears below the System section.
FIGURE 19.5 In Windows Vista, you can add a custom logo and support information to the System window.
Let’s start with creating the logo:
1. In Paint, create a new logo or modify an existing logo so that the resulting image is no more than 120 pixels wide and no more than 120 pixels high.
2. Select File, Save As to open the Save As dialog box.
3. In the Save As Type (or File Type) list, choose 256 Color Bitmap.
4. Give your logo any name you want, and save it in any folder you want.
5. Click Save.
Now follow these steps to customize the System window:
1. Select Start, type regedit, press Enter, and then enter your UAC credentials. Vista opens the Registry Editor.
2. Navigate to the following key:
HKLMSoftwareMicrosoftWindowsCurrentVersionOEMInformation
3. Select File, New, String Value, type Logo, and press Enter. Press Enter again to open the new setting, and then type the full path to the logo file.
4. Select File, New, String Value, type Manufacturer, and press Enter. Press Enter again to open the new setting, and then type the company name you want to use.
5. Select File, New, String Value, type SupportHours, and press Enter. Press Enter again to open the new setting, and then type your support hours.
6. Select File, New, String Value, type SupportPhone, and press Enter. Press Enter again to open the new setting, and then type the support phone number.
7. Select File, New, String Value, type SupportURL, and press Enter. Press Enter again to open the new setting, and then type the support web address.
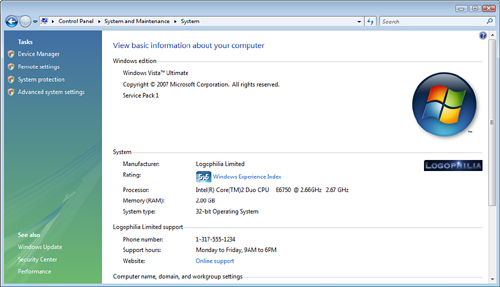
Figure 19.6 shows some sample values in the Registry, and Figure 19.7 shows how they customize the System window.
FIGURE 19.6 Custom OEM information in the Registry.
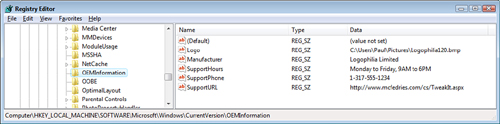
FIGURE 19.7 The System windows showing the custom logo and support info.
Customize the Places Bar for Easier Navigation
![]()
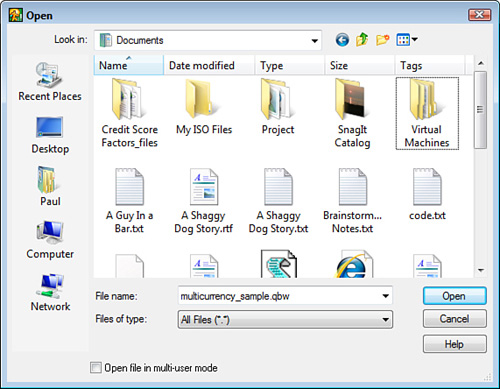
The left side of the standard Save As and Open dialog boxes in Windows XP, as well as the old-style Save As and Open dialog boxes in Windows Vista, include icons for several common locations:
• Windows Vista—Recent Places, Desktop, Computer, Network, and an icon for your main user profile folder, as shown in Figure 19.8.
• Windows XP—My Recent Documents, Desktop, My Documents, My Computer, and My Network Places.
The area that contains these icons is called the Places bar. If you have two or more folders that you use regularly (for example, you might have several folders for various projects that you have on the go), switching between them can be a hassle. To make this chore easier, you can customize the Places bar to include icons for each of these folders. That way, no matter which location you have displayed in the Save As or Open dialog box, you can switch to one of these regular folders with a single click of the mouse.
FIGURE 19.8 The Save As and Open dialog boxes display icons on the left for common locations.
Customizing the Places Bar via Group Policies
The easiest way to do this is via the Group Policy Editor, as shown in the following steps:
1. Select Start, type gpedit.msc, press Enter, and then enter your UAC credentials. (In Windows XP, select Start, Run to open the Run dialog box, type gpedit.msc, and then click OK.) The Group Policy Editor appears.
2. Open the User Configuration branch.
3. Open the Administrative Templates branch.
4. Open the Windows Components branch.
5. Open the Windows Explorer branch.
6. Open the Common Open File Dialog branch.
7. Double-click the Items Displayed in Places Bar policy.
8. Click Enabled.
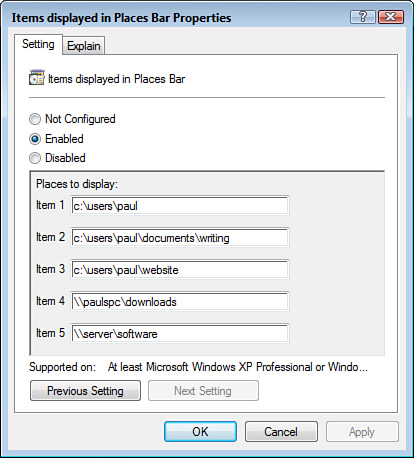
9. Use the Item 1 through Item 5 text boxes to type the paths for the folders you want to display. These can be local folders or network folders, as shown in Figure 19.9.
FIGURE 19.9 Open the Items Displayed in Places Bar policy, click Enabled, and then fill in the folder locations you want to use.
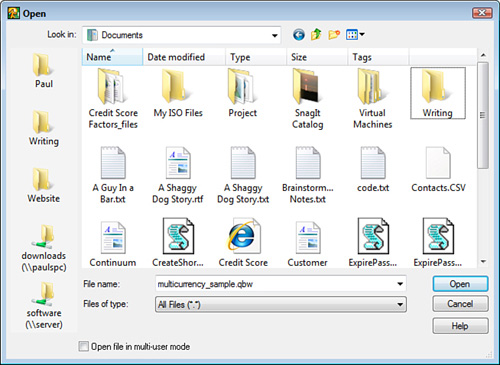
10. Click OK to put the policy into effect. Figure 19.10 shows an Open dialog box with icons for the folders from Figure 19.9 displayed in the Places bar.
FIGURE 19.10 The Open dialog box showing the custom Places bar.
Customizing the Places Bar via the Registry
If you don’t have access to the Group Policy Editor, you can use the Registry Editor to perform the same tweak. Open the Registry Editor and navigate to the following key:
HKCUSoftwareMicrosoftWindowsCurrentVersionPolicies
Now follow these steps:
1. Select Edit, New, Key, type comdlg32, and press Enter.
2. Select Edit, New, Key, type Placesbar, and press Enter.
3. Select Edit, New, String Value, type Place0, and press Enter.
4. Press Enter to open the new setting, type the folder path, and then click OK.
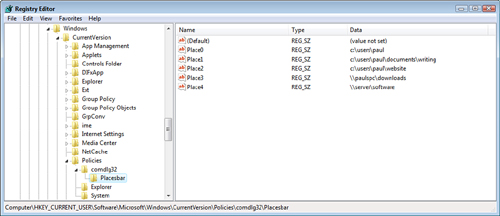
5. Repeat steps 3 and 4 to add other places (named Place1 through Place4). Figure 19.11 shows an example.
FIGURE 19.11 If your version of Windows doesn’t come with the Group Policy Editor, you can still customize the Places bar using the Registry Editor.
Display Multiple Clocks for Different Time Zones

If you have colleagues, friends, or family members who work or live in a different time zone, it is often important to know the correct time in that zone. For example, you would not want to call someone at home at 9 a.m. your time if that person lives in a time zone that is three hours behind you. Similarly, if you know that a business colleague leaves work at 5 p.m. and that person works in a time zone that is seven hours ahead of you, you know that any calls you place to that person must occur before 10 a.m. your time.
If you need to be sure about the current time in another time zone, you can customize Windows Vista’s date and time display to show not only your current time, but also the current time in the other time zone. Follow these steps:
1. Click the Clock icon and then click Change Date and Time Settings to display the Date and Time dialog box.
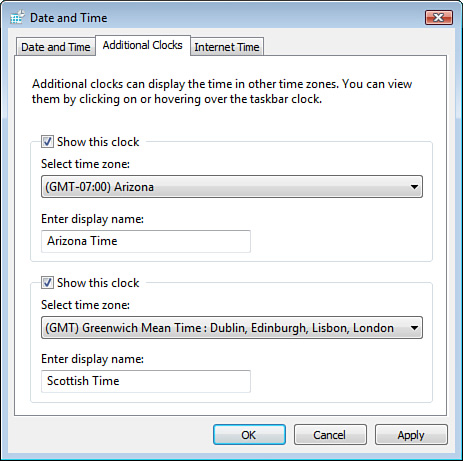
2. Click the Additional Clocks tab. Figure 19.12 shows a completed version of this tab.
FIGURE 19.12 Use the Additional Clocks tab to add one or two more clocks for different time zones in Windows Vista.
3. Activate the first Show This Clock check box.
4. Use the Select Time Zone list to click the time zone you want to display in the additional clock.
5. Use the Enter Display Name text box to type a name for the clock.
6. Repeat steps 4–6 for the second clock.
7. Click OK.
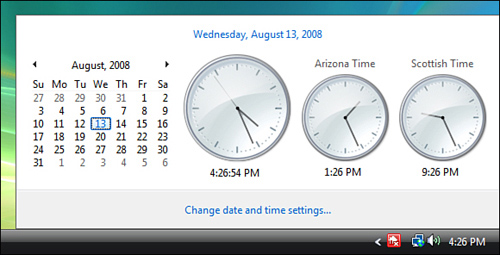
To see the clocks, click the time to display a fly-out similar to the one shown in Figure 19.13.
FIGURE 19.13 Click the time to see your additional clocks.