
CHAPTER 18 Useful Interface Tweaks
In this chapter, we continue to improve the efficiency of Windows by tweaking the interface. I start you off with a couple of easy tweaks that make the cursor easier to find and improve the readability of Windows text. The third tweak is more ambitious as I show you how to configure your PC to support not one, not two, but three monitors. That may sound like a lot, but it’s the setup I use, and I’ll never go back to anything less because it’s just so darned efficient.
Widen the Blinking Cursor to Make It Easier to See
![]()
If you’re running Windows on a smallish notebook screen, or on a display where you’ve cranked up the resolution, you may have noticed a not insignificant problem: the blinking insertion point cursor is often devilishly difficult to see because it’s so tiny. That’s a drag because it means you often have to waste precious time hunting down the cursor.
The problem is that the cursor is only one pixel wide, which is a pretty narrow object to find on a small or high-res screen. To fix that, you can widen the cursor to make it easier to spot.
Here are the steps to follow in Windows Vista to widen the cursor:
1. Select Start, type access, and press Enter. (In XP, select Start, Run, type access.cpl, and click OK.) The Ease of Access Center appears.
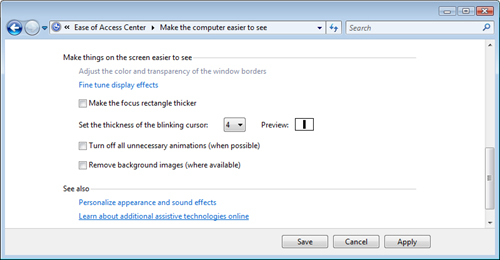
2. Click Make the Computer Easier to See.
3. Use the Set the Thickness of the Blinking Cursor list to choose the cursor width you want. Windows Vista shows a preview of the new cursor width, as shown in Figure 18.1.
FIGURE 18.1 When you select a width from the Set the Thickness of the Blinking Cursor list, the cursor width appears in the Preview box.
4. Click Save to put the new setting into effect.
Here are the steps to follow in Windows XP to widen the cursor:
1. Select Start, Run, type access.cpl, and click OK. The Accessibility Options dialog box appears.
3. In the Cursor Options group, drag the Width slider to the right to widen the cursor.
4. Click OK to put the new setting into effect.
Make Text Easier to Read by Adjusting the Font Size
![]()
Running Windows at a high resolution is useful because it means you can fit more items on the screen because everything appears smaller. The downside is that, depending on the resolution, some fonts may be too small to read comfortably.
You can solve this problem by increasing the dots per inch (DPI) setting in Windows. The default is 96 DPI, which means that Windows uses 96 pixels (dots) for every inch of screen space. (Physical measurements are relative to the screen resolution, so a one-inch line may not actually be one inch long on your screen.)
For example, a line that is meant to be one inch long will be drawn using 96 pixels. However, if you increase the DPI setting, the line appears longer. For example, if you change the DPI to 120, Windows Vista will scale the screen to use 120 pixels to create the same line. In other words, if you scale the DPI setting up, everything on the screen appears larger, including the text, which makes it easier to read.
Follow these steps to increase the DPI value in Windows Vista:
1. Right-click the desktop and then click Personalize. The Personalization window appears.
2. Click Adjust font size (DPI). The User Account Control dialog box appears.
3. Enter you UAC credentials to continue. The DPI Scaling dialog box appears.
4. If you want to go with 120 DPI, activate the Larger Scale (120 DPI) option, and then skip to step 7. Otherwise, click Custom DPI to display the Custom SPI Setting dialog box, shown in Figure 18.2.
FIGURE 18.2 Use the Custom DPI Setting dialog box to set the DPI to a percentage of the default scaling.
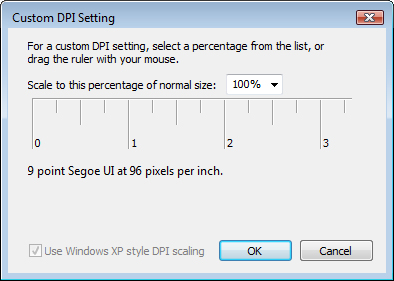
5. Use the Scale to this Percentage of Normal Size control to either select a predefined percentage or type a custom percentage (a number between 100 and 500). You can also click and drag the ruler to set the percentage.
6. Click OK to return to the DPI Scaling dialog box.
7. Click OK. Windows Vista tells you that you must restart your computer for the change to take effect.
8. Close any documents and programs you have open.
9. Click Restart Now. Windows Vista restarts and puts the new font scaling into effect.
Follow these steps to increase the DPI value in Windows XP:
1. Right-click the desktop and then click Properties. The Display Properties dialog box appears.
2. Display the Settings tab.
3. Click Advanced.
5. If you want to go with 120 DPI, use the DPI Setting list to select the Large Size (120 DPI) option, and then skip to step 8. Otherwise, use the DPI Setting list to select Custom Setting to display the Custom SPI Setting dialog box.
6. Use the Scale to this Percentage of Normal Size control to select a predefined percentage. You can also click and drag the ruler to set the percentage.
7. Click OK to return to the DPI Scaling dialog box.
8. Click OK. Windows XP tells you that you must restart your computer for the change to take effect.
9. Close any documents and programs you have open.
10. Click Restart Now. Windows Vista restarts and puts the new font scaling into effect.
Run Windows with Three or More Monitors
![]()
Most tweaks aimed at improving productivity accomplish their goal by saving you a few seconds here and a few seconds there. Do that a few dozen times a day, and you’re finishing your day a half hour earlier than usual. Improvements to productivity are almost always marginal, but you occasionally come across a new way of doing things that offers a radical increase in efficiency. Over the past few years, study after study has shown that you can greatly improve your productivity by doing one thing: adding a second monitor to your system. That makes a ton of sense when you think about it, because you can have whatever you’re working on displayed on one monitor, and your reference materials (or your email client or whatever) on the second monitor. If that’s the way you want to go, there are lots of video cards out there with dual outputs (either a VGA port and a DVI port, or dual DVI ports) that can drive two monitors.
However, I want to crank things up a notch in this tweak and go for not two, but three monitors! This is the setup I use in my office, and it rocks. I have Word on one monitor, reference materials or whatever on a second monitor, and Outlook on the third. It’s almost scary how productive this setup makes me.
How does this work? The secret is that you have to install a second video card on your system. However, you can’t just plop any old video card in there and hope things will work. Instead, you need to use video cards that come with dual-GPU (graphics processing unit) support. Both ATI and NVIDIA offer dual-GPU technologies:
• ATI CrossFire—ATI’s dual-GPU technology is called CrossFire. To use it, you need a motherboard with a CrossFire-compatible chipset and two free PCI Express slots that are designed for CrossFire, as well as two CrossFire-capable video cards from the same Radeon chipset family (for example, two Radeon X1950 cards from any manufacturer). Figure 18.3 shows two video cards connected with a CrossFire bridge. To learn more about CrossFire-compatible equipment, see http://ati.amd.com/technology/crossfire/.
FIGURE 18.3 Two ATI video cards connected with a CrossFire bridge.

• NVIDIA SLI—NVIDIA’s dual-GPU technology is called scalable link interface (SLI). To use it, you need a motherboard with an SLI-compatible chipset and two free PCI Express slots designed for SLI, as well as two SLI-capable video cards that use the same NVIDIA chipset (for example, two GeForce 8800 GTS cards from any manufacturer). To learn more about SLI-compatible equipment, see http://sg.slizone.com/.
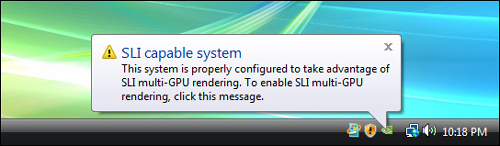
Each of these video cards has two output ports, so you have a total of four ports to use. After you get the cards installed, you run VGA or DVI cables from three of those ports (or four, if you want to go all the way and use four monitors) to the corresponding ports on your monitors. When you next start Windows, install the video card drivers. Note that if you’re using Windows Vista, you’ll likely see a message similar to the one shown in Figure 18.4. Click the message and then look for the option that enables either CrossFire or SLI.
FIGURE 18.4 Click this message to enable (in this case) SLI on your PC.
Now you’re ready to configure Windows to extend the desktop across all your monitors. Here are the steps to follow:
1. Make sure all your monitors are connected and turned on.
2. Open the display settings:
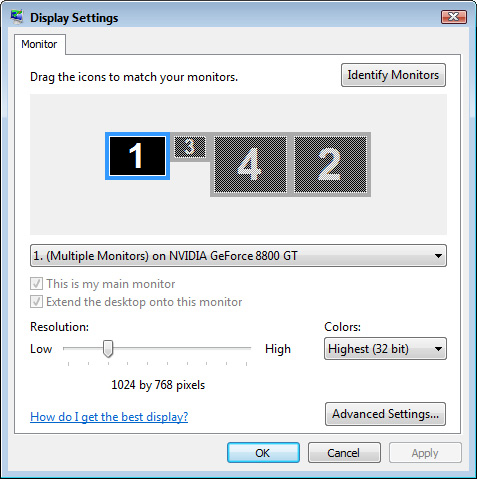
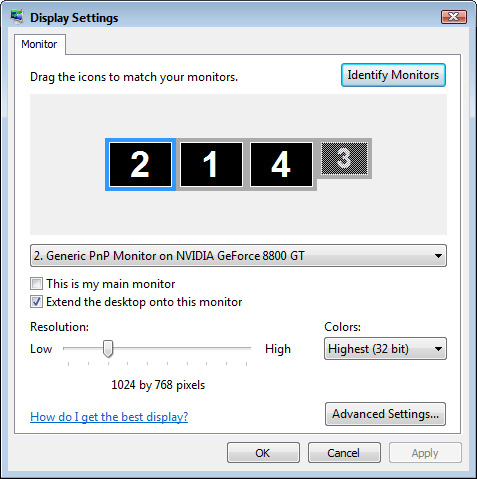
• Windows Vista—Right-click the desktop, click Personalize, and then click Display Settings. Figure 18.5 shows the Display Settings dialog box that appears. The four icons represent the four output ports of the video cards.
FIGURE 18.5 Use the Display Settings dialog box to configure your multiple-monitor setup.
• Windows XP—Right-click the desktop, click Properties, and then click the Settings tab.
3. Click the icon for the monitor you want to add.
4. Activate the Extend the Desktop Onto This Monitor check box.
5. Click Apply. Windows asks if you want to keep the new setting.
6. If you see the desktop on one of your monitors, it means it was added successfully, so click Yes; otherwise, click No and try another.
7. Repeat steps 3–6 to add your other monitors to the desktop.
8. Click and drag the monitor icons to the orientation you prefer. For example, you might want your main monitor (the monitor that holds the taskbar) in the middle and the other two monitors on either side. Figure 18.6 shows just such a setup: the main monitor (1) is flanked by the two other monitors (2 and 4).
FIGURE 18.6 Click and drag the monitor icons into the arrangement you want.
9. Adjust the resolution for each monitor, as desired.
10. Click OK.