
CHAPTER 22 Customizing Video
With average hard drives now weighing in at hundreds of gigabytes and terabyte hard drives becoming more and more commonplace, we suddenly find ourselves in the unusual position of having a lot more hard disk space than we can use. This, of course, is but a temporary situation. Parkinson’s Law of Data tells us that “data expands to fill the space available,” so before long even terabyte drives will begin to seem cramped. How is that possible? One word: video. Movies and recorded TV shows are multigigabyte monsters that threaten to swamp even the largest hard disks.
This chapter can help prevent that from happening (or, realistically, slow it down a bit) by showing you how to record shows to a remote location, remove ads, and compress videos so they take up less space.
Record TV Shows to a Network Location
![]()
When you record TV in Windows Media Center, the program stores the resulting files—which use the Microsoft Recorded TV Show file type with the .dvr-ms extension—in the following folder:
• Windows Vista —%SystemDrive%UsersPublicRecorded TV
• Windows XP Media Center Edition—%SystemDrive%Documents and SettingsShared DocumentsRecorded TV
If you want to give other people access to your recorded shows, you must share the Recorded TV folder. That’s not a big problem if you’re dealing with one folder, but what if you want to share recorded TV from several machines? Even if you go to the trouble of sharing all those other folders, you’re still left with the problem of trying to figure out which folder holds the TV shows you want.
A much better idea is to set up a Recorded TV folder on a single network share and record all TV shows to that share. Unfortunately, this is not as simple as tweaking a folder value, because Media Center has no such setting. However, by modifying some Media Center services and Registry settings, you can get it done.
Here are the steps to follow:
1. On the Media Center computer, log on with a user who uses the Administrator account type.
2. Make sure this same user has Full access to the network share you’re going to use.
3. On the Media Center computer, select Start, right-click Computer, and click Manage. In Vista, enter your User Account Control credentials to continue. The Computer Management snap-in appears.
4. Select Services and Applications, Services.
5. Double-click the Windows Media Center Extender Service to open the service’s property sheet.
6. Display the Log On tab.
7. In the This Account text box, type the name of the user account from step 1.
8. Type the user’s password into the Password and Confirm Password text boxes.
9. Click OK. (If you see a dialog box confirming that the user has been granted Log On as Service rights, click OK.)
10. Repeat steps 5–9 for the Windows Media Center Receiver Service and the Windows Media Center Scheduler Service.
11. Because these two services in step 10 are started, in each case Windows warns you that you must stop and restart the service to put the new user into effect. To do that, for each of those services, select it in the Services list, click the Stop link, and then click the Start link.
12. On the network computer, create a subfolder to hold your recorded TV shows. For best results, use a folder name without spaces, such as RecordedTV.
13. Return to the Media Center computer, press Windows Logo+R to open the Run dialog box, type regedit, and click OK to start the Registry Editor. (You’ll need to enter your UAC credentials in Vista to continue.)
14. Navigate to the following key:
HKLMSOFTWAREMicrosoftWindowsCurrentVersionMedia CenterServiceRecording
15. Double-click the RecordPath setting and change its value to the UNC path to the Windows Home Server folder you created in step 12.
16. If you don’t see a WatchedFolders setting, select Edit, New, String Value, type WatchedFolders, and press Enter.
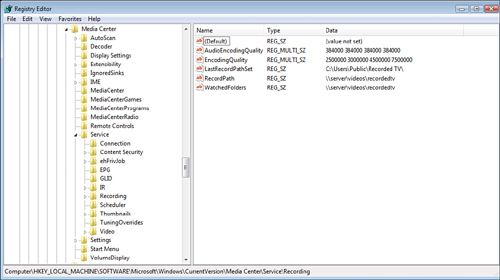
17. Double-click the WatchedFolders setting and change its value to the UNC path to the Windows Home Server folder you created in step 12. Figure 22.1 shows the resulting Registry values.
FIGURE 22.1 To get Media Center to record to a network share, you need to make a couple of Registry tweaks.
18. Reboot the Media Center computer.
When you return to Windows, all future TV recordings will go straight to the network share.
Edit Ads from a Recorded TV Show

If you have a TV tuner in your PC, you can connect a cable or other signal to the tuner and then use Media Center to record TV shows to your hard drive. You can then play back the TV shows at your leisure. If you have a Media Center remote control, you can skip through the commercials lickety-split. That’s a reasonable option for shows that you’re only going to watch once and then trash, but what about shows you plan to watch multiple times? Or what about a longer recording such as a movie that has lots of commercial breaks?
In these cases, you can improve your viewing experience immeasurably by editing the commercial from the recording. That sounds like a lot of work, but with the version of Windows Movie Maker that comes with Vista, all it takes is a few mouse clicks.
Here are the steps to follow:
1. Select Start, All Programs, Windows Movie Maker to open the Movie Maker program.
2. Click Import Media.
3. Open the %SystemDrive%UsersPublicRecorded TV folder, click the TV show you want to edit, and then click Import. Movie Maker adds the TV show to the Imported Media list.
4. Select View, Timeline (or Press Ctrl+T).
5. Click and drag the TV show icon and drop it in the Video section of the timeline.
6. Locate the next commercial break.
7. Click in the time portion of the timeline at the beginning of the commercial break. Movie Maker adds a green box at the location.
8. Select Clip, Split. (You can also just press M or click the Split button.) Movie Maker splits the video into two clips: one that ends at the beginning of the commercial break and a second that starts at the beginning of the commercial break.
9. Click in the time portion of the timeline at the end of the commercial break. Movie Maker adds a green box at the location.
10. Select Clip, Split (or press M or click the Split button). Movie Maker splits the video into three clips, where the middle clip consists of the commercial break, as shown in Figure 22.2.
FIGURE 22.2 Split the TV show in three clips, where the middle clip consists of the commercial break you want to remove.

11. Right-click the clip that contains the commercials, and then click Remove. (You can also click the clip and then press Delete.) Movie Maker deletes the commercials.
12. Repeat steps 6–11 to remove all the commercial breaks in the TV show.
13. Click Publish Movie. Movie Maker launches the Publish Movie wizard.
14. Click This Computer and then click Next.
15. Enter a File Name for the movie, use the Browse button to select a folder (such as %userProfile%Videos or %SystemDrive%UsersPublicPublic Videos), and then click Next.
16. Choose the Best Quality for Playback on My Computer option. (See the next section for a closer look at the options on this page.)
17. Click Publish. Movie Maker publishes the movie.
18. Click Finish.
Compress Video Files to Save Space
![]()
If you’re managing a large collection of video files and you’re worried about them usurping all your hard disk space, there are a number of solutions you can try:
• Delete any videos you no longer need.
• Move some videos to a network location.
• Edit large videos to remove content you don’t need (such as the commercials that I showed you how to edit out in the previous tweak).
• Burn some videos to DVD and then delete them from your hard disk.
• Give up and just add more hard disk space.
If none of these options is quite right for you, there’s yet another you can try: Compress the videos. I’m not talking about using NTFS file compression, because that won’t have much effect on most videos (which are already compressed a certain amount). Instead, I’m talking about changing the videos to a format that uses more compression, or that uses lower-quality settings.
With an image, you can load the file into Paint or some other graphics program, run the Save As command, and then choose a different file format. Videos are a bit different because they must be encoded, and that takes quite a bit of effort. However, it’s still possible to choose a different format if you use Movie Maker to publish the video.
Here are the steps to follow:
1. Select Start, All Programs, Windows Movie Maker to open the Movie Maker program.
2. Click Import Media.
3. Open the folder that contains the video you want to compress, and then click Import. Movie Maker adds the video to the Imported Media list.
4. Select View, Timeline (or Press Ctrl+T).
5. Click and drag the TV show icon and drop it in the Video section of the timeline.
6. Click Publish Movie. Movie Maker launches the Publish Movie wizard.
7. Click This Computer and then click Next.
8. Enter a File Name for the movie, use the Browse button to select a folder, and then click Next.
9. You have two ways to go from here:
• Compress To—Choose this option and then use the text box to type the number of megabytes you want the final video file to be. (If you want to really compress the file, choose KB in the list.) Whatever number you enter, Movie Maker reduces the bit rate and possibly also the frames per second to achieve the desired size. Skip to step 11.
• More Settings—Choose this option if you want to use a predefined format, which I describe in step 10.
10. If you selected the More Settings option, choose one of the formats in the associated drop-down list. To help you choose, Table 22.1 summarizes the formats and compares the bit rates, frame rates, and frame sizes. The formats are sorted by how much disk space each one takes up per minute of video.
Table 22.1 Comparing the Video Formats Available with Movie Maker’s Publish Movie Wizard

11. Click Publish. Movie Maker publishes the movie.
12. Click Finish.