
CHAPTER 17 Giving Windows a Makeover
A time suck is any activity that uses up large amounts of time. One of the great time sucks of our age is Windows and its all-but-innumerable options for customizing the interface. You can fiddle with the fonts, dabble with the desktop, and customize the colors till your mouse arm aches and the sound of your deadlines whooshing by is but a distant memory.
I keep my customizations in check by applying a simple rule in advance: If the interface tweak won’t make me more productive or efficient, I move on to more useful pursuits. Harsh? Perhaps, but I never miss a deadline!
So in this chapter and the next you won’t find any cute customizations. We’re all business as I show you a half dozen tweaks that should make your work with Windows easier and more efficient.
Hide Some (or Even All) Notification Area Icons
![]()
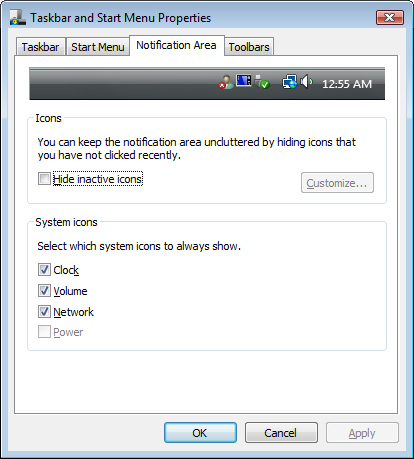
For most people, the notification area on the right side of the taskbar is either really useful or is a complete waste of otherwise useful taskbar space. You’re more likely to fall into the latter camp if your notification area is bristling with icons, as shown in Figure 17.1.
FIGURE 17.1 An out-of-control notification area.

If your notification area is threatening to take over the taskbar, or if you find you never use some or all of the icons, this tweak shows you how to reduce the space used by the notification area.
To get started, right-click an empty part of the taskbar, and then click Properties to open the Taskbar and Start Menu Properties dialog box. In Windows Vista, display the Notification Area tab (see Figure 17.2); in Windows XP, display the Taskbar tab.
FIGURE 17.2 In Windows Vista, use the Notification Area tab to customize the notification area.
To help reduce notification area clutter and make this part of the taskbar more useful, you can do two things:
• Activate the Hide Inactive Icons check box. When this check box is activated, Windows hides notification area icons that you haven’t used for a while. This gives the taskbar a bit more room to display program buttons, so leave this option activated if you don’t use the notification area icons all that often.
• (Windows Vista only) In the System Icons group, deactivate the check box for each icon you don’t use: Clock, Volume, Network, or Power (enabled on notebooks only).
• (Windows XP only) Deactivate the Show the Clock check box to remove the clock from the notification area.
If your notification area is crowded with icons, it’s inefficient to display all the icons if you use only a few of them. Instead of showing them all, activate the Hide Inactive Icons check box and click Customize. You now have a couple of choices:
• For the icons you use often, click the item’s Behavior column and then click Show in the list that appears. This tells Windows to always display the icon in the notification area.
• For icons you never use, click Hide, instead, which tells Windows to never display the icon in the notification area.
To minimize the amount of screen real estate used by the notification area, you must do three things:
1. Deactivate all the system icons.
2. Activate the Hide Inactive Icons check box.
3. Set every icon’s Behavior value to Hide.
This works well enough, but it suffers from a couple of problems: Windows still shows the “chevron” that you click to display the hidden icons; and you’ll probably need to keep hiding icons as you install new applications.
If that all sounds like way to much work, you can disable the notification area entirely by following these steps:
1. Select Start, type gpedit.msc, press Enter, and then enter your UAC credentials. (In Windows XP, select Start, Run, type gpedit.msc, and click OK.) The Group Policy Editor appears.
2. Open the User Configuration branch.
3. Open the Administrative Templates branch.
4. Click the Start Menu and Taskbar branch.
5. Double-click the Hide the Notification Area policy, click Enabled, and then click OK.
6. Double-click the Remove Clock from the System Notification Area policy, click Enabled, and then click OK.
7. Log off and then log back on to put the policy into effect.
If you prefer (or need) to implement this policy via the Registry, first open the Registry Editor (in Vista, click Start, type regedit, press Enter and enter your UAC credentials; in XP, select Start, Run, type regedit, and click OK). Navigate to the following key:
HKCUSoftwareMicrosoftWindowsCurrentVersionPoliciesExplorer
(If you don’t see the Explorer key, click the Policies key, select Edit, New, Key, type Explorer, and press Enter.)
Now follow these steps:
1. Select Edit, New, DWORD (32-bit) Value.
2. Type NoTrayItemsDisplay and press Enter.
3. Press Enter to open the NoTrayItemsDisplay setting, type 1, and then click OK.
4. Select Edit, New, DWORD (32-bit) Value.
5. Type HideClock and press Enter.
6. Press Enter to open the HideClock setting, type 1, and then click OK.
7. Log off and then log back on to put the policies into effect.
Get Control of Taskbar Grouping
![]()
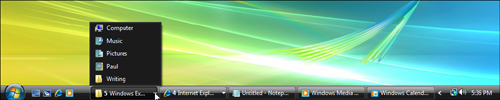
Taskbar grouping means that when the taskbar fills up with buttons, Windows looks for programs that have multiple open windows, and it consolidates those window icons into a single button, as shown in Figure 17.3. The number on the left side of the button tells you how many windows are open. To access one of these grouped windows, you click the button and then click the window you want.
FIGURE 17.3 When the taskbar gets filled with buttons, Windows groups similar windows into a single button, as shown here with Windows Explorer and Internet Explorer.
The grouping feature makes it easier to read the name of each taskbar button, but the price is a slight efficiency drop because it takes two clicks to activate a window instead of one. If you don’t like this trade-off, you can disable the grouping feature by following these steps:
1. Right-click the taskbar and then click Properties.
2. Display the Taskbar tab.
3. Deactivate the Group Similar Taskbar Buttons check box.
4. Click OK.
Alternatively, you can tweak the grouping feature to suit the way you work. You do this by tweaking the Registry, as detailed in the following steps:
1. Select Start, type regedit, press Enter, and then enter your UAC credentials. (In Windows XP, select Start, Run, type regedit, and click OK.) The Registry Editor appears.
2. Navigate to the following key:
HKCUSoftwareMicrosoftWindowsCurrentVersionExplorerAdvanced
3. Select Edit, New, DWORD (32-bit) Value.
4. Type TaskbarGroupSize and then press Enter.
5. Press Enter to open the TaskbarGroupSize setting for editing.
6. Use the Value Data text box to enter one of the following values:
• 0—When the grouping kicks in (that is, when the taskbar gets full), Windows groups the buttons from only the applications that you have used the least.
• 1—When the grouping kicks in, Windows groups the buttons from only the application that has the most windows open. If a second application surpasses the number of open windows in the first application, the second application’s windows are grouped as well (that is, the first application’s windows remained grouped).
• x—Windows groups any application that has at least x windows open, where x is a number between 2 and 99. Note that the grouping occurs even if the taskbar is not full.
7. Log off and then log back on to put the new setting into effect.
Turn Off Vista’s Aero Interface
![]()
A lot of the prerelease and post-release Vista hoopla was centered on the new Aero interface, which offers plenty of eye candy:
• Aero Glass—This is the new look of Vista’s windows, controls, and other elements. The “Glass” part means that for systems with relatively high-end graphics capabilities, the Vista window title bars and borders have a transparency effect.
• Window thumbnails—These are scaled-down versions of windows and documents. For supported file types, these thumbnails are “live,” which means they reflect the current content of the window or document. For example, in folder windows, the icon for a PowerPoint presentation shows the first slide, and an icon for an image file shows the image. Similarly, a Windows Media Player thumbnail shows live content, such as a running video.
• Flip and Flip 3D—When you hold down Alt and press Tab, Vista displays not an icon for each open window, but a thumbnail for each window. Each time you press the Tab key, Vista “flips” to the next window (hence the name of this new feature: Flip). You can also press Windows Logo+Tab to organize the open windows in a 3D stack. Pressing the arrow keys or scrolling the wheel mouse flips you from one window to another (this feature is called Flip 3D).
• Taskbar thumbnails—The live thumbnails idea also extends to the taskbar. If you mouse over a taskbar button, Vista displays a live thumbnail for the window associated with the button.
Except for the glass effect (which seems completely useless to me), these Aero features are worthwhile additions to the interface. Or perhaps I should say they’re worthwhile additions provided you have a powerful graphics card is stuffed with lots of graphics RAM. Otherwise, even if the video card is capable of running Aero, it may not run Aero well, and that can slow you down.
If Aero is acting like an anchor on your system’s graphics, shut it off by following these steps:
1. Right-click the desktop and then click Personalize. The Personalization window appears.
2. Click Window Color and Appearance.
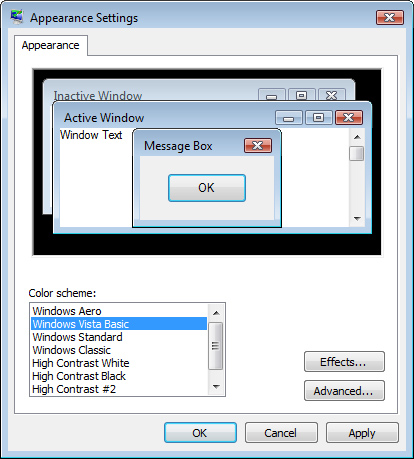
3. Click Open Classic Appearance Properties for More Color Options. The Appearance Settings dialog box appears.
4. Select Windows Vista Basic, as shown in Figure 17.4.
FIGURE 17.4 To get rid of Aero, choose the Windows Vista Basic color scheme.
5. Click OK to put the new interface color scheme into effect.