
CHAPTER 33 More Program Tweaks
In this chapter I’ll continue with the program-related tweaks and techniques. These tweaks are a bit more obscure, but you never know when this stuff will come in handy. You learn how to make an application run on a single processor or core; how to remove even hidden Windows components from your system; how to force Windows to shut down malfunctioning programs right away; how to write a list of all your installed applications to a text file; and how to get a broken service back on its feet.
Restrict a Program to a Single CPU
![]()
The processor core (short for execution core) refers to the actual processing unit that performs all the tasks a CPU is asked to handle. Until recently, the terms core and processor were equivalent because all CPUs contained just one core. In early 2005, however, Intel changed everything by introducing the Pentium D and the Pentium Extreme Edition, both of which somehow managed to shoehorn two cores into a single chip. Older CPUs were now described as single core, and these newfangled processors were described as dual core.
Does dual core mean twice the performance? Well, yes and no:
• Yes, because the processor can now divide tasks between applications among the cores (a process Intel calls HyperThreading). So if you’re, say, compressing a large file, the processor can hand off that task to one core, and the other core is free to handle tasks from other programs.
• No, because the processor usually can’t divide tasks within an application among the cores. For example, if you’re compressing a large file, you won’t be able to do anything else with that program until that task is complete. Note that it is possible to program individual applications to take advantage of two cores, and we’re starting to see more of this as dual-core processors become mainstream.
However, there are times when you definitely do not want a program to utilize both cores. For example, if a program requires a lot of CPU resources, it might end up monopolizing both cores, which can slow the rest of your PC chores to a frustrating crawl. Similarly, many older programs don’t play well with dual-core CPUS, and they may lock up (or appear to lock up by using 100 percent of the CPU resources).
To work around these sorts of problems, you can tell Windows to give the program access to just a single core. The program’s performance might drop (but only slightly because it still has full access to a single core), but your overall PC performance should be noticeably faster.
Controlling which cores a program can access is called setting the processor affinity, and you do it by following these steps:
1. Launch the program you want to work with.
2. Press Ctrl+Alt+Delete to open the Windows Security screen and then click the Start Task Manager link.
3. Display the Processes tab.
4. Right-click your application’s process to display its shortcut menu.
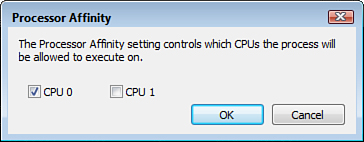
5. Click Set Affinity. (No Set Affinity command? Then your PC comes with only a single core. Too bad.) Task Manager displays the Processor Affinity dialog box.
6. Deactivate one of the check boxes, as shown in Figure 33.1.
FIGURE 33.1 Deactivate a CPU check box to restrict a program to a single core.
7. Click OK.
Remove Hidden Windows Components
![]()
If you’re trying to clean house on your Windows XP PC, you might decide to uninstall some accessories that you never use. So you select Start, Control Panel, Add or Remove Programs, and click Add/Remove Windows Components to run the Windows Components Wizard. To get to the accessories, you double-click Accessories and Utilities, then double-click Accessories. Figure 33.2 shows the Accessories dialog box that appears.
FIGURE 33.2 The Accessories dialog box lets you choose which XP accessories you want to remove.
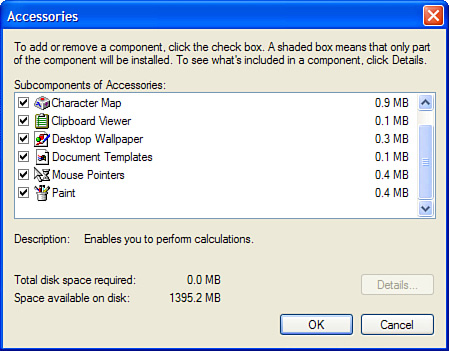
This dialog box enables you to delete Calculator (not shown), Character Map, Clipboard Viewer, Desktop Wallpaper, Document Templates, Mouse Pointers, and Paint. However, where’s WordPad? And how do you blow away useless accessories such as HyperTerminal and Phone Dialer?
These and a few other XP accessories are configured as hidden, so you don’t see them in the Windows Components Wizard. However, it’s possible to tweak XP to show these hidden accessories so you can uninstall them. Here’s how:
1. Run Windows Explorer and navigate to %SystemRoot%inf (where %SystemRoot% is usually C:Windows).
2. Right-click the sysoc.inf file, click Open With, click Notepad, and then click OK.
3. Locate the accessory you want to uninstall. If it’s hidden, it appears with the HIDE parameter, as in this example for WordPad:
MSWordPad=ocgen.dll,OcEntry,wordpad.ing,HIDE,7
4. Delete just the HIDE text (leave the existing commas in place).
5. Repeat steps 3 and 4 for any other hidden accessories you want to uninstall:
• CommApps—Remove HIDE for this item to add the Communications component to the Windows Components Wizard. This enables you to uninstall Chat, HyperTerminal, and Phone Dialer.
• MultiM—Remove HIDE for this item to add the Multimedia component to the Windows Components Wizard. This enables you to uninstall Media Player, Sound Recorder, and Volume Control.
• AccessOpt—Remove HIDE for this item to add the Accessibility Wizard component to the Windows Components Wizard.
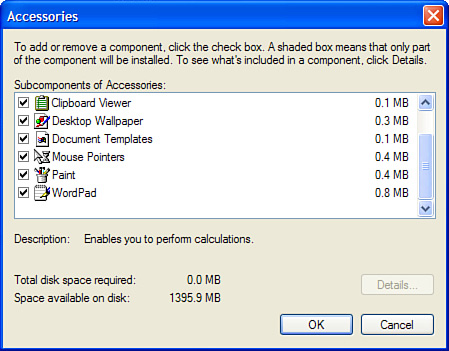
• MSWordPad—Remove HIDE for this item to add WordPad to the Windows Components Wizard, as shown in Figure 33.3.
6. Save and close the sysoc.inf file.
7. Run the Windows Components Wizard to uninstall the components.
FIGURE 33.3 The Accessories dialog box with WordPad no longer hidden.
Shut Down Hung Programs Automatically
![]()
When you log off, restart, or shut down, Windows sends a message to each running program to shut itself down. Windows then waits politely for the program to close. If it doesn’t, you see the End Task dialog box, which displays a message similar to the following:
This Windows application cannot respond to the End Task.
request. It may be busy, waiting for a response from you, or it
may have stopped executing
In some cases, you get three buttons:
• Wait—Click this button to have Windows give the program another five seconds to shut down.
• End Task—Click this button to shut down the program right away.
• Cancel—Click this button to bail out of the restart. This is the way to go if you know that the program is waiting for input from you (for example, to save changes to a file).
The problem is, Windows often waits quite a long time before displaying this message, which is annoying when a process hangs. It would be better if Windows XP simply killed hung programs automatically without wasting all that time.
Here’s how to tweak XP to do this:
1. Select Start, Run, type regedit, and click OK. The Registry Editor appears.
2. Navigate to the following key:
HKCUControl PanelDesktop
3. Double-click the AutoEndTasks setting.
4. Change the value from 0 to 1.
5. Click OK.
6. Double-click the HungAppTimeout setting.
7. Reduce the value from 20000 to 5000.
8. Click OK.
Write a Complete List of Installed Programs to a Text File
![]()
When you migrate to a new PC, most often you want to re-create the same setup as your old PC, and that means (in part) installing some or all of the same programs. Now I don’t know about you, but I routinely install dozens of programs on my main Windows PC, so there’s just no way that I can remember all of them (even back when I had a full complement of brain cells). Fortunately, I can get Windows to do the remembering for me by using a script that writes the name and version number of all my installed programs to a text file. Listing 33.1 shows the script.
Listing 33.1 A Script That Writes a Complete List of a PC’s Installed Programs to a Text File
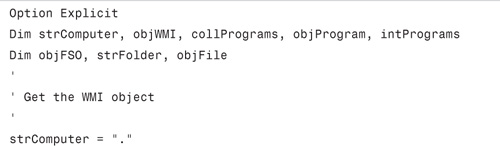
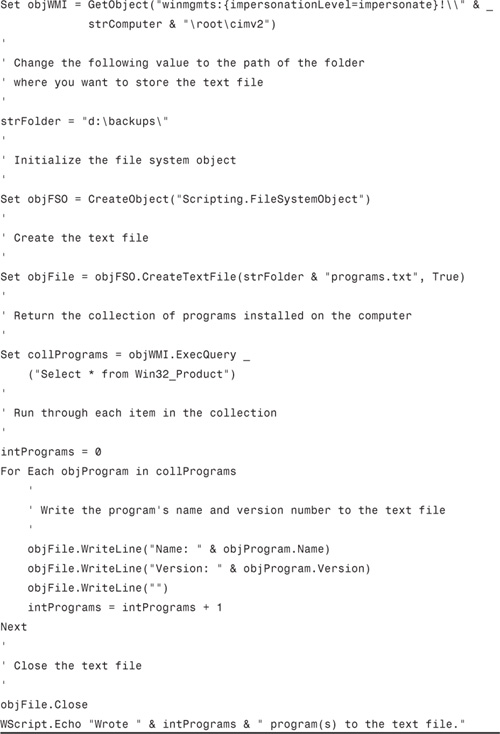
The script sets up the usual Windows Management Instrumentation (WMI) object and then uses VBScript’s FileSystemObject to get a hook into the PC’s file system. In this case, the script uses FileSystemObject to create a new text file in the folder specified by strFolder. The script uses WMI to return the collection of installed programs, and then a For Each...Next loop writes the name and version number of each installed program to the text file.
Reset a Broken Service
![]()
If Windows is acting erratically (or, I should say, if it’s acting more erratically than usual), the problem could be a service that’s somehow gotten corrupted. How can you tell? The most obvious clue is an error message that tells you a particular service isn’t running or couldn’t start. You can also check the Event Viewer for service errors. Finally, if a particular feature of Windows is acting funny and you know that a service is associated with that feature, then you might suspect that service is causing the trouble.
To fix the problem (hopefully!), you can reset the broken service, a procedure that involves the following four general steps:
1. Find out the name of the service that is (or that you suspect is) broken.
2. Delete the service.
3. Load a backup copy of the system hive into the Registry.
4. Copy the service from the backup hive copy to service’s actual Registry location.
To begin, follow these steps to determine the name of the service:
1. In Vista, select Start, type services, press Enter, and then enter your User Account Control credentials. (In XP, select Start, Run to open the Run dialog box, type services.msc, and click OK.) Windows opens the Services window.
2. Double-click the service you want to reset.
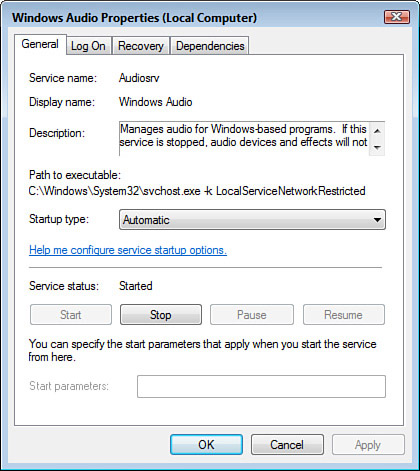
3. In the General tab, locate the Service Name value (see Figure 33.4) and make a note of it.
4. Click OK.
FIGURE 33.4 Open the service you want to reset and make note of the Service Name value.
Next, follow these steps to delete the service:
1. In Vista, select Start, type command, right-click Command Prompt in the result, click Run as Administrator, and then enter your User Account Control credentials. (In XP, select Start, Run to open the Run dialog box, type cmd, and click OK.) Windows opens a Command Prompt session.
2. Type the following (where service is the service name that you noted in the previous set of steps):
sc delete service
3. Press Enter. Windows attempts to delete the service.
If the deletion works properly, you see the following message:
[SC] DeleteService SUCCESS
Note that you’ll need the Command Prompt again a bit later, so leave the session open for now.
Now follow these steps to load a fresh copy of the system hive:
1. In Vista, select Start, type regedit, press Enter, and then enter your User Account Control credentials. (In XP, select Start, Run to open the Run dialog box, type regedit, and click OK.)
2. Select the HKEY_LOCAL_MACHINE key.
3. Select File, Load Hive to open the Load Hive dialog box.
4. Open the system backup file:
• Vista—%SystemRoot%system32configRegBackSYSTEM.OLD
• XP—%SystemRoot%
epairsystem.bak
5. Click Open. The Registry Editor prompts you for a key name.
6. Type reset and click OK.
You now have the backup copy of the system hive loaded into HKLM
eset key. Now you complete the operation by copying the service from this backup:
1. Return to the command prompt.
2. Type the following (where service is the service name that you noted in the first set of steps):
reg copy hklm
esetcontrolset001servicesservice![]() hklmsystemcurrentcontrolsetservicesservice /s /f
hklmsystemcurrentcontrolsetservicesservice /s /f
3. Press Enter. Windows copies the backup version of the service to the original Registry location.
4. Reboot your PC to put the change into effect.