
CHAPTER 15 Streamlining the Start Menu
The whole purpose of the Start menu is, as its name implies, to start things, particularly programs and documents. Yes, you can also launch these objects via shortcut icons on the desktop, but that’s not a great alternative because windows cover the desktop most of the time. So, if you want to get something going in Windows, the vast majority of the time you’re going to have to do it via the Start menu. The good news is that the Start menu is wonderfully flexible and geared, in fact, to launching objects with as few mouse clicks or keystrokes as possible. To get to that state, however, you have to work with a few relatively obscure options and settings, which you’ll learn about in this chapter.
Pin a Program to the Start Menu for Easy Access
![]()
The left side of the Start menu displays the favorite programs list, which includes the shortcut icons for the nine programs that you’ve used most frequently, plus the Internet and E-mail icons at the top. The latter two are fixed in place, so this part of the Start menu is called the pinned programs list.
The Start menu’s list of favorite programs is such a time-saving feature that it can be frustrating if a program drops off the list. Another aggravation is that the icons often change position because Windows displays the programs in order of popularity. When you display the Start menu, this constant shifting of icons can result in a slight hesitation while you look for the icon you want. (This is particularly true if you’ve expanded the maximum number of icons.) Contrast both of these problems with the blissfully static nature of the pinned programs list’s Internet and E-mail icons, which are always where you need them, when you need them.
You can get the same effect with other shortcuts by adding—or pinning—them to the pinned programs list. To do this, first open the Start menu and find the shortcut you want to work with. Then you have two choices:
• Right-click the shortcut and then click Pin to Start Menu.
• Drag the shortcut and drop it in the pinned programs list.
You can also use this technique to pin shortcuts residing on the desktop to the pinned programs lists. If you decide later that you no longer want a shortcut pinned to the Start menu, right-click the shortcut and then click Unpin from Start Menu.
Convert Start Menu Links to Menus
![]()
The right side of the Start menu contains a number of built-in Windows features, which are set up as links. That is, you click an item, and a window or a program runs in response. That’s fine for items such as Search or Help and Support, but it’s not very efficient for an item such as Control Panel where you’re usually looking to launch a specific icon. It seems wasteful to have to open the Control Panel window, locate the icon, launch it, and then close Control Panel.
A better approach is to convert a link into a menu of items that would normally display in a separate window. For example, the Control Panel item could display a menu of its icons. One of the nicer features in Windows is that it’s easy to convert many of the Start menu links into menus. Here are the required steps:
1. Right-click the Start menu and then click Properties to display the Taskbar and Start Menu Properties dialog box.
2. Select the Start Menu tab, make sure the Start Menu option is activated, and then click the Customize button to its right to open the Customize Start Menu dialog box.
3. In Windows XP, select the Advanced tab.
4. In the list of Start menu items, find the following items and activate the Display as a Menu option:
Computer (My Computer in XP)
Control Panel
Documents (My Documents in XP)
Games (Vista only)
Music (My Music in XP)
Personal folder (your username)
Pictures (My Pictures in XP)
Network Connections (XP only)
5. Activate the Favorites Menu check box to add a menu of your Internet Explorer favorites to the Start menu.
6. In the Start Menu Items group, find the System Administrative Tools item and activate the Display on the All Programs Menu and the Start Menu option. This gives you an Administrative Tools menu that offers shortcuts to features such as Computer Management, Device Manager, System Configuration, and the Local Security Policy editor.
7. (XP only) Make sure that the List My Most Recent Documents check box is activated. This adds the My Recent Documents menu to the Start menu, which displays the last 15 documents that you worked with.
8. Click OK to return to the Taskbar and Start Menu Properties dialog box.
9. (Vista only) Make sure that the Store and Display a List of Recently Opened Files check box is activated. This adds the Recent Items menu to the Start menu, which displays the last 15 documents that you worked with.
10. Click OK.
Make the Start Menu Appear More Quickly
![]()
If you’re into the instant gratification thing, this tweak’s for you. When you press the Windows Logo key, you might notice a slight delay before the Start menu appears. You also get delays when you hover the mouse over a menu item within the Start menu system. If you want your menus to appear right away, your wish is Windows’ command. Here’s what you do:
1. Select Start, type regedit, press Enter, and then enter your UAC credentials. (In Windows XP, select Start, Run, type regedit, and click OK.) The Registry Editor appears.
2. Navigate to the following key:
HKCUControl panelDesktop
3. Double-click the MenuShowDelay setting.
4. Reduce the value from 400 to 5.
5. Click OK.
6. Restart your PC to put the new setting into effect.
Prevent the Start Menu from Highlighting New Programs
![]()
One of the hardest things that novice Windows users have to figure out is where things end up on their systems. When they download a program, extract a file from an archive, or save a document attached to an email message, the resulting file ends up somewhere, and new users often have trouble finding it. This is also true when novices install a program. The setup routine seems to proceed without any fuss, but when it’s over the inexperienced user is often left staring at the same old desktop (unless the installation program added a desktop icon), with no clue about where the installed program “went.”
Windows attempts to solve this mystery by highlighting new additions to the Start menu, as shown in Figures 15.1 and 15.2. Novices can then follow the highlights to locate their new program. This is a useful idea, and it seems to help the inexperienced, and anything that makes Windows less impenetrable to the uninitiated is okay in my books.
FIGURE 15.1 Windows XP lets users know when new programs have been added to the Start menu.
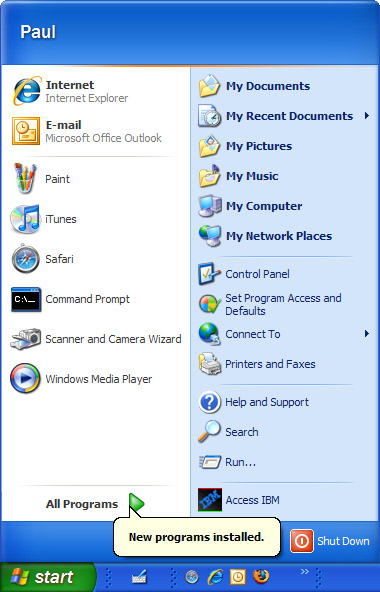
FIGURE 15.2 Both Windows Vista (shown here) and Windows XP highlight newly added Start menu items.

However, it’s not always okay on my PC. Like me, you may find the Start menu highlights annoying, distracting, and unnecessary because as an experienced user you know where programs go when you install them. Fortunately, you can configure Windows to not highlight new programs on the Start menu. It won’t make you a more efficient Windows user, but it will make you a happier Windows user.
Here are the steps to follow:
1. Right-click the Start menu and then click Properties to display the Taskbar and Start Menu Properties dialog box.
2. Select the Start Menu tab, make sure the Start Menu option is activated, and then click the Customize button to its right to open the Customize Start Menu dialog box.
3. In Windows XP, select the Advanced tab.
4. Click to deactivate the Highlight Newly Installed Programs check box. (In Vista, you find this check box in the list of Start menu items.)
5. Click OK to return to the Taskbar and Start Menu Properties dialog box.
6. Click OK.
Get Rid of Start Menu Icons You Don’t Use
![]()
The right side of the Start menu is loaded with predefined links to built-in components such as your user folder, Documents, Pictures, Control Panel, Help and Support, and more. If there are any of these links that you don’t use, it’s possible to configure Windows to remove them from the Start menu. This gives you a custom Start that’s less cluttered and easier to navigate.
Here are the steps to follow to remove unused icons from your Start menu:
1. Select Start, type gpedit.msc, press Enter, and then enter your UAC credentials. (In Windows XP, select Start, Run, type gpedit.msc, and click OK.) The Group Policy Editor appears.
2. Open the User Configuration branch.
3. Open the Administrative Templates branch.
4. Click the Start Menu and Taskbar branch.
5. Double-click the policy you want to work with:
• Remove All Programs list from the Start menu
• Remove and prevent access to the Shut Down, Restart, Sleep, and Hibernate commands (Vista)
• Remove and prevent access to the Shut Down command (XP)
• Remove Default Programs link from the Start menu.
• Remove Documents icon from Start Menu
• Remove Favorites menu from Start Menu
• Remove frequent programs list from the Start Menu
• Remove Games link from Start Menu
• Remove Help menu from Start Menu
• Remove Logoff on the Start Menu
• Remove Music icon from Start Menu
• Remove Network Connections from Start Menu
• Remove Network icon from Start Menu
• Remove Pictures icon from Start Menu
• Remove pinned programs list from the Start Menu
• Remove Recent Items menu from Start Menu
• Remove Run menu from Start Menu
• Remove Search Computer link
• Remove Search link from Start Menu
• Remove the “Undock PC” button from the Start Menu
• Remove user folder link from Start Menu
6. Click Enabled and then click OK.
7. Repeat steps 5 and 6 to implement other Start menu policies as needed.
8. Log off and then log back on to put the policies into effect.
If you prefer (or need) to implement these policies via the Registry, first open the Registry Editor (in Vista, click Start, type regedit, press Enter and enter your UAC credentials; in XP, select Start, Run, type regedit, and click OK). Navigate to the following key:
HKCUSoftwareMicrosoftWindowsCurrentVersionPoliciesExplorer
(If you don’t see the Explorer key, click the Policies key, select Edit, New, Key, type Explorer, and press Enter.)
For each policy you want to implement, you need to follow these steps:
1. Select Edit, New, DWORD (32-bit) Value.
2. Type the policy name and press Enter.
3. Press Enter to open the new Registry value.
4. Type 1 and click OK.
Table 15.1 lists the Start menu policies and their equivalent Registry settings.
Table 15.1 Start Menu Policies and Their Registry Equivalents

Remember to log off and then log back on to put the policies into effect.