CHAPTER 20 Modding Music
In many modern households, music is now an all-digital affair where the CDs have been packed away and the tunes now exist as digital files playable only on a PC or a portable digital music device, such as an iPod or Zune. My own music collection has been all-digital for quite a while, and I wouldn’t even consider going back to physical media.
Not that I eschew CDs altogether. I still purchase them for albums I really like because I get complete control over how I copy that music to my PC (pending whatever digital rights management hurdles have to be cleared).
Whether you’re in the process of digitizing your music collection, or you’re just copying the odd CD that comes your way, the first couple of tweaks in this chapter will be right up your alley because they show you some neat music copying tricks. You also learn how to share your media library over your network so that everyone can enjoy easy access to all that good tuneage.
Rip It Your Way with Custom Rip Settings
![]()
Windows Media Player comes with the welcome capability to copy (rip in the vernacular) tracks from an audio CD to your computer’s hard disk. Although this process is straightforward (insert the CD and click the Rip button), you need to take into account several options before you start copying. These options include the location of the folder in which the ripped tracks will be stored, the structure of the track filenames, the file format to use, and the quality (bit rate) at which you want to copy the tracks. You control all these settings in the Rip Music tab of the Options dialog box (press Alt and then select Tools, Options to get there).
Selecting a Location and Filename Structure
The Rip Music to This Location group displays the name of the folder that will be used to store the copied tracks. By default, this location is %USERPROFILE%Music in Windows Vista (it’s %USERPROFILE%My Music in Windows XP). To specify a different folder (for example, a folder on a partition with lots of free space), click Change and use the Browse for Folder dialog box to choose the new folder.
The default filenames that Windows Media Player generates for each copied track use the following structure:
Track_Number Song_Title.ext
Here, Track_Number is the song’s track number on the CD, Song_Title is the name of the song, and ext is the extension used by the recording format (such as WMA or MP3). Windows Media Player can also include additional data in the filename, such as the artist name, the album name, the music genre, and the recording bit rate. To control which of these details the name incorporates, click the File Name button in the Rip Music tab to display the File Name Options dialog box, shown in Figure 20.1. Activate the check boxes beside the details you want in the filenames, and use the Move Up and Move Down buttons to determine the order of the details. Finally, use the Separator list to choose which character to use to separate each detail.
FIGURE 20.1 Use the File Name Options dialog box to specify the details you want in the filename assigned to each copied audio CD track.

Choosing the Recording File Format
Prior to version 10, Windows Media Player supported only a single file format: WMA (Windows Media Audio). This is an excellent music format that provides good quality recordings at high compression rates. If you plan to listen to the tracks only on your computer or on a custom CD, the WMA format is all you need. However, Windows Media Player 11 (which comes with Vista and is an upgrade in XP) supports a number of formats:
• Windows Media Audio (WMA)—This is Windows Media Player’s default audio file format. WMA compresses digital audio by removing extraneous sounds that are not normally detected by the human ear. This results in high-quality audio files that are a fraction of the size of uncompressed audio.
• Windows Media Audio Pro (WMA Pro)—This version of WMA can create music files that are smaller than regular WMA and so are easier to play on mobile devices that don’t have much room.
• Windows Media Audio (variable bit rate)—This version of WMA is a bit “smarter” in that it changes the amount of compression depending on the audio data: If the data is more complex, it uses less compression to keep the sound quality high; if the data is less complex, it cranks up the compression.
• Windows Media Audio Lossless—This version of WMA doesn’t compress the audio tracks at all. This gives you the highest possible audio quality, but it takes up much more space (up to about 400MB per CD).
• MP3—This is a popular format on the Internet. Like WMA, MP3 compresses the audio files to make them smaller without sacrificing quality. MP3 files are generally about twice the size of WMA files, but more digital audio players support MP3 (although not many more, these days).
• WAV—This is an uncompressed audio file format that is compatible with all versions of Windows, even going back to Windows 3.0.
However, if you have an MP3 player or other device that might not recognize WMA files (although most do, unless you’re one of the billions with an iPod), you should use the MP3 recording format.
Use the Format list in the Rip Music tab to choose the encoder you want to use. Note that if you select any Windows Media Audio format, the Copy Protect Music check box becomes enabled. Here’s how this check box affects your copying:
• If Copy Protect Music is activated, Media Player applies a license to each track that prevents you from copying the track to another computer or to any portable device that is SDMI-compliant (SDMI is the Secure Digital Music Initiative; see www.sdmi.org for more information). Note, however, that you are allowed to copy the track to a writeable CD.
• If Copy Protect Music is deactivated, there are no restrictions on where or how you can copy the track. As long as you’re copying tracks for personal use, deactivating this check box is the most convenient route to take.
Specifying the Quality of the Recording
The tracks on an audio CD use the CD Audio Track file format (.cda extension), which represents the raw (uncompressed) audio data. You can’t work with these files directly because the CDA format isn’t supported by Windows and because these files tend to be huge (usually double-digit megabytes, depending on the track). Instead, the tracks need to be converted into a Windows-supported format (such as MP3 or WMA). This conversion always involves compressing the tracks to a more manageable size. However, because the compression process operates by removing extraneous data from the file (that is, it’s a lossy compression), there’s a trade-off between file size and music quality. That is, the higher the compression, the smaller the resulting file, but the poorer the sound quality. Conversely, the lower the compression, the larger the file, but the better the sound quality. Generally, how you handle this trade-off depends on how much hard disk space you have to store the files and how sensitive your ear is to sound quality.
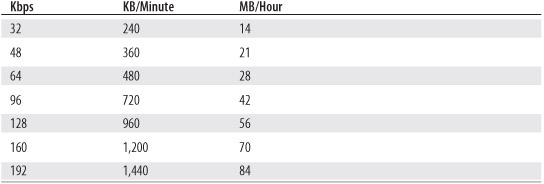
The recording quality is usually measured in kilobits per second (Kbps; this is called the bit rate), with higher values producing better quality and larger files, as shown in Table 20.1. To specify the recording quality, use the Audio Quality slider in the Rip Music tab. Move the slider to the right for higher-quality recordings, and to the left for lower quality.
Table 20.1 Ripping Bit Rates and the Disk Space They Consume
Rip Music to a Network Location
![]()
When you rip music from an audio CD in Windows Media Player, the resulting digital audio files are stored in a subfolder of your user profile’s Music folder (in Windows Vista) or My Music folder (in Windows XP). If you then want to give other people access to your music, you must share the music folder. That’s not a big problem if you’re dealing with one music folder, but what if you want to share music from several machines? Even if you go to the trouble of sharing all those other music folders, you’re still left with the problem of trying to figure out which folder holds the music you want.
A much better idea is to set up a music folder on a single network share and rip all music to that share.
Here are the steps to follow to change Media Player’s rip location to a shared network folder:
1. If you haven’t done so already, enable sharing on the network folder that you want to use.
2. In Windows Media Player, press Alt to display the menu bar, select Tools, Options, and then click the Rip Music tab.
3. In the Rip Music to This Location group, click Change to open the Browse for Folder dialog box.
4. Select the shared network folder that you created in step 1, and then click OK to return to the Options dialog box.
5. Click OK to put the new setting into effect.
Share Media Over Your Network
![]()
If you’re using your Windows PC as the central storage location for your network’s media files, you’ll want to share that media with the rest of the users on your network. One way to do that is to share the media folders directly. However, Windows Media Player 11 gives you a second option: media sharing.
The idea behind media sharing is simple. As you might know, it can take quite a while to set up and customize a Media Player Library just the way you like it with playlists, album art, views, and other features. If you want other people to see and use the same setup, it’s way too much work to configure each computer’s Media Player separately. Fortunately, you don’t have to bother with all that because the media sharing feature enables you to share your Media Player library with other network users or devices, just as you’d share a folder or a printer.
To activate media sharing, follow these steps:
1. On the Windows computer that you’re using as a digital media hub, launch Windows Media Player by selecting Start, All Programs, Windows Media Player.
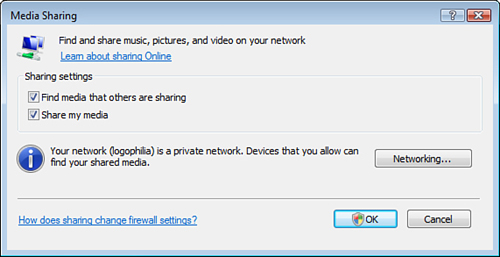
2. Pull down the Library tab’s menu and select Media Sharing. The Media Sharing dialog box appears.
3. Click to activate the Share My Media check box, as shown in Figure 20.2.
FIGURE 20.2 Activate the Share My Media check box to turn on Media Player’s media sharing feature.
4. Click OK. The User Account Control dialog box appears.
5. Enter your UAC credentials to continue. Media Player expands to show the devices connected to Media Player (see Figure 20.5, later in this section).
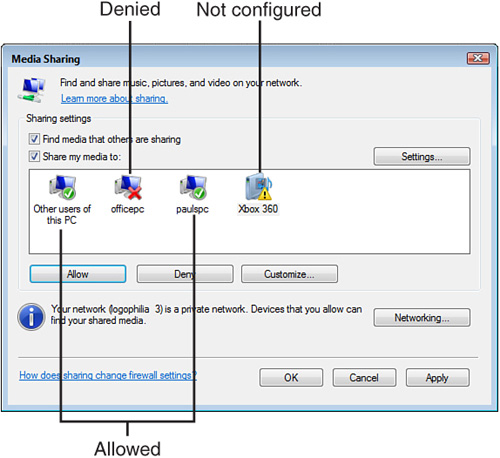
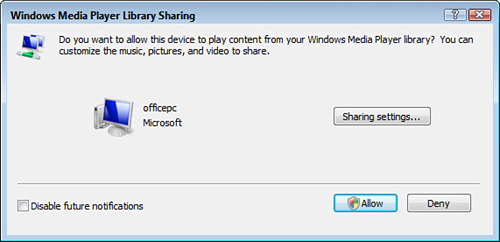
When computers or devices connect to your network, Media Player recognizes them and displays an icon in the notification area. Place your cursor over the icon to see the message Windows Media Player found: computer, where computer is the name of the new computer or device (see Figure 20.3). Double-click the message to open the Windows Media Player Library Sharing dialog box shown in Figure 20.4. Then click either Allow (if you want the computer or device to share your media) or Deny (if you don’t).
FIGURE 20.3 Media Player displays this message when it detects a new computer or device connected to your network.
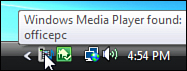
FIGURE 20.4 You can allow or deny other computers and devices access to your media library.
To control media sharing, display the Media Sharing dialog box again. This time, you see the configuration shown in Figure 20.5. The large box in the middle lists the network computers and devices that Media Player has detected. In each case, click an icon and then click either Allow or Deny. If you allow an item, you can also click Customize to specify exactly what you want to share based on three criteria: media types, star ratings, and parental ratings. Deactivate the Use Default Settings check box, and then use the controls to customize what you want to share.
FIGURE 20.5 Use the Media Sharing dialog box to allow or deny other network devices access to your Media Player library.