
CHAPTER 3 Indispensable Interface Tweaks
I don’t think I’m going out on much of a limb by claiming that everybody customizes the Windows interface in some way. Whether it’s changing the desktop wallpaper, configuring a screensaver, or changing the Windows theme, we all like to put our personal stamp on the Windows look and feel.
I’m a dedicated customizer myself, particularly with any machine that’s earmarked for personal use. I also usually have anywhere from four to six “bench” machines that I use for testing, experimenting, and creating the screenshots that you see in my books. Those machines I prefer to leave “as is” so that I can write about Windows with a “pure” setup. However, on all those machines, as well as on my personal PCs, there’s a series of customizations that I simply must run to make the computers more efficient and more usable. I perform these customizations as soon as I get to the desktop for the first time after Windows Setup completes its labors. These are my indispensable interface tweaks, and they’re the subject of this chapter.
Add the Handy Run Command to Vista’s Start Menu

The Run command opens the Run dialog box, which you can use to open all kinds of file types by typing the file’s address. The versatile Run command lets you launch programs, folders, documents, websites, email messages, Command Prompt commands, and more.
One of the most annoying interface changes in Windows Vista is the burying of the Run command deep in the bowels of the Start menu. To access the run command in an out-of-the-box Vista setup, you must select Start, All Programs, Accessories, Run. Way too much work for such a handy and useful feature!
Fortunately, Vista does give us Run addicts a couple of easier methods to get our fix:
• Press Windows Logo+R. This is a great shortcut to know and I use it all the time, but it does have a couple of drawbacks: you can’t use it on machines that don’t have a Windows Logo key (such as my ThinkPad), and it’s a slight hassle to switch to the keyboard if you’re in the middle of a heavy mousing session.
• If your PC doesn’t have a Windows Logo key, it’s possible to reprogram some other key to mimic it; see “Reprogram a Key On Your Keyboard,” available online in the “Dealing with Devices” web chapter.
• Click Start, type run into the Search box, and then click Run when it shows up in the results. This is better than the full Start menu rigmarole, for sure, but it sometimes takes a few seconds for Run to show up in the results, and it still feels like just a bit too much work.
In previous versions of Windows, the Run command was situated right on the main Start menu, which meant that you could launch it quickly with just a couple of mouse clicks. This strikes me as the ideal mouse complement to the Windows Logo+R keyboard technique, so it fries my bananas that the Vista team moved Run to the nether regions of the Start menu landscape.
If, like me, you’re a frequent Run user, you owe it to yourself to restore Run to its rightful place on the main Start menu. This is, in fact, the very first thing I always do with any new Vista installation. Here’s what you do:
1. Right-click the Start button and then click Properties. The Taskbar and Start Menu Properties dialog box shows up with the Start Menu tab displayed.
2. Click Customize. The Customize Start Menu dialog box appears.
3. Scroll down the list of customizations and then activate the Run Command check box.
4. Click OK to return to the Taskbar and Start Menu Properties dialog box.
5. Click OK to put the new setting into effect.
Figure 3.1 shows the Vista Start menu with the Run command where it should be, on the bottom right of the menu.
FIGURE 3.1 That’s better: the Start menu with the Run command restored to its rightful place.

Make Files Make Sense by Showing Extensions
![]()
The seemingly humble file extension—the part of the filename that comes after the dot; for example, the doc part of memo.doc—is one of the most crucial Windows concepts. Why? Because file extensions solely and completely determine the file type of a document. In other words, if Windows sees that a file has a .txt extension, it concludes that the file uses the Text Document file type. Similarly, a file with the extension .bmp uses the Bitmap Image file type.
The file type, in turn, determines the application that’s associated with the extension. If a file has a .txt extension, Windows associates that extension with Notepad, so the file will always open in Notepad. Nothing else inherent in the file determines the file type; so, at least from the point of view of the user, the entire Windows file system rests on the shoulders of the humble file extension.
Microsoft figures that, crucial or not, the file extension concept is just too hard for new users to grasp. Therefore, right out of the box, Windows Explorer doesn’t display file extensions.
This may not sound like a big whoop, but not being able to see the extension for each file can be downright confusing. To see why, suppose you have a folder with multiple documents that use the same primary name. This is a not uncommon scenario, but it’s a fiendish one because it’s often difficult to tell which file is which.
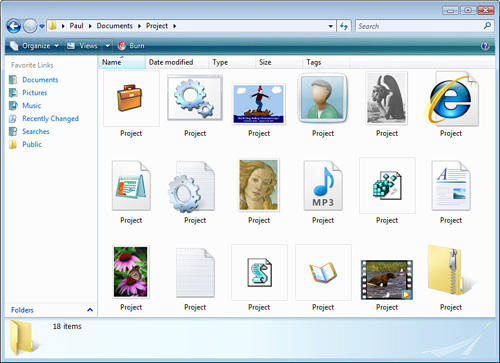
For example, Figure 3.2 shows a folder with 18 different files, all apparently named Project. Windows unrealistically expects users to tell files apart just by examining their icons. To make matters worse, if the file is an image, Vista shows a thumbnail of the image instead of an icon (this happens in thumbnail views such as Tiles, Medium Icons, and Large icons). The result is that in Figure 3.2 it’s impossible to tell at a glance which image is a GIF, which is a JPEG, and so on.
FIGURE 3.2 With file extensions turned off, it’s tough to tell one file from another.
The need to become an expert in Windows iconography is bad enough, but it gets worse. Not being able to see file extensions also leads to two other problems:
• You can’t rename extensions—For example, suppose you have a text file named index.txt and you want to rename it to index.html to make it a web page file. Nope, sorry, you can’t do it with file extensions hidden. If you try—that is, if you click the file, press F2 to choose the Rename command, and then type index.html—you just end up with a text file named index.html.txt.
• You can’t save a document under an extension of your choice—Similarly, with file extensions turned off, Windows Vista forces you to save a file using the default extension associated with an application. For example, if you’re working in Notepad, every file you save must have a .txt extension. If you create your own web pages, for example, you can’t rename these text files with typical web page extensions such as .htm, .html, .asp, and so on.
You can overcome all these problems by turning on file extensions, as described in the following steps:
1. In any Windows Explorer window, select Organize, Folder and Search Options to open the Folder Options dialog box.
2. Click the View tab.
3. Deactivate the Hide File Extensions for Known File Types check box.
4. Click OK.
Figure 3.3 shows the Project files with extensions in full display.
FIGURE 3.3 With file extensions turned on, it’s much easier to tell the files apart.

Give Your Eyes a Rest by Turning on ClearType

If you read a lot of onscreen text, particularly if you use a notebook or an LCD screen, you should activate the Windows ClearType feature, which drastically reduces the jagged edges of screen fonts and makes text super sharp and far easier to read than regular screen text.
Activating ClearType in Vista
Fortunately, ClearType is activated by default in Windows Vista. To be sure, follow these steps:
1. Right-click the desktop and then click Personalize. The Personalization window appears.
2. Click Window Color and Appearance. If you’re not running the Aero interface, skip to step 4.
3. If you’re using the Aero interface, click Open Classic Appearance Properties for More Color Options. The Appearance Settings dialog box appears.
4. Click Effects to open the Effects dialog box.
5. Make sure that the Use the Following Method to Smooth Edges of Screen Fonts check box is activated.
6. Use the drop-down list to select ClearType.
7. Click OK in each open dialog box to put the new setting into effect.
Activating ClearType in XP
ClearType isn’t turned on by default in Windows XP, so follow these steps to activate it:
1. Right-click the desktop and then click Properties. The Display Properties dialog box appears.
2. Click the Appearance tab.
3. Click Effects to open the Effects dialog box.
4. Activate the Use the Following Method to Smooth Edges of Screen Fonts check box.
5. Use the drop-down list to select ClearType.
6. Click OK in each open dialog box to put the new setting into effect.
Automatically Move the Mouse to the Default Button
![]()
The power behind this tweak comes from two observations:
• Being a graphical user interface (GUI), Windows is built with the mouse in mind, which means that everyone does a lot of mousing in a typical day.
• One of the secrets of productivity is to reduce the time it takes you to perform a task that you repeat dozens or even hundreds of times a day. A few seconds saved each time can translate into many precious minutes at the end of the day.
This means that if you can cut some time from your mouse moves, you can save lots of time overall because you probably perform those moves so often. The mouse move that I’m talking about in particular is the clicking of the default button. In most dialog boxes, the default button is the command button that dismisses the dialog box and puts the dialog box settings into effect. The most common default dialog box button is the OK button. How do you know which one is the default? Windows gives you visual clues:
• Windows Vista—Vista makes it easy for you to find the default button by making the button glow while the dialog box is open. That is, the button’s blue color gradually fades in and out.
• Windows XP—In XP the default button is the one that has a blue border around it when you first open the dialog box and when the focus is on any other control except a different command button. (That is, if you press Tab or Shift+Tab to move the focus through the dialog box controls and you land on another command button, that button gets the blue border.)
Many dialog boxes do nothing more than provide you with information or a warning. In most of these cases, the only thing you need to do with the dialog box is click the default button. You can get past such dialog boxes much more quickly if you customize Windows to automatically move the mouse pointer over the default button—this is called the Snap To feature—because then all you have to do is click to dismiss the dialog box. If the dialog box requires more complex input from you, you still save time because the mouse pointer is already inside the dialog box.
Here are the steps to follow to configure Windows to automatically move the mouse pointer to the default button:
1. Open the Run dialog box, type control mouse, and click OK. The Mouse Properties dialog box appears.
2. Click the Pointer Options tab.
3. In the Snap To section, activate the Automatically Move Pointer to the Default Button in a Dialog Box check box.
4. Click OK to put the new setting into effect.