
CHAPTER 16 Speeding Up Your Web Surfing
We all spend huge chunks of our day online, and much of that time is spent prowling the Web for treasure troves of information or entertainment. If you’ve got all the time in the world, your web surfing safaris can be leisurely affairs where you drift from site to site as the mood and links take you. However, it’s much more likely that you’re looking to save time, not waste it. If that’s the case, you’ve come to the right chapter. Here you learn quite a few tweaks for ramping up your web surfing speed. Some of these mods make you more efficient (such as searching directly from the Address bar), whereas others are designed to make web surfing faster (such as using OpenDNS and maintaining your own DNS database). Either way, if time’s short, these tweaks will help you surf more.
Use Any Search Engine from the Address Bar
![]()
To search from the Internet Explorer Address bar, first type your search text. As you type, Internet Explorer adds Search for “text” below the Address bar, where text is your search text. When you’ve finished your search text, use the Down arrow key to select the Search for item and then press Enter. Alternatively, precede your search text with the word go, find, or search, or with a question mark (?), as in these examples:
go vbscript
find wmi
search neologisms
? registry
Address bar–based searching with the search text preceded by a keyword such as go or ? is often the quickest route for simple searches. Unfortunately, you’re limited to using Internet Explorer’s default search engine. But what if you regularly use several search engines, depending on the search text or the results you get? In that case, it’s still possible to set up Address bar searching for any number of other search engines.
To see how this works, let’s run through an example. Follow these steps to set up Address bar searching for Google:
1. Select Start, type regedit, press Enter, and then enter your UAC credentials. (In Windows XP, select Start, Run, type regedit, and click OK.) The Registry Editor appears.
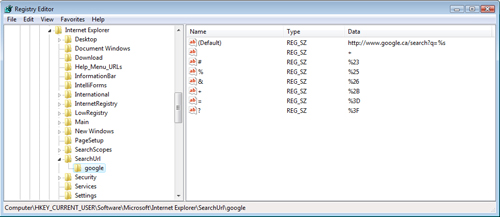
2. Navigate to the following key:
HKCUSoftwareMicrosoftInternet ExploreSearchURL
3. Create a new subkey. The name of this subkey will be the text that you enter into the Address bar before the search text. For example, if you name this subkey google, you’ll initiate an Address bar search by typing google text, where text is your search text.
4. Select the new subkey and double-click its (Default) value for editing.
5. Type the URL that initiates a search for the search engine, and specify %s as a placeholder for the search text. For Google, the URL looks like this:
http://www.google.com/search?q=%s
6. You also have to specify the characters or hexadecimal values that Internet Explorer substitutes for characters that have special meaning within a query string: space, pound sign (#), percent (%), ampersand (&), plus (+), equal (=), and question mark (?). To do this, add the following settings to the new subkey (note that these values work with all search engines):

Figure 16.1 shows a completed example. The text that you type into the Address bar before the search string—that is, the name of the new subkey—is called the search prefix.
FIGURE 16.1 A sample search prefix for the Google search engine.
How do you know the proper URL to use for a search engine? Go to the search engine site and run a search with a single word. When the results appear, examine the URL in the Address bar, which usually takes the following general form:
ScriptURL?QueryString
Here, ScriptURL is the address of the site’s search script and QueryString is the data sent to the script. In most cases, you can just copy the URL and substitute %s for your search text when you set up your search prefix. I often experiment with reducing the query string to the minimum necessary for the search to execute properly. For example, a typical Google search might produce a URL such as the following:
http://www.google.com/search?rls=ig&hl=en&q=mcfedries&btnG=Search
In the query string, each item is separated by an ampersand (&), so I delete one item at a time until either the search breaks or I’m down to the search text (q=mcfedries in the earlier query string). To save you some legwork, the following are the minimal search URLs for a number of search sites:
All the Web:
http://www.alltheweb.com/search?query=%s&cat=web
AltaVista:
http://www.altavista.com/web/results?q=%s
AOL Search:
http://search.aol.com/aolcom/search?query=%s
Ask.com:
Encarta (Dictionary only):
http://encarta.msn.com/encnet/features/
dictionary/DictionaryResults.![]() aspx?search=%s
aspx?search=%s
Encarta (General):
http://encarta.msn.com/encnet/refpages/search.aspx?q=%s
Excite:
http://msxml.excite.com/info.xcite/search/web/%s
Live.com:
Lycos:
http://search.lycos.com/default.asp?query=%s
Technorati:
http://www.technorati.com/search/%s
Yahoo:
http://search.yahoo.com/bin/search?p=%s
Create a Custom Search Provider
![]()
If you’re using Internet Explorer 7, the Address bar isn’t the only way to search. Besides dealing with a search engine site directly, Internet Explorer 7 also lets you run searches from the Search box, which appears to the right of the Address bar. Enter your search term in the Search box and then press Enter or click Search (you can also press Alt+Enter to open the results in a new tab).
By default, Internet Explorer initially submits the search text to the Windows Live search engine. (The default search engine is also the one that Internet Explorer uses for the Address bar AutoSearch.) If you want access to other search engines—or search providers, as Internet Explorer insists on calling them—via the Search box, follow these steps:
1. Click the drop-down arrow to the right of the Search box.
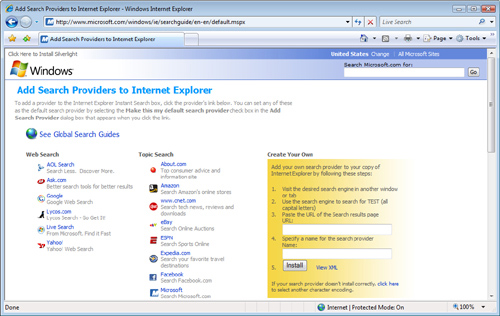
2. Click Find More Providers. Internet Explorer displays a web page with links to various search engines, as shown in Figure 16.2.
FIGURE 16.2 Internet Explorer offers a list of search providers that you can add to the Search box.
3. Click the link for the search engine you want to add. The Add Search Provider dialog box appears.
4. If you want Internet Explorer to use this search engine as the default, activate the Make This My Default Search Provider check box.
5. Click Add Provider.
To use the new search engine, drop down the Search box list to see a list of the search engines, and then click the one you want to use.
That’s fine, but what if the search engine you really want to use isn’t listed? That’s not even remotely a problem because you can create a custom search provider for just about any search tool.
Here are the steps to follow:
1. Navigate to the search engine or site you want to use.
2. Run a search using TEST (all-caps) as the search string.
3. Copy the resulting URL from the Address bar.
4. Click the drop-down arrow to the right of the Search box and then click Find More Providers. Internet Explorer displays the list of providers.
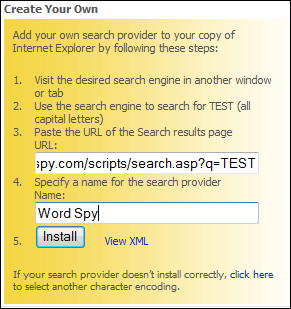
5. In the Create Your Own section of the page, paste the address from step 3 into the URL text box.
6. Use the Name text box to specify the name that appears in the Search box list. Figure 16.3 shows an example that’s ready to go.
FIGURE 16.3 Use the Create Your Own section to create a custom search provider.
7. Click Install. The Add Search Provider dialog box appears.
8. If you want Internet Explorer to use this search engine as the default, activate the Make This My Default Search Provider check box.
9. Click Add Provider.
Make Tabs More Efficient
![]()
Like Firefox, Opera, Safari, and quite a few other browsers, Internet Explorer 7 finally brought tabbed browsing to Microsoft’s flagship browser. You can open up to about 50 tabs in each window, which ought to be enough for anybody. One of the nicest features of tabs is that Internet Explorer supplies each tab with its own execution thread, which means that you can start a page loading in one tab while reading downloaded page text in another tab. You can also specify multiple home pages that load in their own tabs when you start Internet Explorer, as described in Chapter 4, “Terrific Web Tweaks.”
• See “Load Multiple Home Pages at Startup,” p. 37.
Tabs are only as useful as they are easy to use, and Internet Explorer does a good job of smoothing the transition to tabbed browsing. One way that it does this is by giving you a satisfying variety of methods to use for opening a page in a new tab. There are six in all:
• Hold down Ctrl and click a link in a web page—This creates a new tab and loads the linked page in the background.
• Use the middle mouse button (if you have one) to click a link in a web page—This creates a new tab and loads the linked page in the background.
• Type the page URL into the Address bar and then press Alt+Enter—This creates a new tab and loads the page in the foreground.
• Click the New Tab button (or press Ctrl+T) to display a blank tab—Type the page URL into the Address bar and then press the Enter key. This loads the page in the foreground.
• Click and drag a web page link or the current Address bar icon and drop it onto the New Tab button—This creates a new tab and loads the page in the foreground.
• Click a link in another program—This creates a new tab and loads the linked page in the foreground.
Opening a page in the background in a new tab when you Ctrl+click a link is useful if you want to keep reading the current page. However, I find that most of the time I want to read the new page right away. If you have a fast connection, the page loads quickly enough that the delay between clicking and reading is usually minimal.
In such cases, you can tell Internet Explorer to switch to the new tab automatically when you Ctrl+click a link:
1. Select Tools, Internet Options to open the Internet Options dialog box.
2. Display the General tab.
3. Click Settings in the Tabs group to open the Tabbed Browsing Settings dialog box.
4. Activate the Always Switch to New Tabs When They Are Created check box.
5. Click OK in each open dialog box to put the new setting into effect.
Speed Up Web Surfing with OpenDNS
![]()
When you type a web address (for example, http://www.microsoft.com/windows) into any browser, the domain part of that address (www.microsoft.com) gets translated into a number called an IP address (such as 207.46.197.32) that uniquely points to the server located at www.microsoft.com. A connection is established between your own IP address and the server’s IP address, and you see the website’s data.
The association between an Internet node (such as a web server) and its unique IP address is maintained by the Domain Name System (DNS), and the conversion of a domain name into an IP address is handled by a DNS server. Chances are you currently use your ISP’s DNS server to handle this so-called domain name resolution. This likely works well, but your ISP probably has only a server or two handling DNS requests, so at times your surfing may get bogged down as the DNS server tries to handle large workloads.
You can eliminate these inevitable DNS delays by switching to OpenDNS, a company that does nothing but domain name resolution. OpenDNS is faster because it maintains a collection of datacenters in the United States and Europe, and each datacenter is home to multiple servers that do nothing but resolve domain names into IP addresses. This means that OpenDNS can handle just about any workload with no lag, so your web surfing is never slowed down waiting for DNS to resolve.
This is the point where you wait for the painful news about how much such a wonderful service will cost you. No need to sit down for this, because OpenDNS is completely free! They make money by showing ads any time you accidentally type a non-existent domain name. Sweet!
Even better, you don’t have to sign up for anything, download anything, or send away for specialized equipment. Instead, you only have to configure your DNS settings to use the main OpenDNS server addresses:
208.67.222.222
208.67.220.220
(You can sign up for a free OpenDNS account, and that enables you to filter content, block domains, create URL shortcuts, and more. See www.opendns.com for more info.)
The easiest way to set up your computers for the OpenDNS servers is to configure your router to use the servers. That way, your entire network uses OpenDNS automatically. How you do this depends on the router, but you first need to access the router’s setup pages. Here are the general steps to follow:
1. Start any web browser.
2. In the Address bar, type the router address, and then press Enter. See your device documentation for the correct address, but in most cases the address is either http://192.168.1.1 or http://192.168.0.1. You usually see a Connect dialog box.
3. Type the default username and password. Note that in most cases you need to enter only the password; again, see the device documentation for the logon details.
4. Click OK. The router’s setup page appears.
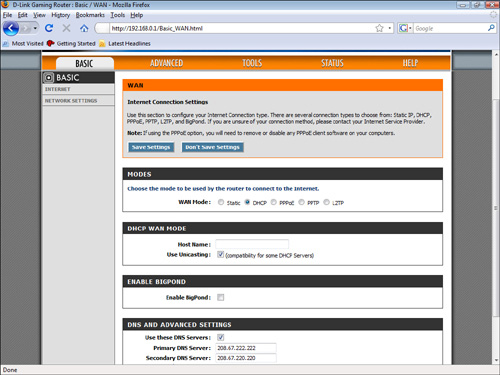
From here, look for the router’s Internet connection settings. For example, Figure 16.4 shows the Internet Connection Settings page for my network’s D-Link router. Notice at the bottom of the page I’ve configured the router to use the OpenDNS servers.
FIGURE 16.4 Configure your router to use the OpenDNS servers.
If you don’t have access to your router, of if you’d prefer to try OpenDNS on a single PC as a test, you need to configure that computer’s DNS settings.
Here are the steps to follow in Windows Vista:
1. Select Start, Control Panel.
2. Under Network and Internet, click the View Network Status and Tasks link. The Network and Sharing Center appears.
3. Click Manage Network Connections. The Network Connections window appears.
4. Right-click the network connection you use to access the Internet, click Properties, and then enter your UAC credentials. The connection’s Properties dialog box appears.
5. In the Networking tab, click Internet Protocol Version 4 (TCP/IPv4) and then click Properties. The Internet Protocol Version 4 (TCP/IPv4) Properties dialog box appears.
6. Activate the Use the Following DNS Server Addresses option.
7. In the Preferred DNS Server address box, enter 208.67.222.222. (To enter this address, type 208, type 67, type a dot (.), type 222, and then type 222.)
8. In the Alternate DNS Server address box, enter 208.67.220.220. Figure 16.5 shows the completed dialog box.
FIGURE 16.5 Configure your Windows Vista Internet connection to use the OpenDNS servers.
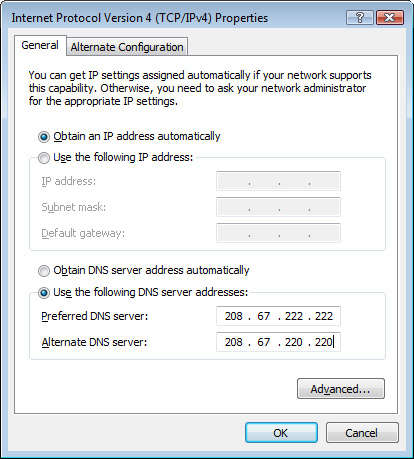
9. Click OK in all the open dialog boxes.
10. Restart your computer to put the new settings into effect.
Here are the steps to follow in Windows XP:
1. Select Start, All Programs, Accessories, Communications, Network Connections. The Network Connections window appears.
2. Right-click the network connection you use to access the Internet, and then click Properties. The connection’s Properties dialog box appears.
3. In the General tab, click Internet Protocol (TCP/IP) and then click Properties. The Internet Protocol (TCP/IP) Properties dialog box appears.
4. Activate the Use the Following DNS Server Addresses option.
5. In the Preferred DNS Server address box, enter 208.67.222.222. (To enter this address, type 208, type 67, type a dot (.), type 222, and then type 222.)
6. In the Alternate DNS Server address box, enter 208.67.220.220.
7. Click OK in all the open dialog boxes.
8. Restart your computer to put the new settings into effect.
Access Common Sites Faster
![]()
OpenDNS is faster than using your ISP’s DNS servers, but it still requires querying a remote database. To avoid the lag time associated with resolving domain names remotely, you can set up your own DNS database on your Windows PC.
First, you need to determine the IP address of those sites that you access most often. Here’s how:
1. Select Start, type cmd, and press Enter. (In Windows XP, select Start, Run to open the Run dialog box, type cmd, and click OK.) The Command Prompt appears.
2. Type ping, a space, and then the domain name of the site you want to work with.
3. Press Enter. Windows sends a packet to the server to see if it responds.
4. Make a note of the IP address that appears in the response.
5. Repeat steps 2–4 for other sites you want to work with.
When you run the ping command, you see output that looks like this:
C:UsersPaul>ping wordspy.com
Pinging wordspy.com [209.34.176.37] with 32 bytes of data:
Reply from 209.34.176.37: bytes=32 time=38ms TTL=112
Reply from 209.34.176.37: bytes=32 time=37ms TTL=112
Reply from 209.34.176.37: bytes=32 time=38ms TTL=112
Reply from 209.34.176.37: bytes=32 time=38ms TTL=112
Ping statistics for 209.34.176.37:
Packets: Sent = 4, Received = 4, Lost = 0 (0% loss),
Approximate round trip times in milli-seconds:
Minimum = 37ms, Maximum = 38ms, Average = 37ms
The domain name gets resolved to its IP address, and ping uses that address to send the ping packets to the server. The ping command displays the IP address in the results (209.34.176.37 in the preceding example).
To make use of this data, you need to set up a database that maps IP addresses to their corresponding domain names. You do that using a text file named hosts (no extension) that comes with all Windows Vista and XP computers.
Follow these steps to open the hosts file in Windows XP:
1. Select Start, Run (or press Windows Logo+R) to open the Run dialog box.
2. Type the following command into the Open text box:
notepad %systemroot%System32driversetchosts
3. Click OK. The hosts file opens in Notepad.
Windows Vista requires elevated permissions to edit any file in the %SystemRoot% folder or any of its subfolders. Therefore, you need to follow these steps to open hosts in Notepad:
1. Select Start, type cmd, and then press Ctrl+Shift+Enter. This runs the selected item with elevation, so the User Account Control dialog box appears.
2. Enter your UAC credentials to continue.
3. At the command prompt, type the following:
notepad %systemroot%System32driversetchosts
4. Press Enter. The hosts file opens in Notepad.
With the hosts file open, start a new line at the end of the file. Then enter the mapping using the following general format:
IP DomainName
Here, replace IP with the IP address returned by the ping command, and replace DomainName with the domain name associated with the IP address. Here are some examples:
209.34.176.37 |
wordspy.com |
207.46.197.32 |
microsoft.com |
64.233.187.99 |
google.com |