An external system is any application that accesses Moodle and its data in one way or the other. There are eight steps that have to be performed to complete the setup, which follow the workflow described on the web services overview screen:
Each application should have a separate user account. This way, you can control the capabilities that each external system is going to use. Our user is aptly called web service.
Depending on the protocol you've selected, you have to allow the respective permissions for the user. You achieve this by creating a new role with any of the four capabilities, webservice/amf:use, webservice/rest:use, webservice/soap:use, or webservice/xmlrpc:use. This role has to be assigned to the web services user(s) in the System context.
A service is like a defined interface that an external application can connect to. It is a set of functions, which are covered next. Selecting a service takes place when you go to Plugins | Web services | External services. You have to Add a Custom service:

Each external service has to have Name, a unique Short name, and should be Enabled. A service has to be accessed via a token. The Authorised users only setting restricts this access to selected users. If it remains unticked, all users with the token permission can access the service.
You can also specify whether the web service Can download files or Can Upload files. In the context of our HR role, this would be useful if you also manage profile pictures via web services. You can further restrict access by specifying required capabilities that users need to have.
Once you have saved the service, select the shown Add functions link.
Moodle provides a number of functions that can be accessed via web services. This number will increase in upcoming versions, for example, to support additional features in mobile devices. Each function corresponds to a capability in Moodle roles. The function(s) selected depend(s) on what tasks the external system has to perform and should be set up in liaison with the developer in charge. Since we are connecting to an HR system, we will allow a number of user-related functions:

Make sure that you avoid the usage of any deprecated functions, which are labeled as such. These are supported for compatibility with older systems but should not be used as far as possible as these functions will be removed from future versions.
Once you have added the selected functions, you will be shown the required capabilities that a user has to have to access the service. Make sure these have been allowed in the role assigned to the web services user.

If you selected Authorised users only when you created the preceding service, you will have to select these user(s). This takes place when you go to Plugins | Web services | External services where you see a list of all the set up services. Select the Authorised users link, which will guide you to the familiar user selection screen. Select the web services user you created in step 1.
Once you have selected a user, Moodle will check whether the account has the appropriate settings in order to access the selected functions. If any are missing, they will be displayed under the user selection screen in the Change settings for the authorised users section. Clicking on a username will also allow you to restrict access to an IP address and to set an expiry date:

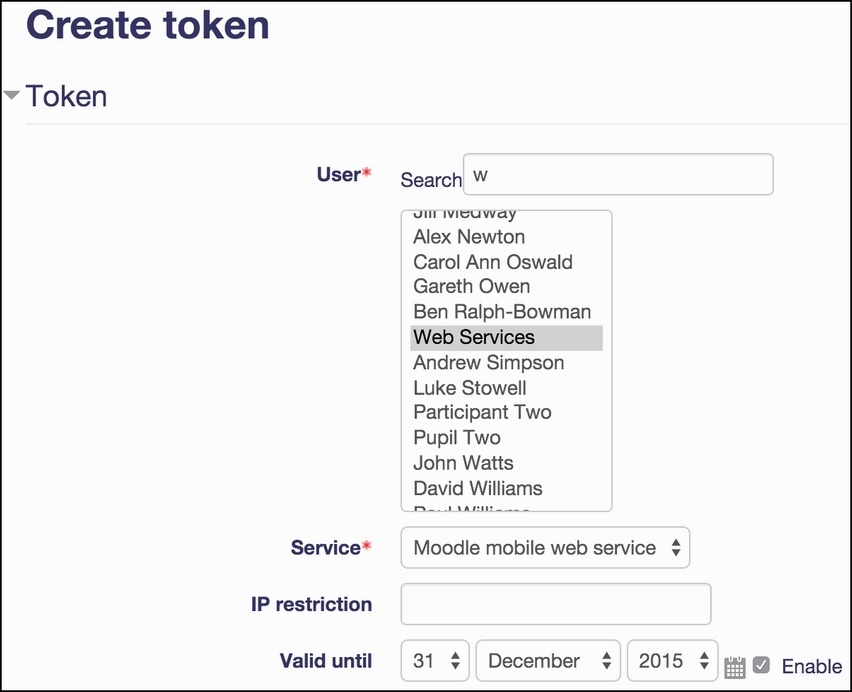
Web services use tokens for security. These are created for each user and can be added by going to Plugins | Web services | Manage tokens. To add a token, select a user (or multiple users), select the service to be accessed, and optionally specify an IP address (or range) and an expiry date as shown in the following screenshot:
Users will be able to access and reset their web services token by going to User account | Security keys in their Preferences if they have the moodle/webservice:createtoken capability.
Moodle is able to generate documentation for developers for the selected functions in the format of the selected protocol. This is done when you set up the protocols (Plugins | Web services | Manage protocols) where you have to tick the Web services documentation option. Developers will be able to see the documentation as part of their security keys.
Once a web service is setup, functions have been selected, and users have been assigned, it is imperative that you test the service to make sure that it works and, more importantly, that only the required functionality has been opened up that is required by the external system. This is done by navigating to Development | Web service test client (select AMF test client if you use AMF).
First, you have to select Authentication method (simple for a username and password, token for a security key), Protocol, and Function to test:

The screen that follows depends on what authentication method has been selected and which function has been chosen. Here, we used token and moodle_user_create_users:

Once you have filled in the required values and executed the command (read the WARNING!), you will see a return value in the XML format. To receive a more meaningful message, change the Debug messages setting by going to Development | Debugging and then to DEVELOPER. If the result shown contains a line containing a DEBUGINFO element, an error has occurred. Otherwise, you should check that the function executed actually performed what it was supposed to (in our case, creating a user called new user).
