According to Moodle Docs, a community hub provides a directory of courses for public use or for private communities. It effectively facilitates the creation of a course portal, where each site can either be a receiver, a sender, or both. The concept has the potential to change the way Moodle courses are advertised and potentially sold by publishers and learning institutions or shared by the community.
Community hubs are not to be confused with Moodle hubs as they are two very distinct concepts. Moodle hubs are for connecting two or more Moodle sites, allowing students to participate in courses outside their institution. Community hubs are like yellow pages where courses are searched, advertised, and shared. An optional payment module has been planned for the future, opening up the facility for commercial course provision.
Users can enroll and import courses from https://moodle.net/ via the COMMUNITY FINDER block. We are not dealing with this, as it is not an administration task. You will find more information about the community hub itself including a good video at https://docs.moodle.org/30/en/Community_hubs.
Instead, we will be looking at the option of creating your own private community hub, for example for a network of schools or a number of customers. Parts of this section follow the structure on https://docs.moodle.org/30/en/Hub_administration.
A community hub is a standard Moodle site that is run in hub mode. While it is possible to use an existing Moodle site as a hub or vice versa, it is not recommended to do so as the front page is being replaced with a search facility, as shown in the following screenshot:

To create a hub server, you will have to go through the following steps:
- Install a fresh copy of Moodle (see Chapter 1, Moodle Installation for instructions)
- Install the Moodle Hub server plugin directly from http://github.com/moodlehq/moodle-local_hub or https://moodle.org/plugins/local_hub in your
/local/hubdirectory (see Chapter 8, Moodle Plugins, for details on installing third-party add-ons) - Once this has been successful, you should see a new sub-menu called Hub at the bottom of the Site administration section:

- Enable web services and enable the XML-RPC protocol in Plugins | Web services | Manage protocols (see Chapter 15, Moodle Integration, for details of web services)
- Optionally, configure ReCAPTCHA in Plugins | Authentication | Manage authentication (see Chapter 5, User Management, for details of user management)
- Set up SMTP in Plugins | Message outputs | Email (see the Communication section in Chapter 9, Moodle Configuration)
- Once you have managed all these steps, go to Hub | Settings to provide the following self-explanatory settings of your hub:

The next step is for other sites to register to your hub. This takes place in Server | Hubs. Either select a public hub or enter the Private hub URL and a Password, if specified. The information to be provided is identical to when you initially register your site with https://moodle.org/ (see Chapter 1, Moodle Installation, for details). Once you have submitted the details and successfully entered the ReCAPTCHA, your site is registered with the hub. This means that users of this site can publish and share courses with users of other sites also registered with the hub. The external Moodle site and your hub are not connected, nor do users become authenticated with your system. It only allows for exchange and collaborative work on courses published on the hub.
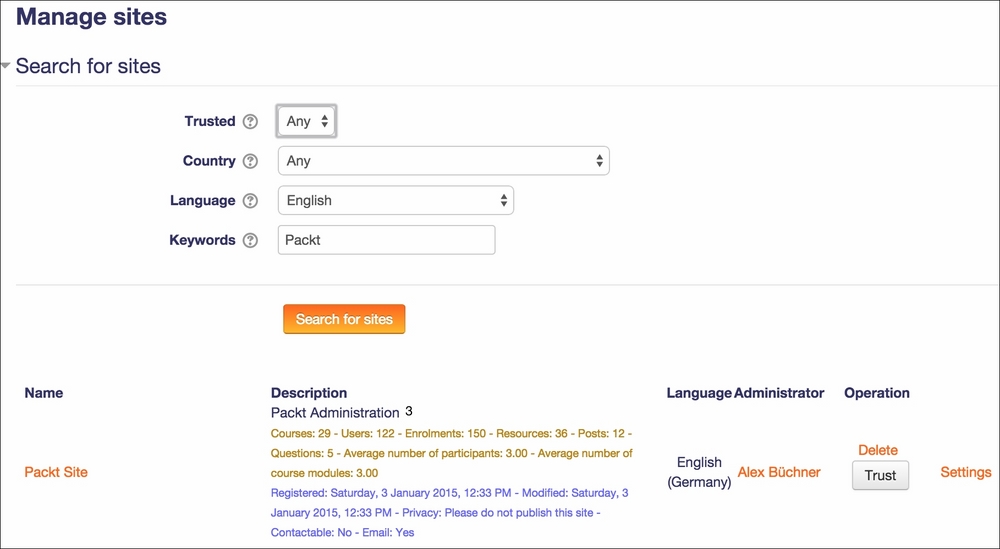
You can see all sites that are registered at your hub at Hub | Manage sites:

Once you Trust a site, it can access your hub via the Community finder block.
As soon as courses have been submitted to your hub (via the Publish link in the Course administration section), you can manage them via Hub | Manage courses.
You have the ability to delete courses and change whether they are visible to other users. You can also download or visit the courses, depending how they have been configured by the external party.
You can also register your hub with https://moodle.org/ (Hub | Hub server registration). Make sure your hub is not private. Once approved, it will appear in the public list on https://moodle.net/.
Internally, each site has been allotted a secret token for identification purposes. If you feel that this has been used maliciously in any way, choose Hub | Stolen secret, search for the compromised site, and select Mark as stolen. Sites related to this token are going to be removed from the site listing and a message will be sent to the site administrators asking them to re-register. Anybody trying to register with this secret will be asked to generate a new secret for this hub server.
We only covered how to set up a community hub and how to manage sites and courses that have been registered and published, respectively. Details on tasks that can be performed by non-administrators—such as searching a course on a hub, downloading and restoring a course, as well as enrolling in a remote course—are covered in detail in the Moodle Docs at http://docs.moodle.org/en/Community_hubs.
