Moodle users, or rather their user accounts, are dealt within Users | Accounts. Before we start, it is important to understand the difference between authentication and enrolment.
Moodle users have to be authenticated in order to log in to the system. Authentication grants users access to the system through login where a username and password have to be given (this also applies to guest accounts where a username is allotted internally). Moodle supports a significant number of authentication mechanisms, which are discussed later in detail.
Enrolment happens at course level. However, a user has to be authenticated to the system before enrolment to a course can take place. So, a typical workflow is as follows (there are exceptions as always, but we will deal with them when we get there):
- Create your users.
- Create your courses (and categories).
- Associate users to courses and assign roles.
Again, this sequence demonstrates nicely how intertwined courses, users, and roles are in Moodle. Another way of looking at the difference between authentication and enrolment is how a user will get access to a course. Please bear in mind that this is a very simplistic view and it ignores the supported features such as external authentication, guest access, and self-enrolment.

During the authentication phase, a user enters his credentials (username and password) or they are entered automatically via single sign-on. If the account exists locally, that is within Moodle, and the password is valid, he/she is granted access. The next phase is enrolment. If the user is enrolled and the enrolment hasn't expired, he/she is granted access to the course. You will come across a more detailed version of these graphics later on, but for now, it hopefully demonstrates the difference between authentication and enrolment.
To add a user account manually, go to Users | Accounts | Add a new user. As with courses, we will only focus on the mandatory fields, which should be self-explanatory:
- Username (has to be unique)
- New password (if a password policy has been set, certain rules might apply)
- Firstname
- Surname
- Email address
Make sure you save the account information by selecting Create user at the bottom of the page. If any entered information is invalid, Moodle will display error messages right above the field.

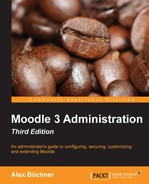
I have created a few more accounts; to see who has access to your Moodle system, go to Users | Accounts | Browse list of users, where you will see all users. Actually, I did this via batch upload, which will be dealt within Chapter 5, User Management.
Now that we have a few users on our system, let's go back to the course we created a minute ago and manually enroll new participants to it. To achieve this, go back to Courses | Manage courses and categories, select the Miscellaneous category again, and select the created demo course. Underneath the listed demo course, course details will be displayed alongside a number of options (on large screens, details are shown to the right). Here, select Enrolled users.

As expected, the list of enrolled users is still empty. Click on the Enrolled users button to change this. To grant users access to the course, select the Enrol button beside them and close the window. In the following screenshot, three users, participant01 to participant03 have already been enrolled to the course. Two more users, participant04 and participant05, have been selected for enrolment.

You have probably spotted the Assign roles dropdown at the top of the pop-up window. This is where you select what role the selected user has, once he/she is enrolled in the course. For example, to give Tommy Teacher appropriate access to the course, we have to select the Teacher role first, before enrolling him to the course.
This leads nicely to the third part of the pyramid, namely, roles.