Every module that is part of the core of Moodle has gone through a thorough quality assurance process. The potential problem with third-party add-ons is that you don't know anything about the quality of the software.
While it is possible to uninstall modules if they don't fit your purpose, you will have to make sure that you don't put barriers in place for future updates. If an add-on is not maintained, it is unlikely that it'll be able to support any upcoming versions of Moodle, and you will either have to delete the module that's already in use or you won't be able to upgrade your system. Also, a module might cater to some required functionality but can also compromise the security of your system.
There are a number of criteria that indicate whether an add-on is trustworthy or not. They are as follows:
- Popularity: Moodle maintains statistics on its downloads, which can be found at https://moodle.org/plugins/stats.php. You will see all the plugins that have been downloaded in the previous year and the last two months, respectively. While there is no guarantee, the more popular a module, the more likely it is to be of a high standard.
- Ratings: Each add-on page allows users to mark a plugin as their favorite. Again, there's no guarantee here, but the more admins who have favored an add-on, the more likely that this is indicative of a good add-on.
- Level of active support: Some of the most valuable third-party add-ons have vanished because they are unsupported. Your best bet is if the add-on is supported by a major stakeholder in Moodle, such as the Open University or a Moodle Partner. The maintainer should have been active in the community for the past 60 days.
- Forum posts and comments: Users are encouraged to post comments, problems, and praise about each module. Read through the posts to get an idea about what other users have experienced. Be suspicious about modules that are not talked about at all. Also, check whether there are any reviews in the Reviews section.
- Documentation: Each add-on should have a dedicated page in Moodle Docs. It is usually not a good sign if the page does not exist or is only a wiki stub. Also, it is a good practice if a change log is kept for the developed software.
- Standalone: It is imperative that third-party add-ons do not modify any core code (known as patches that are supplied in the form of patch files). This is important as the changes will be overridden with every Moodle update and the modifications will have to be reapplied.
- Supported versions: Support for current versions and one or more previous versions of Moodle is a sign that the software is being actively maintained. You can take a look at any of the existing versions in the Versions tab.
- Backup and restore support: If applicable, the add-on should be supported by the course backup and restore facility. Otherwise, what good is an activity if it is not included in your archives?
- Code: If you can read PHP code, have a look at the actual source code of the add-on. Try to find answers to the following questions:
- Is the code well structured, and can it be easily followed?
- Is the source code well commented?
- Does the module follow the Moodle coding guidelines (https://docs.moodle.org/dev/Coding)?
- Official approval: Moodle has recently tightened the process of accepting third-party plugins to its database. While this process does not guarantee the functionality, security, or the integrity of the add-on, it evaluates the code at a high level. Once this stage has been passed, it will be accepted in the plugins' database. Add-ons stored elsewhere, for example, on a developer's home page, should only be trusted if they come from a well-known source.
- Developer: Some developers are known to produce very well-written Moodle add-ons. Programmers that are affiliated with a Moodle Partner are usually a good bet, as are core developers, Moodle documenters, and particularly helpful Moodlers.
The following is a list of some popular third-party Moodle add-ons (in alphabetic order), available through Plugins directory at https://moodle.org/plugins/, as well as a brief description for each plugin:
- Adminer: This module is a repackaged version of Adminer. Once installed, you will see a new Moodle Adminer item in the Server menu in the Site administration section. This is useful to create database backup dumps among other database-related operations.
- Certificate: This fully-customizable activity generates PDF certificates for students once they have fulfilled certain conditions. We will use this module to demonstrate how to install plugins via Git later on.
- Checklist: This Moodle package, comprising of an activity module and a block, allows teachers to create a checklist for the benefit of their students. The teacher can monitor all the students' progress as they tick off each of the items in the list. Items can be indented and marked as optional. Students are presented with a progress bar, and they can add their private items to the list.
- Collapsed Topics: This course format lets users expand and collapse individual topics, tackling the issue of the infamous scroll of death. We use the course format as an example to show how to install a plugin via the admin interface.
- Configurable reports: This is a powerful report generator that lets you create various types of custom reports, including filters, groupings, and visual representation. We will cover its functionality in Chapter 10, Moodle Logging and Reporting and will discuss the installation of the module later in the chapter.
- Essential: This is a very powerful theme with tons of configuration options, such as front page sliders, marketing spots, and social networking icons. We came across this theme in the previous chapter that dealt with the look and feel of your site.
- Google OAuth2: This authentication plugin lets users authenticate via their Google, Facebook, Windows, Linkedin, or any other login.
- Grid format: This represents each topic in a course as an icon and shows activities inside the topic in a lightbox style display.
- HotPot: The HotPot activity module allows teachers to administer Hot Potatoes and TexToys quizzes via Moodle.
- Progress Bar: This block is a time management tool for students that visually shows what activities and resources a student is supposed to interact with in a course.
- Questionnaire: This provides an alternative to feedback activity.
Keep monitoring the list of recently released plugins at https://moodle.org/plugins/ (go to Plugins administration | Reports | Recently approved plugins) via the provided RSS feed or @moodleplugins. There are always great new add-ons being launched, which might be useful for your site.
Before you go wild and bombard your Moodle system with dozens of plugins, sit back and reflect on the following questions:
- Who is the plugin for?
Does the plugin cater for the needs of a wide range of users or only a handful of trainers with very specific needs? Is it a nice-to-have gimmick or a must-have feature? Neither is a problem, just be aware of this.
- What are the requirements of your users?
It has proven very useful to gather your staff's requirements from a representative group of users. Math teachers have other needs that are different from language coaches, novices need tools that are separate from experts, and course authors request features that are dissimilar to those required by course coordinators. Gather all the requirements first, and then make an informed decision on which plugins are needed to cater to the majority.
- What is the impact on your users?
Adding new activities, questions types, and course formats is a great way to equip your teachers with new tools to build engaging learning content. However, take into account the skills of your staff and the time they would have to invest to master these add-ons.
- What is the impact on your infrastructure?
Some plugins require access to other systems, for instance, authentication plugins or cloud services. Other plugins rely on a commercial service, for example, video conference tools or plagiarism detection systems. Make sure that the plugin suits your infrastructure and there is a sustained budget in case regular fees have to be paid.
- Is there an alternative?
Make sure that the requirements cannot be catered to by on-board tools. If this is not the case, trawl Moodle's plugin directory for alternative options.
Be very selective with the plugins you add to your system – the less add-ons you have to maintain, the less maintenance work and potential hassle you are facing long-term.
A good piece of advice is to avoid experimenting with new add-ons on a production site. Most organizations set up a shadow site of their live server to be used as a sandbox. Once the installation has been successful, the procedure is reapplied on the production site.
Additionally, it is recommended that you make a complete site backup before installing any third-party software. This way, you can roll it back in case of a disaster.
Most add-ons are structured in a very similar way. However, some modules either don't follow this standardized approach or require other steps, especially when the module communicates with other software systems. Each plugin should contain a file (usually called README) with installation instructions. It is important that you read these first before installing a module.
The easiest way to install a plugin is by going to Plugins | Install Plugins. However, you will have to make sure that the target directory on your server is writable, which is not recommended on production sites for security reasons but is usually acceptable on test sites. There are two options that show you how to use a plugin installer:
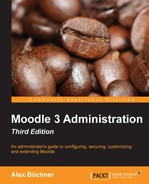
When you click on the Install plugins from the Moodle plugins directory button, you will be directed to the familiar plugins section on https://moodle.org/. You will have to log into the site in order to perform installations. Also, bear in mind that your site's full name, URL, and Moodle version will be sent as well in order to ensure a smooth installation process. Once you have located the plugin you wish to install (here, it's in the Collapsed Topic format), you will see an additional Install now button appear:

Once selected, a list of your sites will be shown and you need to select Install now again. You will be redirected back to your Moodle site where a message will indicate whether the plugin can be installed or a problem has arisen, for instance, that the target directory is not writable. Once this has been confirmed, the plugin validation will be carried out, and the already familiar Plugins check screen has to be confirmed before the installation is carried out:
Once Upgrade Moodle database now has been clicked, the standard installation process kicks off.
Alternatively, you can download the plugin and upload it by navigating to the Plugins | Install Plugins interface. You will have to confirm the validation screen before the installation is performed. Once successful, you will be confronted with a number of default settings for the course format.

For plugins that correctly declare their component's name, the installer is automatically able to detect the type of plugin. If auto detection fails, choose the correct Plugin type manually. The installation procedure can fail if an incorrect plugin type is specified! If you need to change the root directory for the plugin installation, you'll see an option called Rename the root directory once Show more… is selected.
As an alternative to installing plugins via the admin interface, you can perform these tasks manually. For the purpose of demonstrating these steps, we have chosen the Configurable Reports module for a number of reasons. It satisfies all the criteria outlined earlier, it is a very useful and popular activity, and it is packaged in the standard format.
After locating the add-on in the plugins repository (https://moodle.org/plugins/block_configurable_reports), download the version of the software that fits the version of your Moodle system (here 3.0). Next, put Moodle in maintenance mode (Server | Maintenance mode). While it is possible to add most modules while Moodle is in use, it is not recommended that you do this as this can lead to some unforeseen problems.
The module follows the standardized structure of add-ons, that is, it includes the same directory hierarchy as Moodle. It is best to copy the ZIP file to the $CFG->dirroot/blocks directory and unpack the file via unzip configurable_reports.zip. You might have to change the user and group to the same as the folders in those directories.
Now, go to your Notifications page in the Site administration section. The module behind this page will recognize that a new module has to be installed and kick off the installer:

You will see a new entry in the Blocks table called /blocks/configurable_reports with the status To be installed. Once you confirm this via the Upgrade Moodle database now button, a number of database tables with fields are created and populated with values. The overall success of the installation will be displayed.
That's it! All you have to do now is make sure that the module works properly in Moodle. In case of the Configurable Reports module, go to Plugins | Blocks | Manage blocks, and you will see an entry for the newly installed add-on.
It is important that you check that the block is working as intended. In case of the Configurable Report add-on, you can find detailed information in the Moodle Docs at https://docs.moodle.org/en/blocks/configurable_reports. We also have a dedicated Report generation section in Chapter 10, Moodle Logging and Reporting.
An alternative to installing and updating plugins is via Git. Developers are encouraged to maintain their personal Git repository, which might contain multiple Moodle extensions. We are going to use the popular Certificate module as an example to demonstrate how to install a contributed extension from its Git repository.
When you browse to the plugin page of the Certificate module, you will see a link to Source control URL, which will direct you to the github entry of the plugin. Github is the de facto standard site to manage Git repositories.

To install the module, you have to execute the following steps:
- Change to the
$CFG->dirroot/moddirectory (this is where all the modules are stored). - Execute the following
gitcommand:git clone https://github.com/markn86/moodle-mod_certificate.git certificateThis creates a new subdirectory certificate and makes a local copy of the
Certficatecode repository. The path is the same as the one you saw in the previous screenshot.
- Go to the Notifications page in your Moodle system and run through the upgrade screens. The mod_certificate module will be added. Once these have been saved, the module will be available by navigating to Plugins | Activity modules | Manage activities.
Moodle itself does not support the installation of plugins via its CLI, but there is a utility called Moosh that does exactly this. You will find the tool in the Moodle plugins database (https://moodle.org/plugins/view.php?id=522). To install Moosh, extract the downloaded package and set a symbolic link to your programs folder:
sudo ln -s $PWD/moosh.php /usr/local/bin/moosh
You should now be able to execute Moosh from the command line. For further installation options, have a look at http://moosh-online.com/.
Moosh is a bit different in that it is not a plugin as such but a command-line tool that supports over 80 commands, two of which are relevant in the context of installing plugins:
moosh plugin-list: This command lists all the plugins (the full name, short name, available Moodle versions, and a short description) that are available at https://moodle.org/plugins/; it makes sense to apply some filters, such as the module name, since the list is huge.moosh plugin-install mod_certificate 1: This command downloads and installs the current version of the Certificate module. It doesn't get any easier than this! To obtain the version number, use the aforementionedplugin-listcommand (moosh plugin-list | grep "Certificate").
There is also a command to uninstall a plugin; for instance, take a look at this one:
moosh plugin-uninstall mod_certificate
To get an overview of all the plugins installed on your Moodle instance: use this command
moosh info-plugins
You will come across MOOSH at various places in this book, and an entire section has been dedicated to the tool in Chapter 14, Moodle Admin Tools.
One main challenge that Moodle administrators face is to keep plugins up to date. The preceding installation steps are sufficient for a one-off installation, but do not cater to situations that call for maintaining the plugins.
How do you know that new plugins are available? You can either be notified automatically by e-mail (go to Server | Update notifications, as covered in Chapter 1, Moodle Installation), or you can check manually (Notifications).

Keeping plugins up to date depends on the installation method you chose initially:
- Web interface: Go to the Plugins | Plugins overview where the Install available updates button will initiate the update process of any available plugins (download and installation).

- Manually: You will have to download the latest version at https://download.moodle.org/ and reinstall, as described previously.
- Git: To keep the module up to date over time, you will have to create a local branch of the module that is synchronized with the remote branch on github. You will find detailed instructions on how to do this at https://docs.moodle.org/en/Git_for_Administrators.
- Command line: All you need to do is to rerun the same command as you did during installation, that is,
moosh plugin-install <plugin> <moodle_version>.
If you decide to uninstall a third-party add-on and the module is listed in the Activities, Blocks or Filters section in the Plugins menu, you have to use the provided Uninstall option.
The delete operation will remove all the data associated with the module and display a message, as shown in the following screenshot, to confirm the success of doing this. To complete the deletion and prevent the block from reinstalling itself the next time you go to the Notifications page, you will have to delete the directory from your server.

You will also have to remove the installed files from $CFG->dirroot/mod or any other location where the files have been stored. If you don't perform this step, the add-on will be reinstalled next time you go to the Notifications page. Other types of add-ons that cannot be deleted from within Moodle, for example, the Assignment type, will also have to be removed manually.