In this chapter, you will learn how to manage users in your Moodle system. We will first look at what information is stored for each user and how we can extend their profiles. We will then perform a number of standard user actions before dealing with cohorts. Finally, we will deal with a wide range of user authentication mechanisms before concluding the chapter with a best practice section. We will cover the following topics:
- User profiles
- Standard user actions (manual and bulk)
- Manual accounts (including a batch upload)
- Cohorts (including a batch upload)
- User authentication
- Usernames—best practice
This is a lot to take in, so we'd better get going!
Other than guests, each user has a profile that contains information about them. We will first deal with the information that is stored for each user and how it is organized in Moodle.
You can view your own profile by selecting the Preferences item in the drop-down menu beside your name at the top of the screen. Click on the Edit profile link in the User account section to change your profile details. To modify the profiles of other users, click on the Edit icon beside their name by navigating to Users | Accounts | Browse list of users.
Moodle user profiles are divided into a number of categories, of which the first five cannot be changed via the Moodle user interface:
- General: Standard user fields
- User picture: Image of the user
- Additional names: Phonetic names, middle name, and alternate name
- Interests: Tags for social networking activities
- Optional: Additional user information
- User-defined: Newly created fields
The following screenshot shows the profile fields of the General category:

Most of these items are self-explanatory, but there are a few things you need to know about each of them. Here is a brief description of each profile element, along with tips to use them effectively:
- Username: A unique username has to be provided. By default, only alphanumeric lowercase characters, underscores (_), hyphens (-), periods (.), or the at symbol (@) are allowed. If you also want to use other characters in usernames, such as umlauts(¨), you will have to enable these by turning on the Allow extended characters in usernames and going to Security | Site Policies. It is important to remember that you ought to have administrator rights to change the username.
- Choose an authentication method: This menu allows changes to the authentication method for the user. While useful for testing and development purposes, it is highly recommended that you do not select any disabled option from this menu. You cannot change the
authmethod of the main admin account. We'll take a look at authentication methods in detail in the second half of this chapter. - Suspended account: If you wish to prevent a user from logging in, select this option. This is useful as a disciplinary measure or in case of a longer absence, for instance, a sabbatical term. There is no expiry date on the suspension, so you need to change this back manually.
- New password: A password has be provided for security reasons when creating manual accounts. If the user ought to change the given (default) password on their first login, the Force password change option has to be selected. You can unmask (show) your own password but not that of other users. However, administrators can override the existing password of a user.
If Password policy is enabled (go to Security | Site policies), the password has to adhere to this policy.
Note
For more details on password policy, refer to Chapter 11, Moodle Security and Privacy.
- First name and Surname: These are compulsory fields for users, for which diacritical marks (ä, â, à, á, …) are fully supported.
- Email address: This is a compulsory field and has to be unique in Moodle. It is important that the address is correct, since Moodle makes regular use of it, for example, to notify when a user has forgotten their username or password.
- Email display: Choices can be made as to who exactly can see the user's e-mail address. The choices are: Hide my email address from everyone, Allow every one to see my email address, and Allow only other course members to see my email address (default). Administrators and teachers (with editing rights) will always be able to see e-mail addresses even if they are hidden.
- City/town and Select a country: These are used to further identify users by their geographical location.
- Timezone: This is is used to convert time-related messages on the system (such as assignment deadlines) from the local time (typically, the server time) to the correct time in whichever zone the user has selected. It is necessary as your users may be geographically spread across a number of time zones. The default city, country, and time zone can be specified by navigating to Location | Location settings.
Additionally, a Description field is shown, which is used to provide additional information about the user. As an administrator, you can leave the field empty. However, when a user logs in to their profile, populating the field is compulsory.
A number of additional options might appear in the user's profile, for example, Preferred theme or Email charset, but this requires the settings to be changed elsewhere. We will mention these when the respective topics are being dealt with.
The second category is called User picture and, as the name suggests, it deals with the image attached to a user's profile.
To upload a new picture, simply drag it to the New picture pane or select the image from the file picker. The image cannot be larger than the maximum size that's listed (here, it's 2 MB) or it will not be uploaded. If your image is too large, it is recommended that you reduce its size to a minimum of 100 x 100 pixels. The formats that are supported are JPG and PNG; however, be careful with transparent backgrounds as they are not supported by older browsers.
The Picture description field is used as an alt tag, a description of the image, which is used for nonvisual browsers; it is in conformance with accessibility guidelines.

Once a picture has been assigned, it will be shown in place of the None label. To remove the picture, check the Delete checkbox, and the picture will be removed when the profile information is updated.
Moodle will automatically crop the image to a square and resize it to 100 x 100 pixels for the larger view and 35 x 35 pixels for the smaller, thumbnail view.
If you suspect that your learners are likely to misuse this feature by uploading unsuitable pictures, you can disable the functionality. Go to Security | Site policies and check the Disable user profile images checkbox. Bear in mind that once this feature is disabled, pictures cannot be assigned to any users (except the administrator), nor will it be possible for teachers to represent groups in courses with images.
This section comprises the following fields:
- First name – phonetic and Surname – phonetic: The main use case for the field pair is in Far East languages where users have an original and a Romanized version (for example, Japanese) or a phonetic name is being displayed (for instance, Pinyin).
- Middle name: In some cultures, it is common to have three or more names that are displayed.
- Alternate name: This can either be a nickname, handle, or an alias that is being used in certain pedagogical settings, for example, in a gamification or role playing scenario.
Interests, such as hobbies or professional activities, can be entered one by one. To remove a tag, select its label; to recover it again, select it from the pull-down menu. The given List of interests represents tags, which are used by Moodle activities, such as the Flickr, YouTube blocks, and for tagging blog entries. You can find more information on tagging at https://docs.moodle.org/en/Tags and in Chapter 9, Moodle Configuration.

More personal details are grouped under the Optional category:

- Web page: This is the URL of the user's web or home page.
- Messenger information: Moodle supports a range of popular messenger services. These are ICQ, Skype, AOL Instant Messenger (AIM), Yahoo Messenger, and Microsoft's MSN. When entering any of the services' IDs, Moodle will make use of their functionalities, if possible (for instance, displaying the user's Skype status information in their profile).
- ID number, Institution, and Department: This contains IDs of students or staff and information on a school and department. The ID number is used by some synchronization tools with HR systems, for instance, Totara's HR Import facility.
- Contact details: It has the user's phone numbers and postal address.
Some organizations rename some of these fields to ones that are required in their setup. For more information on how to do this, refer to the Localization section in Chapter 9, Moodle Configuration.
Moodle allows new arbitrary fields to be added to the user profile. This feature can be found by navigating to Users | Accounts | User profile fields.
The profile fields are organized into categories (General, User picture, Interests, and Optional). Additional categories can be created and user-defined fields can then be placed within these new categories. A default category, called Other fields, is already present, which can be deleted or renamed via the standard Moodle icons. To create a new category, click on the Create a new profile category button:

You are asked to provide a unique category name. The category will be displayed at the bottom of the user profile once profile fields have been added to the category.
Once a category has been created, five types of profile fields can be added to Moodle via the Create a new profile field pull-down menu:
- Checkbox (here, the values are true or false)
- Date/Time (this contains the date and an optional time field)
- Dropdown menu (selection of a single value from a predefined list)
- Text area (multiline formatted text)
- Text input (a single line of text or a number)
Once you have chosen your field type, you are taken to a settings screen for that field. It has two sections—Common settings deal with parameters that apply to all fields, and Specific settings contains parameters that apply only to the chosen field type.
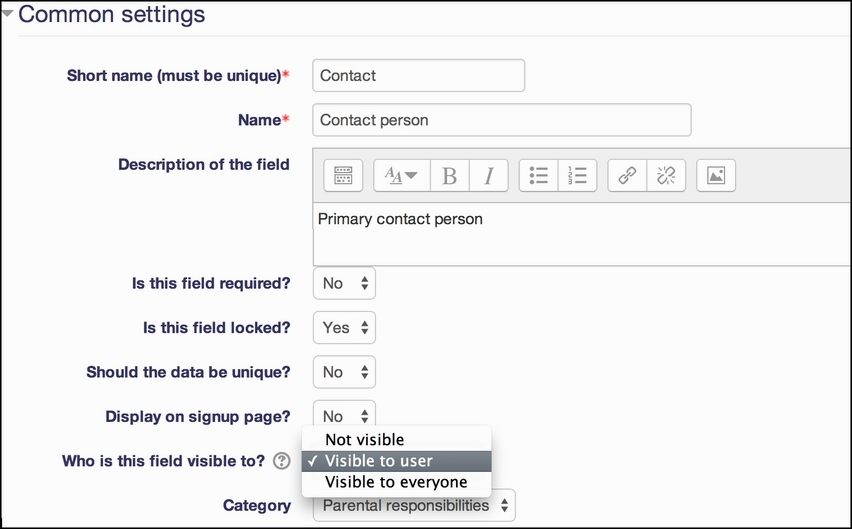
- The Short name is a unique identifier of the field that is accompanied by the actual Name, which is the label displayed in the profile. An optional Description of the field can be given, which is for reference only.
- If the field is to be made obligatory, the Is this field required? option has to be set to Yes. The field can be locked, that is, the user can be prevented from modifying it. If the value entered needs to be unique, the Should the data be unique? field must be changed accordingly.
- When self-registration is enabled, a number of default fields have to be provided at signup. If the new field should also be displayed on the signup page, the Display on signup page? option has to be set to Yes. This can be very useful in a commercial training setting when additional information, such as the address of the learner or previous qualifications, is required.
The custom field can be given one of the following three visibility settings:
- The Not visible setting is typically set by an administrator who wants to hold private data on the users.
- The Visible to user setting is normally selected for fields that hold sensitive information.
- The Visible to everyone setting is used for any other type of information. This is the default setting.
A Category has to be chosen from the list of added entries before the specific settings are shown for each field type. It is only possible to select newly created categories; default categories cannot, unfortunately, be selected. For example, if you wish to extend the existing address field with a ZIP code, you will have to do this in a separate category.
In addition to the common field settings, specific settings have to be provided for each profile field type:
- Checkbox: This type has only a single setting. It specifies whether the checkbox will be Checked by default in new user profiles or not.
- Date/time: The Start year (by default, the current year) and End year value (by default, the current year + 30) have to be specified. Additionally, an optional time field can be included by checking the Include time? option.
- Drop-down menu: For this type, a list of Menu options (one per line) and an optional Default value have to be provided. The list consists of a single item per line. In the following screenshot, three options (
Father,Mother, andCarer) have been entered, withMotherbeing the default value:
If you wish to allow empty values, leave the first entry empty:
- Text Area: This type allows users to define Default value in a free-form textbox.
- Text Input: For this type, Default value, Display size (the size of the textbox), and Maximum length have to be provided. Additionally, it has to be specified whether the field is a password field, which will lead to masking being turned on, if enabled.
The Link field lets you create dynamic links, where
$$represents the parameter that will be replaced with the entered text. In the following screenshot, we have specifiedhttp://twitter.com/$$. The transformed link will be shown in the user profile. Link target specifies where this link will be opened once it's selected:
Once all the required fields have been added, the order in which they will be displayed in the user profile can be changed by using the up and down arrows, as shown in the following screenshot:

These fields will now be shown in the user profile in the same way as the generic Moodle fields:

There are some more fields that technically belong to the user profile, but they have recently been moved to the User preferences section, which can be accessed via the drop-down menu besides the user icon in the toolbar. The reason why this has been done is that you can disallow users from editing their profile altogether (via the moodle/user:editownprofile capability) and let them specify certain preferences via dedicated forms:
- Preferred language: The default language of the system is shown and can be changed to the preferred language of the user. We will deal with localization in Chapter 9, Moodle Configuration.
- Forum preferences: There are three forum-related entries:
Preferences
Description
E-mail digest type
This setting determines how a user receives posts from forums to which a subscription exists. There are three possible choices, which are No digest (single e-mail per forum post) —which is the default, Complete (daily email with full posts), or Subjects (daily email with subjects only).
Forum auto-subscribe
This setting dictates whether a user is automatically subscribed to forums to which they post.
Forum tracking
If enabled, posts that have not yet been read will be highlighted, which improves forum usability.
- Editor preferences: This option determines which of the configured editors should be used when entering information in text areas. Unless the user has special requirements or preferences, this should be left as the Default editor option. You'll learn more about editors in Chapter 7, Moodle Look and Feel.
The default preferences of some settings (e-mail and forums) can be specified by navigating to Users | Accounts | User profile fields.