There are two ways for users to manually (that is, via the internal Moodle authentication mechanism) get access to your system and its courses:
- Adding individual users
- Uploading users in bulk
You will learn how to perform and support each type in the two sections that follow.
To add user accounts manually, go to Users | Accounts | Add a new user. You will see the same screen here that you saw earlier when you edited the user's profile.
You should avoid adding individual users manually as much as possible, as it is a very time-consuming, cumbersome, and potentially error-prone procedure. However, there are situations when you cannot avoid it, for example, when a student joins a school halfway through the term.
If you have more than one user to add, use Moodle's batch uploading facility, which we will look at next.
Uploading users in bulk allows the importing of multiple user accounts from a text file or the updating of user accounts that already exist in your system.
Student information is often available in existing applications, such as the internal student management information system, which can export data to an Excel spreadsheet or directly to a text file.

You will find good and detailed documentation on uploading and updating users in the batch mode at https://docs.moodle.org/en/Upload_users.
Before uploading users, you have to generate a text file that has to conform to a certain format. Its general format is that of a Comma Separated Value(CSV) file, which is a flat text file format. You can create such a CSV file in Excel or any other spreadsheet application. Use the first row to provide the field names, and then fill in each cell with the required data. Then, save the file as CSV, making sure that you specify that the top row contains field names.
The format of a text file is as follows:
- Each line of the file must contain a single record
- Each record must be a series of data that is separated by commas or other delimiters
- The first record of the file must contain the list of field names that will define the format of the rest of the file
An example of a valid input file is as follows:
username, password, firstname, lastname, email
galmond, pwd, Graham, Almond, [email protected]
earmstrong, pwd, Eleanor, Armstrong, eleanor. [email protected]
jarnold, pwd, Joanne, Arnold, [email protected]
The first line contains the list of fields that are provided, while the remaining three lines represent individual users to be uploaded.
Moodle's upload function supports five types of data fields:
- Required: Compulsory fields that have to be included
- Password: A password field
- Optional: If no value is provided, specified default values will be used
- Custom: User-defined profile fields
- Enrolment: This deals with courses, roles, and groups
- System: Assigning and unassigning system roles to and from users
- Special: This is used to change or remove users
When adding new users, only firstname and lastname are compulsory. When updating records, only username is required. You might recall that the user profile has a few more compulsory fields such as the e-mail address. If these fields are not provided, a default value has to be specified via a template. We will deal with this a little later.
The sample file is an example of a valid input file containing five fields, including the required firstname and lastname.
The password value is required unless Create password if needed has been enabled (take a look at the following information). If this is the case, an e-mail will be sent out to the respective user the next time the cron process runs.
Tip
If you set password to changeme, the user will be forced to change the password when they log in for the first time. This only works if the password policy has been deactivated. A better way to do this is using Force password change in Bulk user actions.
If no password is set, Moodle will, by default, generate one and send out a welcome e-mail.
Optional fields do not have to be specified—if they are not included in the text file, default values are taken, if present. These optional fields are listed as follows:
|
Field |
Values |
|---|---|
|
|
Text |
|
|
Text (from an existing list) |
|
|
|
|
|
Text |
|
|
Text (from an existing list); the two-letter code must be in capitals |
|
|
Text |
|
|
Text |
|
|
|
|
|
Text |
|
|
Text |
|
|
Text |
|
|
Text (from an existing list) |
|
|
|
|
|
|
|
|
Text |
|
|
Text (from an existing list) |
|
|
Text |
Let's assume that the default city has been set to Birmingham. In order to override the field for the users who are not living in the default town, the following sample file can be used:
username, password, firstname, lastname, city, email
galmond, changeme, Graham, Almond, London, [email protected]
earmstrong, changeme, Eleanor, Armstrong, , [email protected]
jarnold, changeme, Joanne, Arnold, York, [email protected]
In the preceding sample file, a city field has been added. After uploading the file, city for Graham Almond is set to London and that for Joanne Arnold is set to York. The city value for Eleanor Armstrong has been left empty and will be set to the default value of Birmingham.
It is important to include empty fields in the data when the default setting has to be used. These must be left empty even if it includes the last field in each record. An empty field is represented by two consecutive commas (as shown in the sample file).
In fields that have numeric values, the options are numbered in the same order as they appear in the Moodle interface—the numbering starts with 0. For instance, Email display allows the following settings:
- Hide my email address from everyone
- Allow everyone to see my email address
- Allow only other course members to see my email address
For Boolean fields, such as Forum auto-subscribe, use 1 for Yes and 0 for No.
If any fields in your upload file contain commas (for example, in Description), you have to encode them as , the upload function will automatically convert these back to commas.
Any user-defined fields that you specify (in our case, the ones for parental responsibilities) can also be used as part of the batch upload process. Each field has to be preceded by profile_field_; for instance, the field representing the Twitter ID would be called profile_field_twitter.
Custom fields are treated in the same way as optional fields. If they are specified, the values are taken; otherwise, default values will be used, if present.
Enrolment fields allow you to assign roles to users, that is, you can enroll them to courses and also groups. Groups are created by teachers in courses. Roles will be covered in greater detail in Chapter 6, Managing Permissions – Roles and Capabilities.
Each course has to be specified separately by course1, course2, course3, and so on. The course name is the short name of the course. Each corresponding type, role, group, enrolment period, and enrolment status has to have the same postfix, that is, type1, role1, group1, enrolperiod1, and enrolstatus1 have to correspond to course1.
It is further possible to set the role of a user in a course. Each role has a role short name and a role ID, either of which can be specified. If the type is left blank, or if no course is specified, the user will be enrolled as a student. The enrolment period sets the enrolment duration in terms of days; the enrolment status suspends a user from a course when it's set to 1.
If you want to assign users to groups in a course (group1 in course1, group2 in course2, and so on), you have to specify the group name or ID. If a specified group does not exist, it will be created automatically.
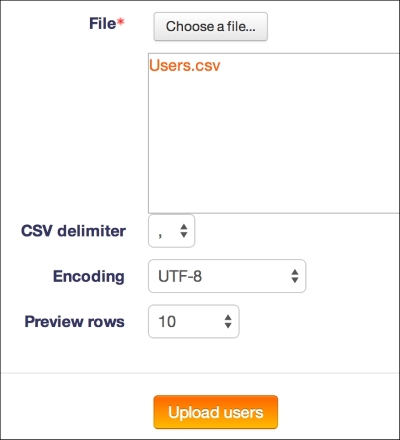
The following example demonstrates some of the enrolment features:
username, course1, role1, course2
galmond, Advanced, editingteacher, Staff
earmstrong, Advanced, examiner, Staff
jarnold, Basic, 3, Staff
As explained earlier, the first line specifies the fields in the file. The course1 field and its corresponding role2 as well as course2 are optional enrolment fields. Graham Almond will be assigned the editingteacher role in the Advanced course and a student role in the Staff course (no role has been specified, and hence the default is set). Eva Armstrong will be assigned the examiner role and also a student role in the Staff course. Jonny Arnold will be editingteacher (the role ID is 3) in the Basic course and student in the course labeled Staff.
Cohort fields allow you to add users as members to cohorts. Like enrolments and groups in courses, the field name has to be cohort1, cohort2, and so on. An example file snippet is as follows:
username, firstname, lastname, cohort1
pupil1, Pupil, One, 7a
pupil2, Pupil, Two, 7a
Users can be added to system cohorts as well as context cohorts. Cohorts will be dealt with after this main section.
If you need to assign users a system role, you need to specify this via sysrole1, sysrole2, and other similar fields. The value of the field has to be shortname of the role, for instance, manager or coursecreator.
You can also unassign a system role from a user by preceding the role name with the minus symbol, for example, -manager or -coursecreator.
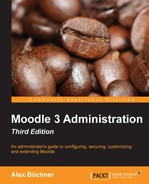
In order to upload or update users in the batch mode, go to Users | Accounts | Upload users.
The following settings are available:
|
Setting |
Description |
|---|---|
|
File |
The name of the text file. |
|
CSV delimiter |
Specify whether the delimiter is a comma (default), semicolon, colon, or tab. In most European locales, for instance, German, French, and Dutch, the default delimiter is a semicolon! |
|
Encoding |
The encoding scheme of your uploaded file, which specifies the locale in which it has been saved (the default is UTF-8). |
|
Preview rows |
The number of rows that will be displayed on the preview screen. |
Once this screen has been confirmed, you will see the following four sections:
- A preview of the specified number of rows that will be uploaded. Records that are to be skipped will not be shown.
- Settings will also be included, which will depend on the selected upload type.
- All the user fields for which default values can be set.
- Any user-defined fields that are grouped by category, if present.
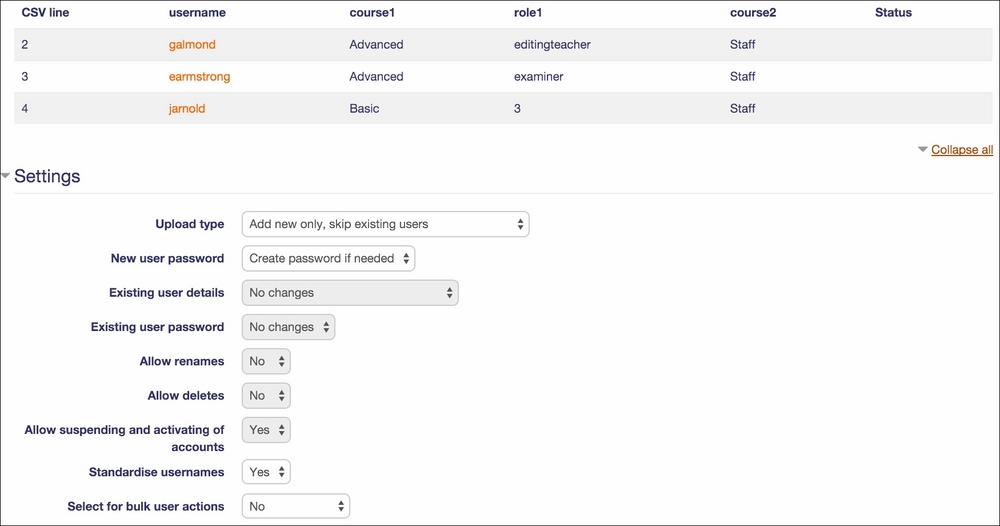
Bear in mind that not all settings exist for all upload types; they will remain grayed out if they are not applicable. The following settings have to be applied:
As mentioned earlier, the Moodle batch upload function supports default values that are used instead of optional fields if no value has been set. This includes all the values in the user profile that can be uploaded and also any user-defined custom fields.
Each text-based field can be populated using a template. This is useful for some fields, for instance, the URL of students' websites, and is compulsory for required fields if they're not specified in the CSV file, for example, username and email. Moodle will warn you if the latter is the case. For example, in the following screenshot, Username template has not been provided, which is indicated by the red warning message:

The template (or pattern) will create a value that's based on the values of other fields and the standard characters you specify. For example, if the username should be the first name of a user, followed by a period, and then the surname, the template you have to specify would look like %f.%l.
Four replacement values can be used:
%fwill be replaced byfirstname%lwill be replaced bylastname%uwill be replaced byusername%%will be replaced by%(this is required if you need a percentage sign in the generated text)
Between the % sign and any of the three code letters (l, f, and u), the following four modifiers are allowed:
–: This value will be converted to lowercase+: This value will be converted to uppercase~: This value will be converted to title case#: This value will be truncated to that many characters (where the hash represents a decimal number)
For instance, if firstname(%f) is Aileen and lastname(%l) is Bittner, the following values will be generated:
|
Pattern |
Value |
|---|---|
|
|
|
|
|
|
|
|
|
|
|
|
|
|
|
The last template is an example of embedding the replacement values inside other text; in this case, it is a URL that represents a user's home page.
Once all the settings have been specified, the default values have been provided, and the Upload users button has been clicked, Moodle will finally start the actual importing process.
Moodle displays a large table that contains all the user fields that have been added and/or changed. It also displays a status for each field, including any problems or errors that have occurred.
At the end of the user upload process, a message is displayed, summarizing the upload process. It contains the number of users that were created, updated, the ones who have a weak password (according the password policy), and the number of errors that occurred. Take a look at the following screenshot:

It is recommended that you identify the respective users immediately and modify their user settings manually.
The process to upload users, as described so far, does not support their profile pictures. These have to be uploaded separately by going to Users | Accounts | Upload user pictures.

The images to be uploaded have to be archived in a ZIP file. Each image filename has to conform to the user-attribute.extension format. The User attribute to use to match picture field is set to any one of these values: username, idnumber, or id of the user. This attribute is used to match the picture to an existing user, and you have to select the attribute in the respective pull-down menu. The extension is the filename extension (.jpg or .png). The image filenames are not case-sensitive.
For example, if the username consists of an initial name and a surname (%1f%l, if expressed in the template style), the valid filenames are psmith.png, lcohen.png, and mstripe.png. If the users exist, the pictures will be added to their profile. If a picture already exists for a user, it will only be replaced if you have enabled the Overwrite existing user pictures? option.
There are two types of settings for all accounts that are created manually or by batch creation: password expiry and the locking of user fields. These can be changed by navigating to Plugins | Authentication | Manual accounts.
Password expiry lets you choose how long a password is valid for via the Password duration setting before it has to be changed by a user. Notification threshold lets you specify when a user is being notified of the password rotation.
You have the ability to lock fields for accounts that are manually created or uploaded via batch files. This is useful whenever you do not want users to be able to change certain data in their user profiles—young students may misuse the Description field, idnumber may be used by Moodle to link to other systems, Email address might have been provided by the company, and so on.
If a field is Locked, the user will not be able to change its value. If you lock any compulsory fields, you either have to make sure that they are populated correctly or you set its lock state to Unlocked if empty. This will force the user to enter the value and then it will be locked. In the following screenshot, this has been done for the Email address field. If a required field is locked and not populated, Moodle will not operate correctly.
Unfortunately, the locking mechanism is only available for a number of user fields.
