Moodle's front page changes after a user has logged in. The content and layout of the page before and after login can be customized. Look at the following screenshot. It is the same site that the preceding screenshot was taken from but before a user had logged in:

In this particular example, the Login block is shown on the left-hand side and the Course categories and Courses as well as a course search box are displayed in the center, as opposed to the list of available courses. Additionally, the Administration block is not displayed.
Bear in mind that some implementations may not have an unauthenticated view. This is the case if a single sign-on mechanism has been implemented.
In order to customize the front page (go to Front page | Front page settings), you either have to be logged in as the Moodle administrator, or you have been granted front page-related permissions in the Front page context:

The following parameters are available on the Front Page settings page:
Front page settings mainly dictate what is displayed in the center of the page. Now, let's have a look at the blocks on the left-hand side and the right-hand side of the page.
To configure the left-hand side and right-hand side column areas with blocks, you have to turn on editing in the Front page settings area of the Administration block. Once turned on, you will see the Add a block block, which contains all the available blocks that can be added to the front page (except the ones that have already been added and only allow a single instance):

Blocks are added to the front page in exactly the same way as courses. To change their position, use the Move icon. Some blocks have settings that are unique to that block and which can be accessed through the Configuration icon. For example, the Navigation block allows you to specify whether the block can be docked and how certain types of content are displayed:

In addition to block-specific settings, every block contains two sets of parameters that control its behavior. The two sections, Where this block appears and On this page, will be shown for every block:

A block, like a role, can be assigned in a context (here, Front page) and its properties are inherited and overridden in subcontexts. The first set of settings specify where the block will be displayed and what the default properties are. The second set of settings specify the properties in the current context. The following parameters are available:
|
Setting |
Description |
|---|---|
|
Original block location |
This shows the context in which the block has been created. This is sometimes referred to as the home context. As with roles, pages may inherit blocks from a parent context. |
|
Page contexts (not in all contexts) |
This setting dictates on which pages the block will be shown; the options that are available are:
In other contexts, such as Courses, other (context-sensitive) options will be shown, depending on the original block location and your current location. |
|
Display on page types (unavailable on the front page) |
The options that are available depend on the context that the block is shown in, for example, Only user profile pages and My home page in the User context, or Any page, Any course page, and Any type of course main page in Courses. |
|
Default region (Left, Right) |
This determines whether the block's position is on the left-hand side or on the right-hand side. |
|
Default weight (-10…10) |
Think of a block as a balloon: the lighter the weight of the block, the higher up its position, and the heavier the weight, the further down it will be placed. |
|
Visible (Yes, No) | |
|
Region (Left, Right) |
This is the same as Default region. On My Home and other profile pages, content is offered as a third option (refer to the default Dashboard and Profile pages section further along). |
|
Weight (-10…10) |
This is the same principle as Default weight. |
In the preceding screenshot, the block is shown in the right-hand column in the first position. However, when it is displayed on any other page, the block is initially shown on the left-hand side and has a weight of -5.
The Main menu block allows the addition of any installed Moodle resource or activity inside the block. For example, using labels and links to (internal or external) websites, you are able to create a menu-like structure. Another block that has proven popular on the front page is Online users, which displays a list of everybody who's currently logged in to your Moodle site. The HTML block lets you add any HTML code, which is useful for any type of content that cannot be displayed using standard Moodle blocks.
If the Include a topic section parameter has been selected in Front page settings, you have to edit the area and add any installed Moodle activity or resource. This topic section is usually used by organizations to add a welcome message for visitors, which is often accompanied by a picture or other multimedia content.
The purpose of the Login block is for users to authenticate themselves by entering their credentials in the form of a username and password. It is possible to log in to Moodle from a different website, maybe your organization's home page, effectively avoiding Moodle's front page and the Login block. To implement this, you will have to add some HTML code on the remote page from which you wish the user to log in:
<form class="loginform" name="login" method="post" action="http://www.mysite.com/login/index.php">
<p>Username :
<input size="10" name="username" />
</p>
<p>Password :
<input size="10" name="password" type="password" />
</p>
<p>
<input name="Submit" value="Login" type="submit" />
</p>
</form>
The form will pass the username and password to your Moodle system. You will have to replace www.mysite.com with your URL; this address has to be entered in the Alternate Login URL field by navigating to Plugins | Authentication | Manage authentication.
The Moodle front page is being treated as a standalone component in Moodle and has, therefore, been given a top-level menu with a number of features that can all be accessed through Front page settings in the Administration block:

We have already looked at Front page settings; now, let's take a brief look at the other available options. Since the front page is treated like a course (internally, it has course ID of 1), a number of settings are available, which are identical to their course counterparts.
The front page has its own context in which groups can be created and roles can be assigned to users. This allows a separate user to develop and maintain the front page without having access to any other elements in Moodle. Since the front page is treated as a course, a Teacher role is usually sufficient for this. It is possible to upload users as teachers in the front page with a CSV file using the site's short name as the course1 field, teacher in the role1 field and, if required, the chosen group name in the group1 field).
We discussed this feature in detail in the previous chapter, which dealt with the management of roles.
Any filters that have been activated can be configured at the course level. The same applies to the front page. We will discuss filters in detail in Chapter 9, Moodle Configuration, when we look at different configuration settings.
These are identical to course reports. We will be looking at these options in Chapter 10, Moodle Logging and Reporting.
The front page has its own backup and restore facilities to back up and restore any elements of the front page, including any content. The mechanism of performing a backup and restore is the same as course backups, which is dealt with in Chapter 13, Backup and Restore.
Like all other course backups, front page backups are stored in the User backup folder of your user file (System/<your name>/Userbackup).
Since the Moodle front page is treated in the same way as a course, it also has its own question bank, which is used to store any questions used in front page quizzes. For more information on quizzes, question types, and the question bank, go to Moodle Docs at https://docs.moodle.org/en/Quiz_activity.
There are two special pages that users are able to customize themselves. These are the Dashboard page—we came across this in the introduction—and the Profile page.
Once logged in, users will have the ability to edit these pages by adding blocks to the respective areas and changing any blocks that have already been added by default. They also have the ability to reposition certain elements. You, as the administrator, have the ability to specify what these default blocks are, where they are positioned, and control how much customization can be carried out. When users customize their Dashboard or Profile page, they also have the ability to reset the respective pages to these defaults.
The two default settings can be found by navigating to Appearance | Default Dashboard page and Appearance | Default profile page, respectively. Once on the page, you have to click on the Blocks editing on button. Any blocks that you place on the default pages will appear on the users' pages. Interestingly, using the standard Move icon, you can place blocks in the center column! It is a shame that the same functionality does not (yet) exist on the front page or even in courses, by default, as shown in the following screenshot:

Not only that, you can also make blocks sticky. These are blocks that you wish to display on every page, effectively making them compulsory blocks that cannot be modified or deleted. To facilitate this, the block settings have to be extended with the Select pages setting, which is shown in the properties of any block in Default Dashboard page (take a look at the block settings, which were discussed earlier). If set to Any page matching the above, the block will appear on all those subpages and cannot be modified, effectively making the block sticky. The same mechanism applies to the default profile page.
To prevent users from editing their Dashboard and Profile pages, change the moodle/my:manageblocks and moodle/user:manageownblocks capabilities in the Authenticated user role, respectively.
There are a number of settings that impact how your users will navigate your site, regardless of whether they are on the Site home page, their Dashboard, or inside a course. This takes place when you navigate to Appearance | Navigation:
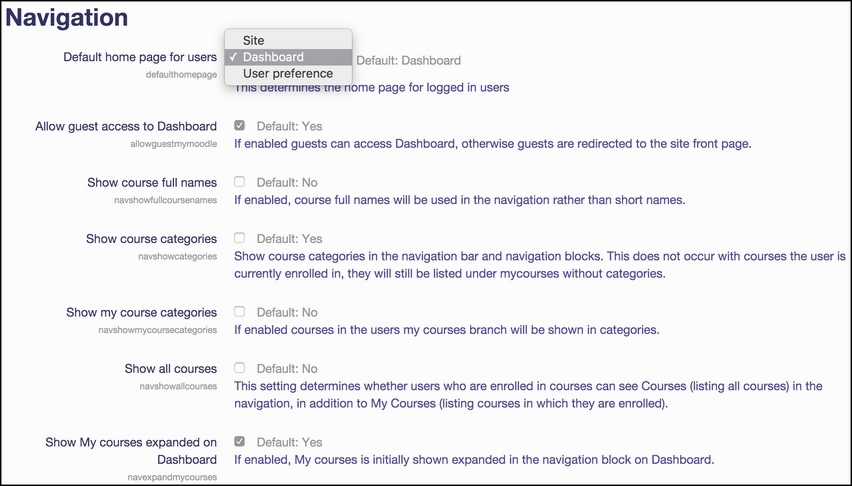
The vast majority of these mostly self-explanatory settings deal with the level of detail that is shown in courses and categories in the Navigation block as well as some related blocks.
The subject of displaying courses and categories comes up regularly when customizing Moodle sites. The common cause for concern is that the list of courses seen on the screen is overwhelming, and it will be difficult for users to navigate through the entire category hierarchy.
Bearing this in mind, there are a number of ways that the entire category structure can be exposed to users:
- Through the All courses link in the Courses block, unless the Hide all courses link option has been checked by navigating to Plugins | Blocks | Courses. Here, you can also specify that the admin will only see their own courses.
- By selecting List of categories or Combo list in the front page settings.
- Through the Courses listing in the Navigation block. This is controlled by the settings seen in the preceding screenshot.
The users that are shown alongside the course description. This is related to the way in which courses and categories are presented to the user. By default, this is only users with the Teacher role. You can change this via Course contacts by navigating to Appearance | Courses. Here, you can also specify a further number of useful settings:

Courses per page is a threshold setting that is used when displaying courses within categories. If there are more courses in a category than specified, the page navigation will be displayed at the top of the page. Also, when a combo list is used, course names are only displayed if the number is less than the specified threshold. For all the other categories, only the number of courses is shown after the category name.
Course authors have the ability to enter a course summary. This usually contains a textual description, but it can also contain files, for example, the curriculum as a PDF. You limit the number of courses with the summary shown on the front page via the Courses with summaries limit setting. By default, only one file can be attached; you might need to increase this Course summary files limit. In the preceding screenshot, we have also added the PDF format as a valid Course summary files extensions.
As we have seen so far, Moodle provides us with a great set of tools to customize the front page. Sometimes, though, you might want to replace this with a custom front page. The home page of https://moodle.org/ is a good example of where this has been implemented successfully.
Moodle lets you add a custom script to the front page. To implement this feature, you will have to add the following line to your config.php file:
$CFG->customfrontpageinclude="<dirroot>/local/<yourfrontpage>";
Bear in mind that this will display the output of the <yourfrontpage> PHP file at the top of the content area, in addition to any elements of the front page. This way, you have the best of both worlds: the Moodle elements (disable the ones you don't require) and your custom elements.