
In Chapter 3, Managing Windows Active Directory, in the Installing Active Directory with DNS recipe, you installed a DNS server as part of the installation of AD. This enabled DC1 to be an initial DNS server that provided a home for the various DNS records that were created by AD for the Reskit.Org domain. Adding a DHCP scope with DHCP options that specify 10.10.10.10 (the IP address of DC1.Reskit.Org) means that DHCP clients use DC1 as their DNS server (and register their IP addresses with DC1).
After you perform these two recipes, DHCP clients receive IP address configuration, which includes a DNS server. Thus, DHCP clients can easily resolve IP address for each other and for the domain forest infrastructure (DNS resolution provides AD clients with IP address details for the domain controller and global catalog servers).
The DC installation process, combined with DNS auto registration, means that basic DNS operations just work for DHCP configured clients (and DCs). Each Windows client and Windows server registers its details with the DNS servers on DC1 for others to resolve. This provides a good, basic DNS infrastructure. If you have statically configured servers, you need to ensure that each host has properly configured DNS settings that are pointing to both DNS servers. The IP addresses you assign statically must not interfere with the IP address range(s) provided by DHCP.
Once you have your first DNS server up and running (and AD installed), you should add both a second DC to the domain (outside the scope of this chapter) and add a second DNS server (and update DHCP to ensure that clients are configured with the IP addresses of both DNS servers). Adding a second DNS server (and a second DC) provides resilience and continuity, should a DC/DNS server fail.
In this recipe, you add a second DNS server, update DHCP, and then add a new DNS zone and new resource records.
This recipe uses three systems: DC1 and DC2, and a client computer, CL1. DC1 is a domain controller with DNS installed, DC2 is a second domain controller, but without DNS installed, and CL1 is a Windows 10 system configured to be a DHCP client.
- Add the DNS server service to
DC2:Add-WindowsFeature -Name DNS -ComputerName DC2.Reskit.Org
- Check that
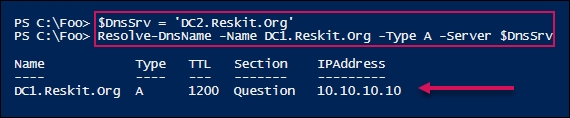
DC1has replicatedReskit.OrgtoDC2after installing DNS:$DnsSrv = 'DC2.Reskit.Org' Resolve-DnsName -Name DC1.Reskit.Org -Type A -Server $DnsSrv
- Add the new DNS server to the DHCP scope:
$OHT = @{ ComputerName = 'DC1.Reskit.Org' DnsDomain = 'Reskit.Org' DnsServer = '10.10.10.10','10.10.10.11' } Set-DhcpServerV4OptionValue @OHT - Check the options on
DC1:Get-DhcpServerv4OptionValue | Format-Table -AutoSize
- On
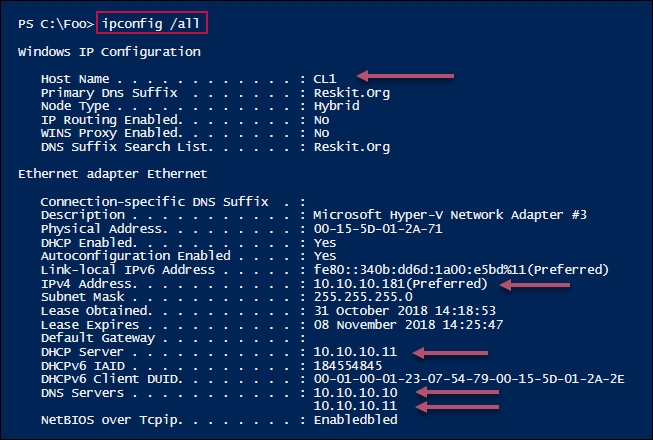
CL1, check the IP configuration:Get-DhcpServerv4OptionValue | Format-Table -AutoSize
- Create a new primary forward DNS zone:
$ZHT = @{ Name = 'Cookham.Reskit.Org' ReplicationScope = 'Forest' DynamicUpdate = 'Secure' ResponsiblePerson = 'DNSADMIN.Reskit.Org' } Add-DnsServerPrimaryZone @ZHT - Create a new IPv4 primary reverse lookup domain:
$PSHT = @{ Name = '10.in-addr.arpa' ReplicationScope = 'Forest' DynamicUpdate = 'Secure' ResponsiblePerson = 'DNSADMIN.Reskit.Org' } Add-DnsServerPrimaryZone @PSHT - Check that both zones are available:
Get-DNSServerZone -Name 'Cookham.Reskit.Org', '10.in-addr.arpa'
- Add an
Aresource record to theCookham.Reskit.Orgzone:$RRHT1 = @{ ZoneName = 'Cookham.Reskit.Org' A = $true Name = 'Home' AllowUpdateAny = $true IPv4Address = '10.42.42.42' TimeToLive = (30 * (24 * 60 * 60)) # 30 days in seconds } Add-DnsServerResourceRecord @RRHT1 - Check the results of the resource records in the
Cookham.Reskit.Orgzone:$Zname = 'Cookham.Reskit.Org' Get-DnsServerResourceRecord -ZoneName $Zname -Name 'Home'
- Check the reverse lookup information for
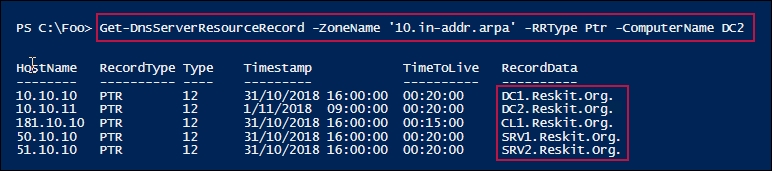
DC2:$RRH = @{ ZoneName = '10.in-addr.arpa' RRType = 'Ptr' ComputerName = 'DC2' } Get-DnsServerResourceRecord @RRH - Add the resource records to the
Reskit.Orgzone:$RRHT2 = @{ ZoneName = 'Reskit.Org' A = $true Name = 'Mail' CreatePtr = $True AllowUpdateAny = $True IPv4Address = '10.10.10.42' TimeToLive = '21:00:00' } Add-DnsServerResourceRecord @RRHT2 $MXHT = @{ Preference = 10 Name = '.' TimeToLive = '1:00:00' MailExchange = 'Mail.Reskit.Org' ZoneName = 'Reskit.Org' } Add-DnsServerResourceRecordMX @MXHT $GHT = @{ ZoneName = 'Reskit.Org' Name = '@' RRType = 'Mx' } Get-DnsServerResourceRecord @GHT - Test the DNS service on
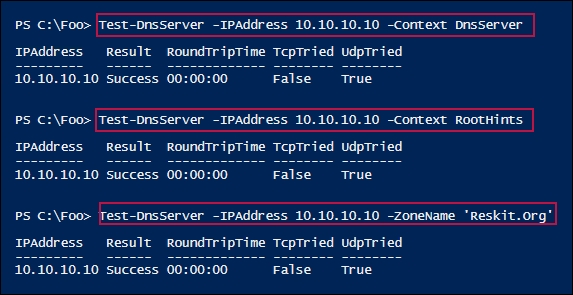
DC1:Test-DnsServer -IPAddress 10.10.10.10 -Context DnsServer Test-DnsServer -IPAddress 10.10.10.10 -Context RootHints Test-DnsServer -IPAddress 10.10.10.10 -ZoneName 'Reskit.Org'
In step 1, we started by adding the DNS server feature to DC2. The output from this step looks like this:

In step 2, you checked the DNS server on DC2 to ensure that it has replicated zone details from DC1 by checking to see whether DC2 can resolve DC1's IP address, which looks like this:
In step 3, which produces no output, you add DC2's IP address to the DHCP scope you created earlier. This enables DHCP clients to obtain the IP address of both DC1 and DC2.
With step 4, you checked on the DHCP options to ensure that the second DNS server address is configured as part of DHCP, which looks like this:

After configuring DHCP to issue both DNS server IP addresses with any leases from the DHCP service, you can validate this by running step 5 on CL1 (a domain joined Windows 10 host set up for DHCP). The output looks like this:
In step 6, you carried out some additional DNS maintenance by creating a forward lookup zone for Cookham.Reskit.Org. Then, in step 7, you created a new IPV4 reverse lookup domain. Neither step produces any output.
In step 8, you checked that these two zones are available, which looks like this:

In step 9, you added a resource record for Home.Cookham.Reskit.Org. This produces no output. In step 10, you checked that the resource record(s) are available, which looks like this:

In step 11, you looked at the contents of the reverse lookup zone. Depending on how many hosts have registered with DNS, the output of this step may vary, but should look like this:
In step 12, you added an A resource record (for Mail.Reskit.Org and a mail exchanger (MX) resource record (pointing to Mail.Reskit.Org). Adding these two resource records to DNS creates no output.
In step 13, you tested the DNS service on DC1 by using the Test-DNSServer cmdlet. You used this cmdlet to test that the overall DNS service is up and running, is properly configured with root hints, and that the server is resolving addresses within the Reskit.Org domain. The output of this step appears as follows:
In step 1, you installed the DNS service on DC2, which is a domain controller. When you installed Active Directory on DC1 in the Installing Active Directory with DNS recipe in Chapter 3, Managing Windows Active Directory, the installation process created a DNS zone for Reskit.Org, and set the replication to replicate to all DCs in the forest. Thus, when you install DNS on DC2, it should be able to immediately resolve the resource records for the Reskit.Org domain. As you can see, DC2 is able to resolve the addresses in the Reskit.Org zone on DC1.
In step 3, you adjusted the DHCP scope that was created in the Configuring DHCP Scopes recipe, which you then tested by first ensuring that the DHCP scope was configured with the IP addresses of both DNS servers and that a DHCP client was configured via DHCP with those addresses.
In step 6, you created a forward lookup DNS zone and, in step 7, you created a reverse lookup zone for the 10.0.0.0/8 set of IP addresses. In step 8, you checked that those two zones were up and running.
In step 9, you create an A resource record for Home.Cookham.Reskit.Org host and, as you can see in step 10, this resource record was successfully resolved.
In step 11, you examined the resource records in the 10.in-addr.arpa zone (that is, hosts with a 10.0.0.0/8 IP address).
In step 12, you added an A resource record for a mail server (Mail.Reskit.Org) and a MX resource record to point to the mail host. Hosts wishing to send mail to any user in the Reskit.Org domain (for example, [email protected]) would be sent to Mail.Reskit.Org. Note that this DNS server (and the mail-related RRs) exist only inside the Reskit.Org network. If Reskit.Org is to receive mail from the internet, then you need to configure your external DNS zones with the appropriate mail server addresses.
These days, many organizations are moving to cloud mail, for example, Google's Gmail. In such cases, you should check with your cloud mail provider as to what resource records are to be set up and what they should contain. You also need to set up the Sender Protected Framework (SPF) to minimize spam coming from your domain. Setting up a mail server and configuring SPF records is outside the scope of this chapter. Look at https://support.google.com/domains/answer/6304562?hl=en-GB for an example of how you can set up mail security for G Suite (Google's cloud mail product).