
Once you have a container host configured, you need to ensure that your environment has been configured successfully and can utilize containers. A really simple way to check that all is well on your container host is by downloading and running an application. Running this containerized application successfully shows that you have containers and Docker set up.
There are a few simple applications you can utilize that test the container environment on CH1 (which you set up in the Configuring a container host recipe). You use a few of them in this recipe.
Before you can run a container, you must acquire a container image. There are several ways to obtain images as you see in this chapter. Docker maintains an online registry that contains a variety of container images for you to leverage. Using the docker command, you can search and download images either to use directly or to use as the basis of a custom-built container (for example, as you can see in the Using a Dockerfile to create and use a container recipe). In this recipe, you download several images, run them as containers, and then clean up your environment.
This recipe demonstrates using the Docker registry to obtain images, and then using those images locally. This recipe looks at some basic container management tasks and shows some methods to automate the docker.exe command.
This recipe needs a configured container host, CH1. You set up this host in the Configuring a container host recipe.
- Find any
hello-worldcontainers at the Docker registry:docker search hello-world
- Pull the official Docker
hello-worldcontainer image:docker pull hello-world
- List the images on
CH1:docker image ls
- Run the
hello-worldcontainer image:docker run hello-world
- Look for Microsoft images in the Docker registry:
docker search microsoft
- Get the
nanoserverbase image:docker image pull mcr.microsoft.com/windows/nanoserver:1809
- Run the
nanoserverbase image:docker run mcr.microsoft.com/windows/nanoserver:1809
- Check the images available now on
CH1:docker image ls
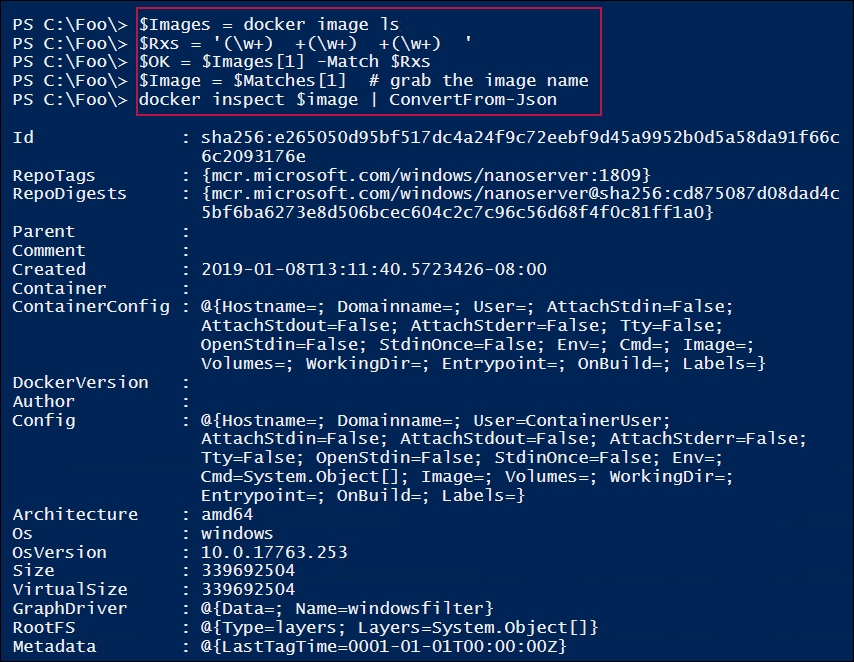
- Inspect the first image:
$Images = docker image ls $Image = (($Images[1]).Split(' ')|where {$_.Length -ge 1})[2] docker inspect $image | ConvertFrom-Json - Get another (older) image and try to run it:
docker image pull microsoft/nanoserver | Out-Null
docker run microsoft/nanoserver
- Now, run the image with Hyper-V isolation:
docker run --isolation=hyperv microsoft/nanoserver
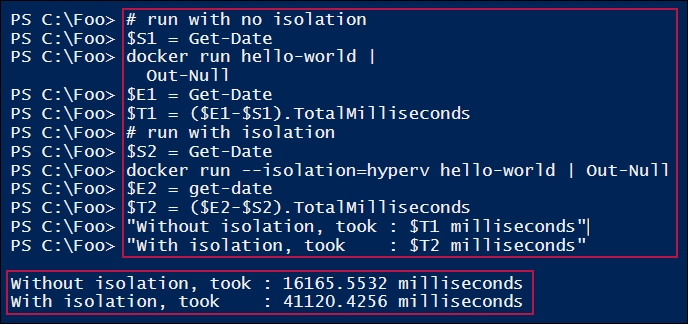
- Examine the differences in runtimes with Hyper-V:
# Run the container with no isolation
$S1 = Get-Date
docker run hello-world | Out-Null
$E1 = Get-Date
$T1 = ($E1-$S1).TotalMilliseconds
# Run the same container with isolation
$S2 = Get-Date
docker run --isolation=hyperv hello-world | Out-Null
$E2 = get-date
$T2 = ($E2-$S2).TotalMilliseconds
# display the difference
"Without isolation, took : $T1 milliseconds"
"With isolation, took    : $T2 milliseconds"
- Remove all container images:
docker rmi $(docker images -q) -f | out-Null
- View the remaining images and verify that the containers have been removed:
docker image ls
docker container ls
In step 1, you search the Docker registry for hello-world images, like this:

In step 2, you pull the official Docker hello-world image and download it to your container host, which looks like this:

In step 3, you use the docker command to list the images on CH1, which looks like this:

In step 4, you run the Docker hello-world image, which produces the following output:

In step 5, your search for Microsoft images in the online Docker registry, which produces output like this:

In step 6, you download another base image from the Docker registry with output like this:

In step 7, you run the nanoserver:1809 image, which looks like this:

In step 8, you look at the images you have downloaded so far, which now looks like this:

In step 9, you use the docker inspect command to get more information about the nanoserver image, which looks like this:
In step 10, you download and run a container that needs isolation, which generates a Docker error, as follows:

In step 11, you run this same image, but this time using Hyper-V isolation. The results are more like what you might expect, as shown in the following screenshot:

In step 12, you examine the performance impact of using Hyper-V isolation, which looks like this:
In step 13, you remove all the container images on CH1, which produces no output. In step 14, you list the current images and containers on CH1, which looks like this:

In step 4, you run the hello-world container you downloaded in step 2. This container prints out some text, then exits. This is a great demonstration that your container host is up, running, and able to host containers.
In step 7, you download the nanoserver image. By using the :1809 tag in the image name, you ensure that docker.exe downloads an image which corresponds to the kernel in Windows Server 2019 (and Windows 10 1809).
In step 9, you use the docker image command to get all the images on the container host (CH1). Docker.exe returns the images on the system as an array of strings (that is, not objects!). The first ($Images[0]) entry is a string of the line of column headers. The next two entries in the $Images array relate to the nanoserver and hello-world images, respectively. You create the $Image value by using a regular expression to pull the Docker image name from the string returned by docker. Those more experienced in the dark arts of regular expressions could no doubt improve this step.
In step 10, you download and attempt to run a container whose built-in base OS is a different version to the OS running on the container host (CH1). This is to be expected, and you have two alternatives. The first is to use a more up-to-date container image—one that matches yours (or create an updated image as shown in the Using a Dockerfile to create and use a container recipe). The other alternative is to use Hyper-V isolation, which works fine, as you saw in step 11.
Using isolation, however, has a performance implication. The approach does provide added security, which may be appropriate in a share-hosting environment. There is, however, a significant startup performance hit. The good news is that the overhead of running a container using the isolation provided by Hyper-V is not huge once the container is up and running.
In step 13, you start up a detached container. In doing so, you tell Docker to map the local host's port 80 to port 80 in the container. So, when you browse to http://CH1, you see the standard IIS startup screen, which comes from IIS running in the container. We look at doing a bit more with IIS in the Deploying IIS in a container and Using a Dockerfile to create and use a container recipes.
For more information around getting started with Docker, see this link: https://docs.docker.com/get-started/.