
With Hyper-V in Server 2019, a checkpoint captures the state of a VM into a restore point. Hyper-V then enables you to roll back a VM to a checkpoint. Windows Server 2008's version of Hyper-V first provided this feature. With Server 2008, these restore points were called snapshots. With Server 2012, Microsoft also changed the name to checkpoint. This made the terminology consistent with System Center, and avoided confusion with respect to the Volume Shadow Copy Service (VSS) snapshots used by backup systems.
While the Hyper-V team did change the terminology, some of the cmdlet names remain unchanged. To restore a VM to a checkpoint, you use the Restore-VMSnapShot cmdlet.
When you create a checkpoint, Hyper-V temporarily pauses the VM. It then creates a new differencing disk (AVHD). Hyper-V then resumes the VM, which writes all data to the differencing disk. You can create multiple checkpoints for a VM.
Checkpoints are great for a variety of scenarios. They can be useful for troubleshooting. For example, if you are troubleshooting, you can get the VM to the point where some bug is triggered, then take a checkpoint. With the checkpoint taken, you can try a fix. If the fix does not work, you can just roll back to the checkpoint and try some other fix. Checkpoints are also useful for training. You could create a VM for a course, and create a checkpoint after each successful lab. That way, the student can make a mistake in a lab, and skip forward to a later checkpoint and carry on.
Using checkpoints in production is a different matter. In general, you should avoid using checkpoints on your production systems for a number of reasons. If your servers use any sort of replication or transaction-based applications, the impact of resetting the clock to an earlier time can be bad. Since checkpoints rely on differencing disks that feature constantly growing physical disk files, the use of checkpoints can result in poor performance.
Checkpoints have their place—but should not be used as a backup strategy. In this recipe, you create a snapshot of PSDirect, then you create a file in the VM. You take a further checkpoint and create a second file, after reverting back to the first snapshot, observing that there are no files created. Then, you roll forward to the second snapshot to see that the first file is there but not the second (because you created the second file after the snapshot was taken). Then, you remove all the snapshots. After each key checkpoint operation, you observe the VHDX and AVHD files, which support the PSDirect VM.
This recipe, which you run on HV1, uses the PSDirect VM you created and used earlier in this chapter. The VHDX files for the VM reside in C:VmVhdsPSDirect. Depending on which other recipes you have run from this chapter, the virtual disks may be in a different folder, but the recipe copes with the disk files being in any folder (known to Hyper-V).
- Create credentials for
PSDirect:$RKAn = 'WolfAdministrator' $PS = 'Pa$$w0rd' $RKP = ConvertTo-SecureString -String $PS -AsPlainText -Force $T = 'System.Management.Automation.PSCredential' $RKCred = New-Object -TypeName $T -ArgumentList $RKAn,$RKP
- Look at
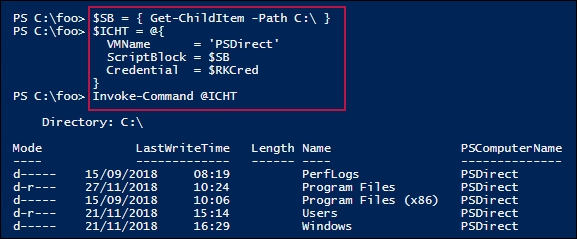
C:in thePSDirectVM at the start:$SB = { Get-ChildItem -Path C: } $ICHT = @{ VMName = 'PSDirect' ScriptBlock = $SB Credential = $RKCred } Invoke-Command @ICHT - Create a snapshot of the
PSDirectVM onHV1:$CPHT = @{ VMName = 'PSDirect' ComputerName = 'HV1' SnapshotName = 'Snapshot1' } Checkpoint-VM @CPHT - Look at the files created to support the checkpoints:
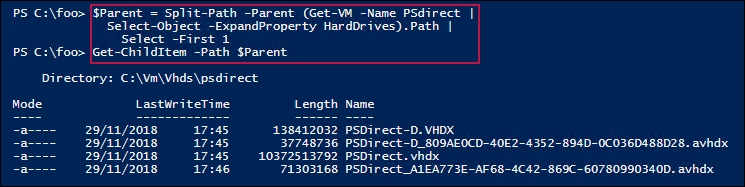
$Parent = Split-Path -Parent (Get-VM -Name PSDirect | Select-Object -ExpandProperty HardDrives).Path | Select -First 1 Get-ChildItem -Path $Parent - Create some content in a file on
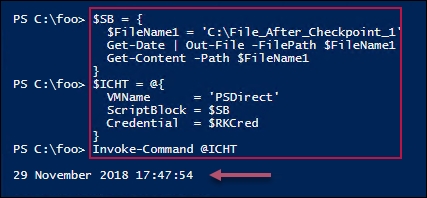
PSDirectand display it:$SB = { $FileName1 = 'C:File_After_Checkpoint_1' Get-Date | Out-File -FilePath $FileName1 Get-Content -Path $FileName1 } $ICHT = @{ VMName = 'PSDirect' ScriptBlock = $SB Credential = $RKCred } Invoke-Command @ICHT - Take a second checkpoint of the
PSDirectVM:$SNHT = @{ VMName = 'PSDirect' ComputerName = 'HV1' SnapshotName = 'Snapshot2' } Checkpoint-VM @SNHT - Get the VM checkpoint details for
PSDirect:Get-VMSnapshot -VMName PSDirect
- Look at the files supporting the two checkpoints:
Get-ChildItem -Path $Parent
- Create and display another file in
PSDirect(after you have takenSnapshot2):$SB = { $FileName2 = 'C:File_After_Checkpoint_2' Get-Date | Out-File -FilePath $FileName2 Get-ChildItem -Path C: -File } $ICHT = @{ VMName = 'PSDirect' ScriptBlock = $SB Credential = $RKCred } Invoke-Command @ICHT - Restore the
PSDirectVM back to the checkpoint namedSnapshot1:$Snap1 = Get-VMSnapshot -VMName PSDirect -Name Snapshot1 Restore-VMSnapshot -VMSnapshot $Snap1 -Confirm:$false Start-VM -Name PSDirect Wait-VM -For IPAddress -Name PSDirect
- See what files we now have on
PSDirect:$SB = { Get-ChildItem -Path C: } $ICHT = @{ VMName = 'PSDirect' ScriptBlock = $SB Credential = $RKCred } Invoke-Command @ICHT - Roll forward to
Snapshot2:$Snap2 = Get-VMSnapshot -VMName PSdirect -Name Snapshot2 Restore-VMSnapshot -VMSnapshot $Snap2 -Confirm:$false Start-VM -Name PSDirect Wait-VM -For IPAddress -Name PSDirect
- Observe the files you now have in the
PSDirectVM:$SB = { Get-ChildItem -Path C: } $ICHT = @{ VMName = 'PSDirect' ScriptBlock = $SB Credential = $RKCred } Invoke-Command @ICHT - Restore the VM to
Snapshot1:$Snap1 = Get-VMSnapshot -VMName PSDirect -Name Snapshot1 Restore-VMSnapshot -VMSnapshot $Snap1 -Confirm:$false Start-VM -Name PSDirect Wait-VM -For IPAddress -Name PSDirect
- Check snapshots and VM data files again:
Get-VMSnapshot -VMName PSDirect
Get-ChildItem -Path $Parent
- Remove all the snapshots from
HV1:Get-VMSnapshot -VMName PSDirect | Remove-VMSnapshot
- Check VM data files again:
Get-ChildItem -Path $Parent
In step 1, you create a credentials object for the PSDirect VM's local administrator account. There is no output from this step.
In step 2, you examine the C: drive in the PSDirect VM, which looks like this:
In step 3, you create a checkpoint of PSDirect on HV1, which produces no output. With step 4, examine the files supporting the PSDirect VM after the checkpoint is taken, which looks like this:
In step 5, you create a file (after the first checkpoint is taken) and file contents, then view the file, which looks like this:
After creating the file, in step 6, you take another checkpoint for the PSDirect VM, which produces no output. With step 7, you view the VM snapshots available for the PSDirect VM, which looks like this:

In step 8, you again view the files supporting the PSDirect VM, which looks like this:

After reverting the PSDirect VM back to the first checkpoint, in step 9, you create a further file in the C: folder inside the PSDirect VM, which looks like this:

Without saving any work done, in step 10, you revert the PSDirect VM back to the first snapshot, Snapshot1, which creates no output. Once the PSDirect VM is restarted from Snapshot1, in step 11, you look at the files now in the PSDirect VM's C: drive, which looks like this:
In step 12, you roll the VM forward to the second checkpoint, Snapshot2. This step produces no output. With step 13, you view the files in the root of the C: drive of the PSDirect VM, which looks like this:

In step 14, you re-restore the PSDirect VM back to the first snapshot, Snapshot1, then wait until the VM is restarted. This step produces no output. In step 15, you re-view the PSDirect VM's snapshots and the snapshot files, which looks like this:

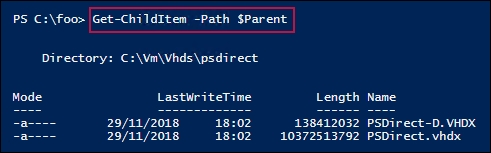
In step 16, you remove all the snapshots from the PSDirect virtual machine, which produces no output. In step 17, you view the VHDX files for the PSDirect VM (now that all snapshots are removed), which looks like this:
In step 10, you revert the PSDirect VM back to an earlier snapshot. Any file activity in the VM after you took the second snapshot, and before reverting to the earlier snapshot, is now lost. In step 12, you roll forward the PSDirect VM to the second snapshot. This loses all work you might have done after reverting to Snapshot1 and before rolling forward to Snapshot2. Be very careful when reverting to earlier snapshots or rolling forward.