
WSUS is a feature within Windows Server 2019. To use Windows Update Services, you first install the WSUS Windows feature and then do basic configuration and setup. In this recipe, you install WSUS and review the results of that installation.
This recipe uses the WSUS1 server, a member server in the Reskit.Org domain. At the start of this recipe, WSUS1 has no additional features or software loaded.
- Install the Windows Update feature and tools:
$IFHT = @{ Name = 'UpdateServices' IncludeManagementTools = $true } Install-WindowsFeature @IFHT - Determine the features installed on the
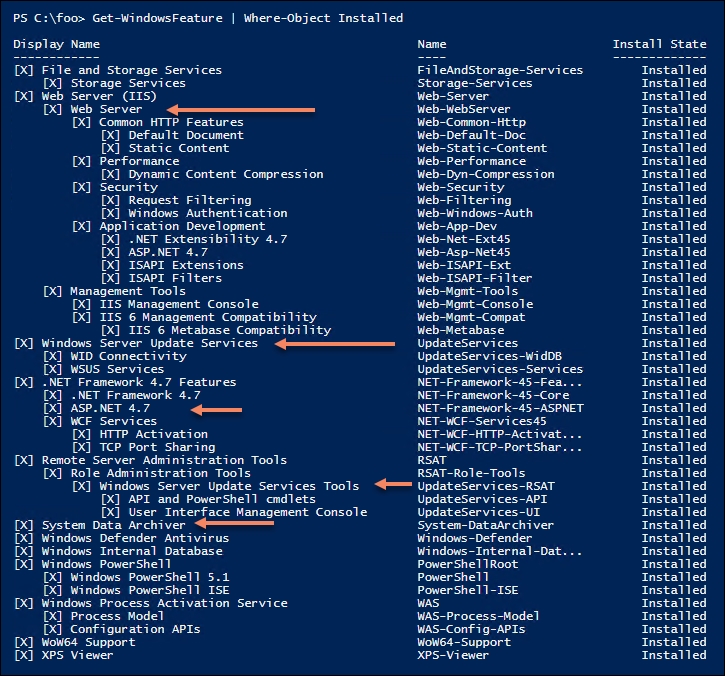
WSUS1server after installation of WSUS:Get-WindowsFeature | Where-Object Installed
- Create a folder for WSUS update content:
$WSUSDir = 'C:WSUS' If (-Not (Test-Path -Path $WSUSDir -ErrorAction SilentlyContinue)) {New-Item -Path $WSUSDir -ItemType Directory| Out-Null} - Perform post-installation configuration using
WsusUtil.Exe:$CMD ="$env:ProgramFiles" + 'Update ServicesToolsWsusUtil.exe' & $CMD Postinstall CONTENT_DIR=$WSUSDir
- View the post-installation log file:
$LOG = "$env:localappdata	empWSUS_Post*.log"
Get-ChildItem -Path $LOG
- View the WSUS website created on
WSUS1:Get-Website -Name ws* | Format-Table -AutoSize
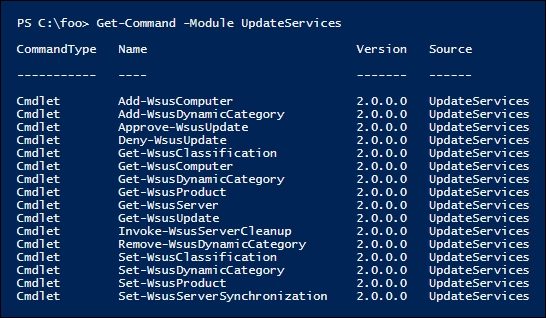
- View the cmdlets in the
UpdateServicesmodule:Get-Command -Module UpdateServices
- Inspect
TypeNameand properties of theWSUS1server:$WSUSServer = Get-WsusServer $WSUSServer.GetType().Fullname $WSUSServer | Select-Object -Property *
- Examine the methods available:
($WSUSServer | Get-Member -MemberType Method).count
$WSUSServer | Get-Member -MemberType Method
- Examine the configuration of the
WSUS1server:$WSUSServer.GetConfiguration() | Select-Object -Property SyncFromMicrosoftUpdate,LogFilePath - View product categories after initial install:
$WSUSProducts = Get-WsusProduct -UpdateServer $WSUSServer
$WSUSProducts.Count
$WSUSProducts
- Display subscription information:
$WSUSSubscription = $WSUSServer.GetSubscription()
$WSUSSubscription | Select-Object -Property * |
  Format-List
- Update the categories of products available:
$WSUSSubscription.StartSynchronization() Do { Write-Output $WSUSSubscription.GetSynchronizationProgress() Start-Sleep -Seconds 5 } While ($WSUSSubscription.GetSynchronizationStatus() -ne 'NotProcessing') - Once synchronization is complete, check the results of the synchronization:
$WSUSSubscription.GetLastSynchronizationInfo()
- Examine the categories available after synchronization:
$WSUSProducts = Get-WsusProduct -UpdateServer $WSUSServer
$WSUSProducts.Count
$WSUSProducts
In step 1, you install the Windows Update Services feature and the associated tools, which looks like this:

Adding the Update Services feature adds a number of additional related services, as you can see in step 2, which looks like this:
In step 3, you create, silently, a folder that you are going to use to hold WSUS content. In step 4, you perform the post-installation task using the wsusutil.exe console command, which also produces no output.
The wsusutil.exe application creates an output log file containing details of the actions taken by the application. In step 5, you look at the log file that wsusutil.exe created in step 4:

The WSUS installer also installs a website on a WSUS to communicate with WSUS clients. In step 6, you view the site, as you can see here:

In step 7, you examine the commands contained in the UpdateServices module that you installed as part of step 1. The output of this step looks like this:
You examine the status of your WSUS server, in step 8, by using the Get-WsusServer cmdlet, which returns an UpdateServer object, which looks like this:

The $WSUSServer object you instantiated in step 8 contains a large number of methods you can call to manage aspects of the WSUS server. As you can see from the output of step 9, there are 77 methods—to save space, only a few are listed, as shown here:

WSUS also generates an important log file, SoftwareDistribution.log, that can be invaluable for troubleshooting. You can see the filename, in step 10, which looks like this:

Following the initial installation and configuration done so far, in step 11, you can see that the WSUS1 server now is to get updates for a small set of products (17 in total), as you can see here:

In step 12, you retrieve and view the WSUS server's subscription details, which looks like this:

In step 13, you perform a full synchronization by invoking the StartSynchronization() method of the WSUS server object. This is an asynchronous operation—when you call the method, WSUS carries out the server update process in the background. You can call the GetSynchronizizationStatus() method to view the status, as you can see in step 13. The synchronization process is not overly fast and can take several hours to complete. Truncated for brevity, the output of this step looks something like this:

Once the synchronization has completed, in step 14, you review a summary of the results, which looks like this:

Now that this first full synchronization has taken place, WSUS is able to support a larger number of Microsoft products, as you can see in the output from step 15:

In step 2, you can see that installing WSUS also installs the web-server (Internet Information Server) along with ASP.NET 4.7 on WSUS1.
In step 3, you create a folder to hold downloaded updates that you intend to review then deploy to your organization. This folder can get large, especially when you implement multi-language updates. You should hold your updates on a volume that is likely to have adequate space going forward. Making the volume fault-tolerant is also important as you plan and deploy WSUS.
In step 13, you perform a full sync with the Windows Update servers. This can take several hours. You may wish to change the value used in the Start-Sleep command to a larger value (otherwise you could end up with thousands of lines of output!).
In this recipe, you installed WSUS on a single server. You can use WSUS on multiple servers, which is appropriate for supporting larger networks. You can set up a WSUS server to synchronize from other WSUS servers on the network, you can use web proxies, and you can work with SQL Server instead of the Windows Internal Database.
The WSUS server requirements and deployment scenarios are documented at https://docs.microsoft.com/en-us/windows-server/administration/windows-server-update-services/plan/plan-your-wsus-deployment.
The commands in the UpdateServices module are useful, but many of the tasks you are going to perform in PowerShell make use of the UpdateServer and Subscription objects and their methods.
MSDN contains documentation on the objects inside the Microsoft.UpdateServices.Administration namespace. You can view the documentation at https://docs.microsoft.com/en-us/previous-versions/windows/desktop/ms748969(v=vs.85).