
Configuring hardware in your virtual machine is very much like configuring a physical computer—just without the need for a screwdriver. With a physical computer, you can adjust the CPUs and BIOS settings. You can also adjust physical RAM, network interfaces, disk interfaces and disk devices, and DVD drives (with/without a loaded DVD), and so on. Each of these physical components is provided within a Hyper-V VM, and the PowerShell cmdlets make it simple to configure the virtual hardware available to any Hyper-V VM.
In this recipe, you adjust the VM's BIOS, CPU count, and memory, and then add a SCSI controller. You then create a virtual disk and assign it to the SCSI controller. Then, you view the results.
Just like in most physical servers, not all of these components can be changed while the server is running. You run this recipe from HV1 and turn the PSDirect VM off before configuring the virtual hardware.
This recipe does not cover the VM's virtual NIC. By default, Virtual Machines (such as you created in the Creating a virtual machine recipe) contain a single virtual NIC. But you can always add additional NICs. Configuring the VM's networking is covered in the Configuring Hyper-V networking recipe.
This recipe uses the VM you created in the Creating a virtual machine recipe. The VM is called PSDirect.
- Turn off the
PSDirectVM:Stop-VM -VMName PSDirect Get-VM -VMName PSDirect
- Set the
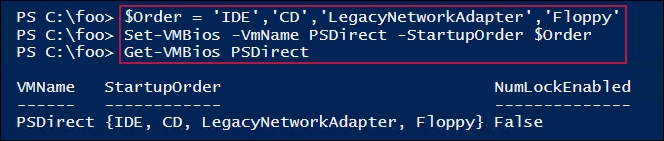
StartupOrderin the VM's BIOS:$Order = 'IDE','CD','LegacyNetworkAdapter','Floppy' Set-VMBios -VmName PSDirect -StartupOrder $Order Get-VMBios PSDirect
- Set and view CPU count for
PSDirect:Set-VMProcessor -VMName
PSDirect-Count 2 Get-VMProcessor -VmName PSDirect | Format-Table VMName, Count - Configure
PSDirectmemory settings:$VMHT = [ordered] @{ VMName = 'PSDirect' DynamicMemoryEnabled = $true MinimumBytes = 512MB StartupBytes = 1GB MaximumBytes = 2GB } Set-VMMemory @VMHT Get-VMMemory -VMName PSDirect - Add a SCSI controller to
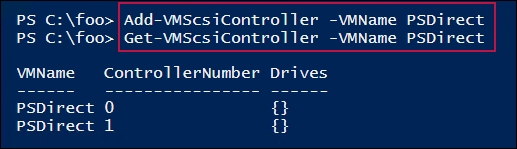
PSDirectand view the controllers available in the VM:Add-VMScsiController -VMName PSDirect Get-VMScsiController -VMName PSDirect
- Restart the VM:
Start-VM -VMName PSDirect
Wait-VM -VMName PSDirect -For IPAddress
- Create a new VHDX file:
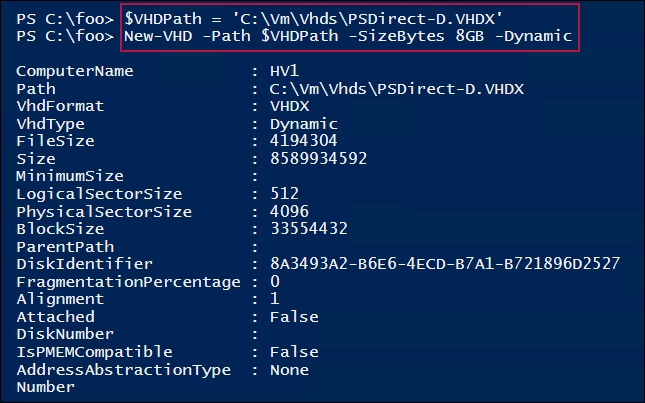
$VHDPath = 'C:VmVhdsPSDirect-D.VHDX'
New-VHD -Path $VHDPath -SizeBytes 8GB -Dynamic
- Add the VHD to the SCSI controller:
$VHDHT = @{ VMName = 'PSDirect' ControllerType = 'SCSI' ControllerNumber = 0 ControllerLocation = 0 Path = $VHDPath } Add-VMHardDiskDrive @VHDHT - Get volumes from
PSDirectVM:Get-VMScsiController -VMName PSDirect | Select-Object -ExpandProperty Drives
In step 1, you turn off the PSDirect VM, then get the VM's details, as follows:

In step 2, you adjust then view the startup order in the VM's virtual BIOS, which looks like this:
In step 3, you set and then view the CPU count for the PSDirect VM, which looks like this:

In step 4, you adjust and view the VM's memory settings, which looks like this:

In step 5, you add a new SCSI controller to the PSDirect VM, then view the controllers, which looks like this:
In step 6, you restart the PSDirect VM, which produces no output. Once the VM has restarted, in step 7, you create a new virtual hard drive, that looks like this:
In step 8, you add the VHDX to the VM, which produces no output. In step 9, you view the details of the virtual hard drive in the SCSI controller in the PSDirect VM, which looks like this:

In addition to the hardware components covered in this recipe, you can also manage a VM's COM ports and diskette drives. While you cannot directly connect a VM's COM port to the host's COM port, you can configure a VM to communicate with the physical computer via a named pipe on the host computer. A typical use for this is kernel debugging—probably something most IT pros rarely ever do. For more information on named pipes, see https://docs.microsoft.com/en-us/windows/desktop/ipc/named-pipes.
You can also use a virtual floppy drive in a VM. There is no cmdlet support to create a virtual floppy drive file (a .vfd file) in the Hyper-V module, nor is there support for mounting a VFD file in Windows. You can create VFD files using Hyper-V Manager and then use Set-VMFloppyDiskDrive to attach the VFD file as a floppy disk drive in the VM.