
Deploying a DSC web-based pull server is more complex than deploying an SMB pull server. Deploying the SMB-based pull server is simple: just create the two shares that you need and place the relevant files on that share. The web server approach requires you to also load IIS, install the DSC service, and configure the service, as well as place the MOF files, resources, and any relevant checksums on the web server. Of course, in both cases, you need to configure each node's LCM.
You deploy a web-based pull server to provide a pull client with both resources and configuration MOF files. Unlike an SMB-based pull server, a web-based pull server also provides reporting capabilities, enabling a pull client to report the status back to the reporting server.
Reporting is not available using an SMB-based pull server. To simplify the creation of a web-based DSC pull server, you can use the xPSDesiredStateConfiguration module DSC resource. You download this resource from PS Gallery, which greatly simplifies the process of configuring a node to be a DSC pull server (and to be a reporting server).
As with SMB-based pull servers, once you have set up a DSC web pull server, you need to configure the clients to pull configurations/resources from the pull server and send reporting information to the report servers.
The details of setting up a DSC web-based pull server changed with PowerShell V5 (and later versions). This recipe is based on the PowerShell V5 approach.
This recipe uses two servers: SRV1 and SRV2. SRV1 is the pull server. This recipe configures the DSC web service on SRV1 and configures SRV2 to pull configurations and resources from the pull server.
- Install the
xPSDesiredStateConfigurationmodule from the PS Gallery onSRV1andSRV2using the following code:$SB = { Install-Module -Name xPSDesiredStateConfiguration } Invoke-Command -ComputerName SRV1 -ScriptBlock $SB Invoke-Command -ComputerName SRV2 -ScriptBlock $SB - Remove the existing certificates for
SRV1, then create a self-signed certificate forSRV1using the following code:Get-ChildItem cert:LocalMachine oot | Where Subject -EQ 'CN=SRV1.reskit.org' | Remove-Item -Force Get-ChildItem cert:LocalMachinemy | Where Subject -EQ 'CN=SRV1.reskit.org' | Remove-Item -Force $CHT = @{ CertStoreLocation = 'CERT:LocalMachineMY' DnsName = 'SRV1.Reskit.Org' } $DscCert = New-SelfSignedCertificate @CHT - Copy the certificate to the root store on
SRV2andSRV1using the following code:$SB1 = { Param ($Rootcert) $C = 'System.Security.Cryptography.X509Certificates.X509Store' $Store = New-Object -TypeName $C ` -ArgumentList 'Root','LocalMachine' $Store.Open('ReadWrite') $Store.Add($Rootcert) $Store.Close() } $ICHT1 = @{ ScriptBlock = $SB1 ComputerName = 'SRV2.Reskit.Org' Verbose = $True ArgumentList = $DscCert } # run script block on SRV2 Invoke-Command @ICHT1 # and copy it to root on SRV1 $ICHT2= @{ ScriptBlock = $SB1 ComputerName = 'SRV1.Reskit.Org' Verbose = $True ArgumentList = $DscCert } Invoke-Command @ICHT2 - Check that the certificate is properly installed on
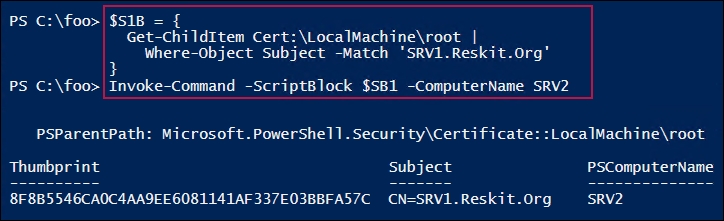
SRV2using the following code:$SB2 = { Get-ChildItem Cert:LocalMachine oot | Where-Object Subject -Match 'SRV1.Reskit.Org' } Invoke-Command -ScriptBlock $SB2 -ComputerName SRV2 - Remove the existing DSC configuration on
SRV1andSRV2using the following code:$SB3 = { $RIHT = @{ Path = 'C:WindowsSystem32configuration*.mof' ErrorAction = 'SilentlyContinue' } Get-Childitem @RIHT | Remove-Item @RIHT -Force $EASC = @{ ErrorAction = 'SilentlyContinue' } New-Item -Path c:DSC -ItemType Directory @EASC | Out-Null Remove-DscConfigurationDocument -Stage Current } Invoke-Command -ComputerName SRV1 -ScriptBlock $SB3 Invoke-Command -ComputerName SRV2 -ScriptBlock $SB3 - Create a DSC Service
Configurationblock to makeSRV1a web pull server using the following code:Configuration WebPullSRV1 { Param ([String] $CertThumbPrint) Import-DscResource -Module PSDesiredStateConfiguration Import-DscResource -Module xPSDesiredStateConfiguration $Regfile= 'C:Program FilesWindowsPowerShellDscService'+ 'RegistrationKeys.txt' Node SRV1 { $Key = '5d79ee6e-0420-4c98-9cc3-9f696901a816' WindowsFeature IIS1 { Ensure = 'Present' Name = 'Web-Server' } File DSCConfig-Folder { DestinationPath = 'C:DSCConfiguration' Ensure = 'Present' Type = 'Directory' } File DSCResource-Folder{ DestinationPath = 'C:DSCResource' Ensure = 'Present' Type = 'Directory' } WindowsFeature DSCService { DependsOn = '[WindowsFeature]IIS1' Ensure = 'Present' Name = 'DSC-Service' } xDscWebService WebPullSRV1 { Ensure = 'Present' EndpointName = 'PSDSCPullServer' Port = 8080 PhysicalPath = 'C:inetpubPSDSCPullServer' CertificateThumbPrint = $CertThumbPrint ConfigurationPath = 'C:DSCConfiguration' ModulePath = 'C:DSCResource' State = 'Started' UseSecurityBestPractices = $true DependsOn = '[WindowsFeature]DSCService','[WindowsFeature]IIS1' } File RegistrationKeyFile { Ensure = 'Present' Type = 'File' DestinationPath = $Regfile Contents = $Key } } # End of Node configuration } # End of Configuration - Create a MOF file to configure
SRV1using the following code:$TP = $DscCert.Thumbprint WebPullSRV1 -OutputPath C:DSC -CertThumbPrint $TP | Out-Null
- Use DSC to configure
SRV1to host the DSC web service using the following code:Start-DscConfiguration -Path C:DSC -Wait -Verbose $DscCert | Set-Item -Path IIS:SslBindings�.0.0.0!8080
- Check on the results using the following code:
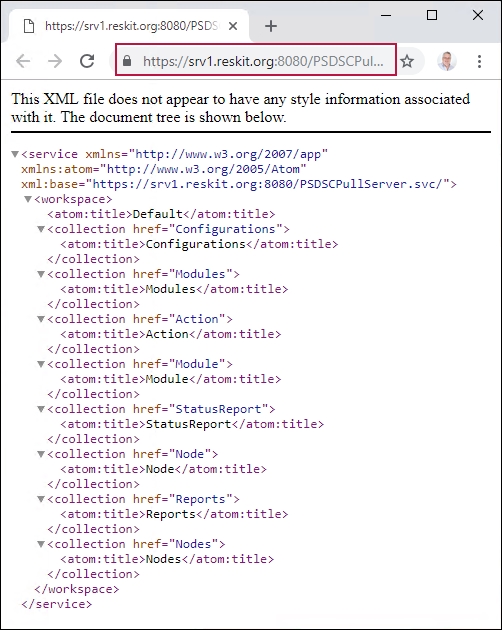
$URI = 'https://SRV1.reskit.org:8080/PSDSCPullServer.svc/'
Start-Process -FilePath $URI
- Create a metaconfiguration to make
SRV2pull two partial configuration blocks fromSRV1using the following code:[DSCLocalConfigurationManager()] Configuration SRV2WebPullPartial { Node SRV2 { Settings { RefreshMode = 'Pull' ConfigurationModeFrequencyMins = 30 ConfigurationMode = 'ApplyandAutoCorrect' RefreshFrequencyMins = 30 RebootNodeIfNeeded = $true AllowModuleOverwrite = $true } ConfigurationRepositoryWeb DSCPullSrv { ServerURL = 'https://SRV1.Reskit.Org:8080/PSDSCPullServer.svc' RegistrationKey = '5d79ee6e-0420-4c98-9cc3-9f696901a816' ConfigurationNames = @('NFSConfig','SMBConfig') } PartialConfiguration NFSConfig { Description = 'NFS Client Configuration'Configurationsource =@('[ConfigurationRepositoryWeb]DSCPullSrv') } PartialConfiguration SMBConfig { Description = 'FS-SMB1 Client Removal' Configurationsource = @('[ConfigurationRepositoryWeb]DSCPullSrv') DependsOn = '[PartialConfiguration]NFSConfig'} } } # End of Configuration block - Create a MOF to configure DSC LCM on
SRV2using the following code:SRV2WebPullPartial -OutputPath C:DSC | Out-Null
- Configure LCM on
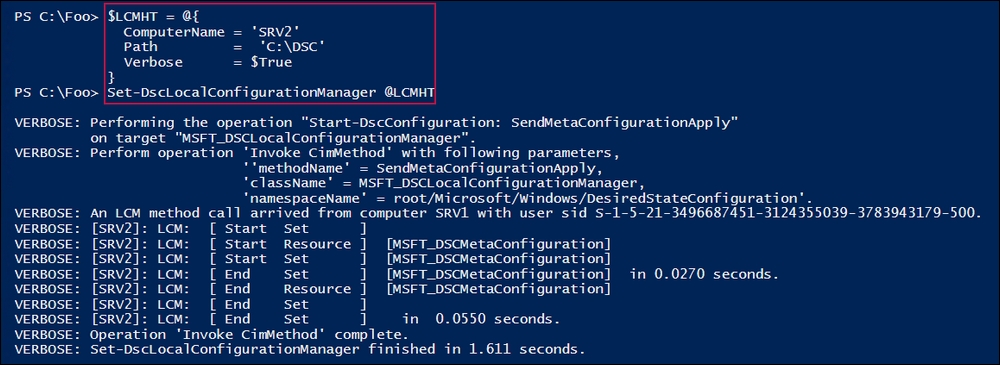
SRV2using the following code:$CSSrv2 = New-CimSession -ComputerName SRV2 $LCMHT = @{ CimSession = $CSSrv2 Path = 'C:DSC' Verbose = $true } Set-DscLocalConfigurationManager @LCMHT - Create a partial configuration to ensure that the NFS client is present using the following code:
Configuration TFTPSRV2 { Import-DscResource –ModuleName 'PSDesiredStateConfiguration' Node SRV2 { WindowsFeature TFTPClient { Name = 'TFTP-Client' Ensure = 'Present' } } } - Create the MOF file for this configuration and place the MOF file into the configuration folder using the following code:
Remove-Item -Path C:DSCConfiguration -Rec -Force
TFTPSRV2 -OutputPath C:DSCConfiguration |
  Out-Null
- Rename the file and create the checksum using the following code:
$RIHT = @{ Path = 'C:DSCConfigurationSRV2.mof' NewName = "C:DSCConfiguration$Guid.MOF" } Rename-Item @RIHT New-DscChecksum -Path C:DSCConfiguration Get-ChildItem C:DSCConfiguration - Wait a while, then review the details using the following code:
Start-Sleep -Seconds (30*60)
$Session = New-CimSession -ComputerName SRV2
Get-DscConfiguration -CimSession $Session
- Check on the feature on
SRV2using the following code:Get-WindowsFeature -Name TFTP-Client -ComputerName SRV2
In step 1, you ensure that the xDesiredStateConfiguration module is loaded on both SRV1 and SRV2. In step 2, you remove the existing certificates for SRV1 then create a new self-signed certificate. In step 3, you copy the newly created self-signed certificate to the root store of SRV2, thereby enabling SRV2 to trust the self-signed certificate. These three steps produce no output.
In step 4, you check to ensure that the certificate is properly installed on SRV2, which looks like this:
In step 5, you forcibly remove any DSC configuration information from both SRV1 and SRV2. In step 6, you create a configuration to configure SRV1. Then, in step 7, you run the configuration to produce the MOF file to configure SRV1 to be a pull. These three steps produce no output.
In step 8, you use the Start-DscConfiguration cmdlet to set the DSC configuration for SRV1, which looks like this:

In step 9, you use the browser to check on the configuration of SRV1 as a DSC pull server, which looks like this:
In step 10, you create an LCM configuration document to make SRV2 pull DSC partial configurations from SRV1 via HTTPS. In step 11, you use the configuration statement to create the required MOF file. These two steps produce no output.
In step 12, you use Set-DSCLocalConfigurationManager to configure the LCM on SRV2. The output from this step, created by using the -Verbose and -Wait switches, looks like this:
In step 13, you create a partial configuration to ensure that the NFS client is present, and then in step 14, you run the configuration to create the MOF file. You send the MOF file to the C:DSCConfiguration folder. There is no output from these two steps.
In step 15, you rename the MOF file, create the DSC checksum file, and view the contents of the DSCConfiguration folder, which looks like this:

In step 16, you wait for SRV2 to contact SRV1, and then pull the configuration and apply it. Then you can get the DSC configuration for SRV2, which looks like this.

In step 17, you check for the presence of the TFTP client on SRV2, which looks like this:

In step 5, you remove all DSC configurations from both SRV1 and SRV2. After doing that, running some of the DSC cmdlets, such as Get-DSCConfiguration, may result in an error, as there is no configuration. This error is to be expected. In later steps in the recipe, you push a configuration to SRV1 and enable SRV2 to pull its configuration from the DSC pull server on SRV1. Once those steps are complete (and SRV2 gets around to pulling the two partial configurations from SRV1), the DSC cmdlets work as expected. Also, if you examine the DSC event logs, events happening just after you wipe the DSC configuration can show odd dates and times in the event log entries. This is also to be expected.
In step 9, you viewed the output from the SRV1's DSC web service over HTTPS. If the system you run this step on trusts the certificate, you see the page as shown. If, for some reason, you have not copied the self-signed certificate in the local machine's root certificate store, you see certificate errors when navigating to the DSC service.
If you run the step on another computer, say DC1, then you see a certificate error, since that computer does not trust the self-signed certificate.