
Azure provides a range of on-demand computing resources, one of which is virtual machines (VM). An Azure VM is a good solution where you need more control over the computing environment than you might be able to obtain using a PaaS service.
An Azure VM is essentially a Hyper-V VM that you run within Azure. There are some differences between the Hyper-V VMs you create within Server 2019 (or Windows 10) and Azure VMs, but they are minor. The AZ cmdlets you use to manage Azure VMs are a little different in style to Hyper-V cmdlets, which may mean a bit of a learning curve.
You run this recipe on CL1, which you configured (in the Using PowerShell with Azure recipe) to work with Azure. Also, you should have already created an Azure Resource Group and an Azure Storage Account, but this recipe checks for these and creates the resources if needed.
- Define the key variables:
$Locname = 'uksouth'          # Azure location name
$RgName  = 'packt_rg'         # Resource group name
$SAName  = 'packt42sa'        # Storage account name
$VNName  = 'packtvnet'        # Virtual Network Name
$CloudSN = 'packtcloudsn'     # Cloud subnet name
$NSGName = 'packt_nsg'        # NSG name
$Ports   = @(80, 3389)        # Ports to open in VBM
$IPName  = 'Packt_IP1'        # Private IP Address name
$User    = 'AzureAdmin'       # User Name
$UserPS  = 'JerryRocks42!'    # User Password
$VMName  = 'Packt42VM'        # VM Name
- Log in to your Azure account:
$CredAZ = Get-Credential
Login-AzAccount -Credential $CredAZ
- Ensure that the Resource Group has been created:
$RG = Get-AzResourceGroup -Name $RgName -ErrorAction SilentlyContinue if (-not $rg) { $RGTag = @{Publisher = 'Packt'} $RGTag += @{Author = 'Thomas Lee'} $RGHT1 = @{ Name = $RgName Location = $Locname Tag = $RGTag } $RG = New-AzResourceGroup @RGHT1 Write-Host "RG $RgName created" } - Ensure that the Storage Account has been created:
$SA = Get-AzStorageAccount -Name $SAName -ResourceGroupName $RgName -ErrorAction SilentlyContinue if (-not $SA) { $SATag = [Ordered] @{Publisher = 'Packt'} $SATag += @{Author = 'Thomas Lee'} $SAHT - @{ Name = $SAName ResourceGroupName = $RgName Location = $Locname Tag = $SATag $SkuName = 'Standard_LRS' } $SA = New-AzStorageAccount @SAHT Write-Host "SA $SAName created" } - Create the VM credentials:
$T = 'System.Management.Automation.PSCredential'
$P = ConvertTo-SecureString -String $UserPS -AsPlainText -Force
$VMCred = New-Object -TypeName $T -ArgumentList $User, $P
- Create a VM:
$VMHT = @{ ResourceGroupName = $RgName Location = $Locname Name = $VMName VirtualNetworkName = $VNName SubnetName = $CloudSN SecurityGroupName = $NSGName PublicIpAddressName = $IPName OpenPorts = $Ports Credential = $VMCred } New-AzVm @VMHT - Get and view the VM's external IP address:
$VMIP = Get-AzPublicIpAddress -ResourceGroupName $RGname
$VMIP = $VMIP.IpAddress
"VM Public IP Address: [$VMIP]"
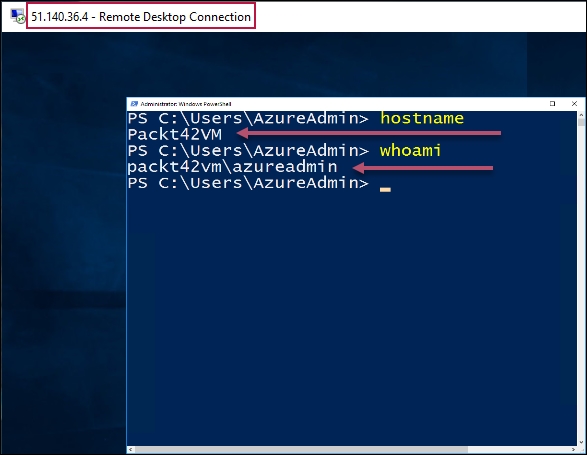
- Connect to and view the VM:
mstsc /v:"$VMIP"
In step 1, you defined the variables to be used for this recipe. In step 2, you logged in to your Azure account. In step 3, you ensured that the resource group was created and, in step 4, you ensured that the Azure Storage Account for this recipe was created. In step 5, you created a PowerShell credential object that encapsulates the credentials for the VM. These steps produce no output.
In step 6, you used the New-AzVm cmdlet to create your new VM. This produces the following output:

In step 7, you retrieved the new Azure VM's public IP address and displayed it, as follows:

In the final step, step 8, you used the mstsc.exe application to open up an RDS window into the VM, as follows:
In step 6, you used the New-AzVm cmdlet to create a new Azure VM. This method of creating the VM takes a number of defaults, including the version of the OS to install in the VM. This recipe takes a very simple approach to the creation of the VM—there is a lot more that you can do that is beyond the scope of this book.
There is a lot of richness in terms of the VM and the networks you can create to access it that this recipe has not covered. For more details on Azure VMs, refer to the online documentation at https://docs.microsoft.com/en-us/azure/virtual-machines/windows/.