
DFSR is an efficient file-replication engine built into Windows Server 2019. You can use DFS Replication to replicate DFSN targets in an efficient manner, especially across low-bandwidth connections.
In DFSR, a replication group is a collection of computers, known as members. Each replication group member hosts replicated folders. Replicated folders are folders that DFSR ensures are synchronized. With DFS Replication groups, you can replicate the folders contained in your DFS Namespace.
A DFS replicated folder is a folder that DFSR keeps synchronized on each member. In the Configuring a DFS Namespace recipe, you created some folders that you need to replicate between each server. As the data changes in each replicated folder, DFSR replicates the changes across connections between the members of the replication group. The connections you set up between the members forms the replication topology.
Creating multiple replicated folders in a single replication group simplifies the process of deploying replicated folders because DFSR applies the topology, schedule, and bandwidth-throttling from the replication group to each replicated folder. Each replicated folder has many properties. These include file and subfolder filters that enable you to filter out different files and subfolders from each replicated folder.
In this recipe, you set up replication of the DFSN shared folders, created in the Configuring a DFS Namespace recipe. Then you'll test the replication in action.
This recipe uses the same systems you used in the Configuring DFS Namespace recipe and assumes you have completed that recipe successfully. It sets up DFS Replication on the folders you created in the earlier recipe. You run this recipe on the Windows 10 system, CL1, that you set up in Chapter 1, Establishing a PowerShell Administrative Environment.
- Install the
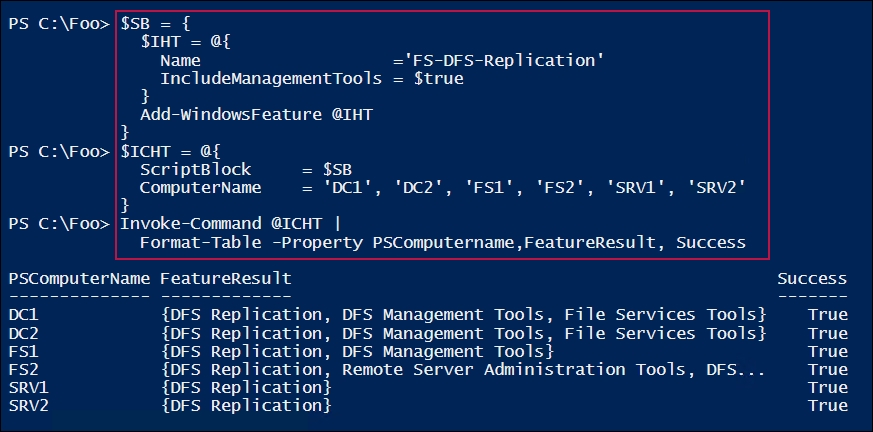
DFS-Replicationfeature on the key servers:$SB = { $IHT = @{ Name ='FS-DFS-Replication' IncludeManagementTools = $true } Add-WindowsFeature @IHT } $ICHT = @{ ScriptBlock = $SB ComputerName = 'DC1', 'DC2', 'FS1', 'FS2', 'SRV1', 'SRV2' } Invoke-Command @ICHT | Format-Table -Property PSComputername,FeatureResult, Success - Turn on the administrative shares:
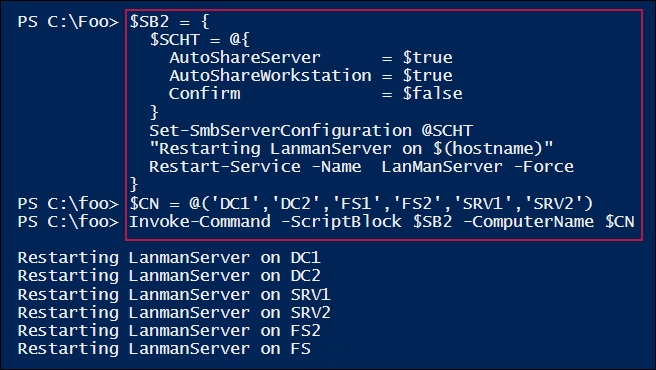
$SB2 = { $SCHT = @{ AutoShareServer = $true AutoShareWorkstation = $true Confirm = $false } Set-SmbServerConfiguration @SCHT "Restarting LanmanServer on $(hostname)" Stop-Service -Name LanManServer -Force Start-Service -Name LanManServer } $CN = @('DC1','DC2','FS1','FS2','SRV1','SRV2') Invoke-Command -ScriptBlock $SB2 -ComputerName $CN - View the DFS cmdlets:
Get-Module -Name DFSR -ListAvailable
Get-Command -Module DFSR | Measure-Object
- Create replication groups:
$RGHT1 = @{ GroupName = 'FSShareRG' DomainName = 'Reskit.org' Description = 'Replication Group for FS1, FS2 shares' } $RGHT2 = @{ GroupName = 'DCShareRG' DomainName = 'Reskit.Org' Description = 'Replication Group for DC1, DC2 shares' } New-DfsReplicationGroup @RGHT1 | Out-Null New-DfsReplicationGroup @RGHT2 | Out-Null - Get replication groups in
Reskit.Org:Get-DfsReplicationGroup -DomainName Reskit.Org | Format-Table
- Add replication group members to
FSShareRG:$MHT1 = @{ GroupName = 'FSShareRG' Description = 'ITData on FS1/2' ComputerName = ('FS1','FS2') DomainName = 'Reskit.Org' } Add-DfsrMember @MHT1 - Add the DFSN folder to the
FSShareRGreplication group, thus replicating theITDatashare:$RFHT1 = @{ GroupName = 'FSShareRG' FolderName = 'ITData' Domain = 'Reskit.Org' Description = 'ITData on FS1/2' DfsnPath = '\Reskit.OrgShareDataITITData' } New-DfsReplicatedFolder @RFHT1 | Out-Null - Add replication group members to
DCShareRG:$MHT2 = @{ GroupName = 'DCShareRG' Description = 'DC Server members' ComputerName = ('DC1','DC2') DomainName = 'Reskit.Org' } Add-DfsrMember @MHT2 | Out-Null - Add DFSN folders to the
DCShareRGreplication group:$RFHT2 = @{ GroupName = 'DCShareRG' FolderName = 'ITManagement' Domain = 'Reskit.Org' Description = 'IT Management Data' DfsnPath = '\Reskit.OrgShareDataITITManagement' } New-DfsReplicatedFolder @RFHT2 | Out-Null - View the replicated folders:
Get-DfsReplicatedFolder | Format-Table -Property DomainName, GroupName, FolderName, Description - Set the membership for the
FSShareRGreplication group:$DMHT1 = @{ GroupName = 'FSShareRG' FolderName = 'ITData' ComputerName = 'FS1' ContentPath = 'C:IT2' PrimaryMember = $true Force = $true } Set-DfsrMembership @DMHT1 | Out-Null $DMHT2 = @{ GroupName = 'FSShareRG' FolderName = 'ITData' ComputerName = 'FS2' ContentPath = 'C:IT2' PrimaryMember = $false Force = $true } Set-DfsrMembership @DMHT2 | Out-Null - Set the membership for the
DCShareRGreplication group:$DMHT3 = @{ GroupName = 'DCShareRG' FolderName = 'ITManagement' ComputerName = 'DC1' ContentPath = 'C:ITM' PrimaryMember = $true Force = $true } Set-DfsrMembership @DMHT3 | Out-Null $DMHT4 = @{ GroupName = 'DCShareRG' FolderName = 'ITManagement' ComputerName = 'DC2' ContentPath = 'C:ITM' Force = $true } Set-DfsrMembership @DMHT4 | Out-Null - View the DFSR membership of the two replication groups:
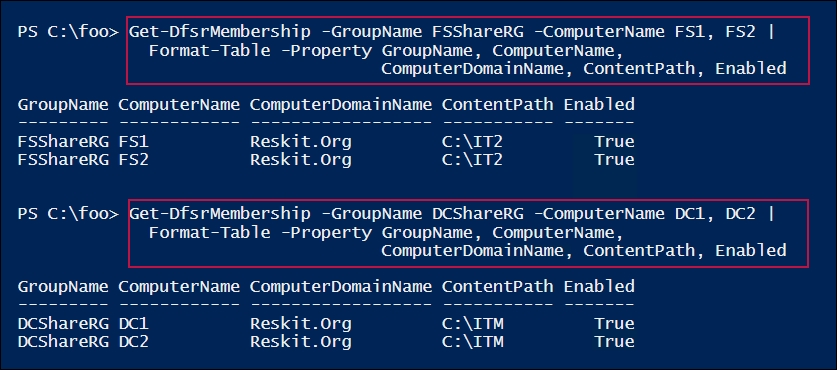
Get-DfsrMembership -GroupName FSShareRG -ComputerName FS1, FS2 | Format-Table -Property GroupName, ComputerName, ComputerDomainName, ContentPath, Enabled Get-DfsrMembership -GroupName DCShareRG -ComputerName DC1, DC2 | Format-Table -Property GroupName, ComputerName, ComputerDomainName, ContentPath, Enabled - Add replication connections for both replication groups:
$RCHT1 = @{ GroupName = 'FSShareRG' SourceComputerName = 'FS1' DestinationComputerName = 'FS2' Description = 'FS1-FS2 connection' DomainName = 'Reskit.Org' } Add-DfsrConnection @RCHT1| Out-Null $RCHT2 = @{ GroupName = 'DCShareRG' SourceComputerName = 'DC1' DestinationComputerName = 'DC2' Description = 'DC1-DC2 connection' DomainName = 'Reskit.Org' } Add-DfsrConnection @RCHT2 | Out-Null - Get the DFSR Membership and view it:
Get-DfsrMember | Format-Table -Property Groupname, DomainName, DNSName, Description - Update the DFSR configuration:
Update-DfsrConfigurationFromAD -ComputerName DC1, DC2, FS1, FS2
- Check the existing folders to discover what's currently in the DFS share:
$Path  = '\Reskit.OrgShareDataITITManagement'
$Path1 = '\DC1itm'
$Path2 = '\DC2itm'
Get-ChiLditem -Path $Path
Get-ChiLditem -Path $Path1
Get-ChildItem -Path $Path2
- Create files in the DFS share and re-check the underlying shares:
1..100 | foreach { "foo" |
  Out-File \Reskit.OrgShareDataITITManagementStuff$_.txt}
$P  = (Get-ChildItem -Path $Path  | Measure-Object).count
$P1 = (Get-ChildItem -Path $Path1 | Measure-Object).count
$P2 = (Get-ChildItem -Path $Path2 | Measure-Object).count
"$P objects in DFS root"
"$P1 objects on \DC1"
"$P2 objects on \DC2"
In step 1, you install the DFS Replication feature on several servers, which looks like this:
In step 2, after installing the DFSR feature, you configure Windows to update the SMB server configuration and then restart the target servers, which looks like this:
In step 3, you view the DFS module and see how many cmdlets are provided by the module. The output looks like this:

In step 4, which produces no output, you define the replication groups (FSShareRG and DCShareRG). In step 5, you view the domain-based DFSR replication groups, which look like this:

In step 6, you populate the FSShareRG replication group, which looks like this:

In step 7, you add the DFSN folder to the replication group, which produces no output.
In step 8, you add the Add replication group members for DCShareRG and in step 9, you add the DFSN folders to the DCShareRG replication group. These two steps produce no output.
In step 10, you view the replicated folders in the Reskit.Org domain, which looks like this:

In step 11, you set the membership for the FSShareRG replication group, and in step 12, you set the membership for the DCShareRG replication group—these two steps produce no output.
In step 13, you view the DFSR membership of the two replication groups, which looks like this:
In step 14, you add connections for both replication groups, which produces no output. In step 15, you get the DFSR memberships of the groups in Reskit.Org and format the key properties, which looks like this:

In step 16, you force an update to the DFSR configuration, which produces no output. In step 17, you check to see that there are no files in the DFS share—this step produces no output.
In step 18, you test DFS Replication by creating a number of files on the DFS share (\Reskit.OrgShareData) and observe the number of files present in the underlying shares. The output, which is likely to vary, looks like this:

In step 2, you turn on the administrative shares. This is a requirement for setting up DFS Replication. Once you've set up replication, you may wish to turn off these administrative shares.
In step 8, for each shared folder in the FSShareRG replication group, you identify a primary member. Should a document be changed by multiple different members in the replication group, then DFS considers the copy on the primary master as definitive.
In step 11, you set up simple DFS Replication connections. DFS enables you to manage rich replication topologies and supports your configuring-replication schedules and bandwidth constraints.
For a comparison of DFS Replication and Storage Replica, see https://www.petri.com/windows-server-2016-dfs-r-vs-storage-replica.
In step 17, you check to see what files exist in the DFS share (that is, none). Then in step 18, you test the DFSR replication by creating 100 new files on the DFSN share, and then observe how many files exist in the two underlying shares. As you can see from the output, 100 files exist both on the DFS share and on DC1, but at the time of execution, only 92 files had replicated. If you'd waited a few more seconds after creating the files, you would have observed complete replication.
The recipe sets up a simple set of replicated folders—four replicated folders on four servers based on the DFS Namespace created earlier. To extend this recipe, you could add other folders to the replication groups that weren't part of the DFS Namespace.
DFS Replication is one way to replicate files in an organization. DFS was designed for use over lower-bandwidth networks, thus in larger networks, DFS replicas might be out of sync. Also, DFS only replicates a file after it has been closed. With Server 2019, the Storage Replica feature is an alternative to DFSR. SR works at the block level, unlike DFSR, which operates at the file level. As a result, SR can replicate the changes to open files.