
This recipe shows you how to use DSC in push mode. With this mode, you create a configuration document on one system—in this case SRV1—and push the configuration to the target node (SRV2). You can also use DSC in pull mode, which you look at in greater detail in the Implementing an SMB DSC pull server and Implementing a web-based DSC pull server recipes.
With pull mode, you create a configuration definition and execute it to produce a MOF file. In this recipe, you use the built-in File resource to specify the files that should be on the target node (and where to find them if they are not).
In this recipe, you examine the Windows Server 2019 built-in resources and use these to create and compile a configuration statement on server SRV1. You use this configuration statement to then deploy the Web-Server feature on a second server, SRV2.
This recipe relies on two files being created and shared from DC1. The two files are Index.Htm and Page2.Htm. These two files are created and shared as \DC1ReskitApp. You can use the following code to achieve this, which you can run on SRV1:
# Setup for DSC Recipe
# Create folder/share on DC1
$SB = {
  New-Item C:ReskitApp -ItemType Directory
  New-SMBShare -Name ReskitApp -Path C:ReskitApp
}
Invoke-Command -ComputerName DC1 -ScriptBlock $SB |
  Out-Null
# Create Index.Htm on DC1
$HP    = '\DC1.Reskit.OrgC$ReskitAppIndex.htm'
$P2    = '\DC1.Reskit.OrgC$ReskitAppPage2.htm'

$Index = @"
<!DOCTYPE html>
<html><head><title>
Main Page - ReskitApp Application</title></head>
<body><p><center><b>
HOME PAGE FOR RESKITAPP APPLICATION</b></p>
This is the root page of the RESKITAPP application
<br><hr>
Pushed via DSC</p><br><hr>
<a href="http://SRV2/ReskitApp/Page2.htm">
Click to View Page 2</a>
</center>
<br><hr></body></html>
"@
$Index |
  Out-File -FilePath $HP -Force
# Create Page2.htm on DC1
$Page2 = @"
<!DOCTYPE html>
<html>
<head><title>ReskitApp Application - Page 2</title></head>
<body><p><center>
<b>Page 2 For the ReskitApp Web Application</b></p>
<a href="http://SRV2/ReskitApp/Index.htm">
Click to Go Home</a>
<hr></body></html>
"@
$Page2 |
  Out-File -FilePath $P2 -Force
You can use (and embellish) this code and HTML. Alternatively, the GitHub repository supporting this book has both of these files, which you can download. See https://github.com/doctordns/PowerShellCookBook2019/tree/master/Chapter%2010%20-%20Implementing%20Desired%20State%20Configuration for the HTML for these two pages, and for this script, see https://github.com/doctordns/PowerShellCookBook2019/blob/master/Chapter%2010%20-%20Implementing%20Desired%20State%20Configuration/Setup-DSCWebApp.ps1.
- Discover DSC resources on
SRV1using the following code:Get-DscResource | Format-Table -Property Name, ModuleName, Version
- Examine the DSC
Fileresource using the following code:Get-DscResource -Name File | Format-List -Property *
- Get the DSC
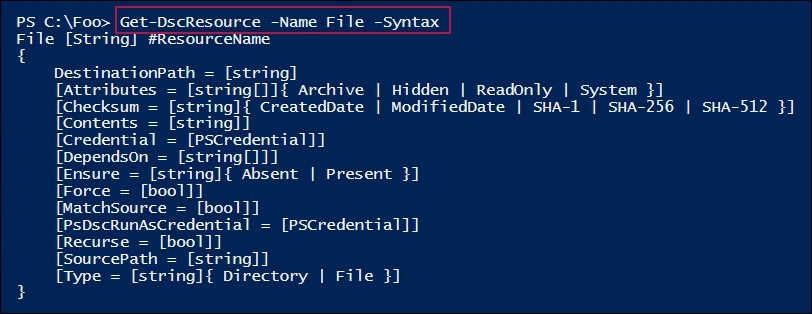
Fileresource syntax using the following code:Get-DscResource -Name File -Syntax
- Create/compile a configuration block using the following code:
Configuration PrepareSRV2 { Import-DscResource –ModuleName 'PSDesiredStateConfiguration' Node SRV2 { File BaseFiles { DestinationPath = 'C:ReskitApp' SourcePath = '\DC1ReskitApp' Ensure = 'Present' Recurse = $True } } } - View the configuration function using the following code:
Get-Item -Path Function:PrepareSRV2
- Create an output folder for DSC using the following code:
$Conf = { $EASC = @{ErrorAction = 'SilentlyContinue'} New-Item -Path C:ReskitApp -ItemType Directory @EASC } Invoke-command -ComputerName SRV2 -ScriptBlock $Conf | Out-Null - Run the following function to produce a MOF file:
PrepareSRV2 -OutputPath C:DSC
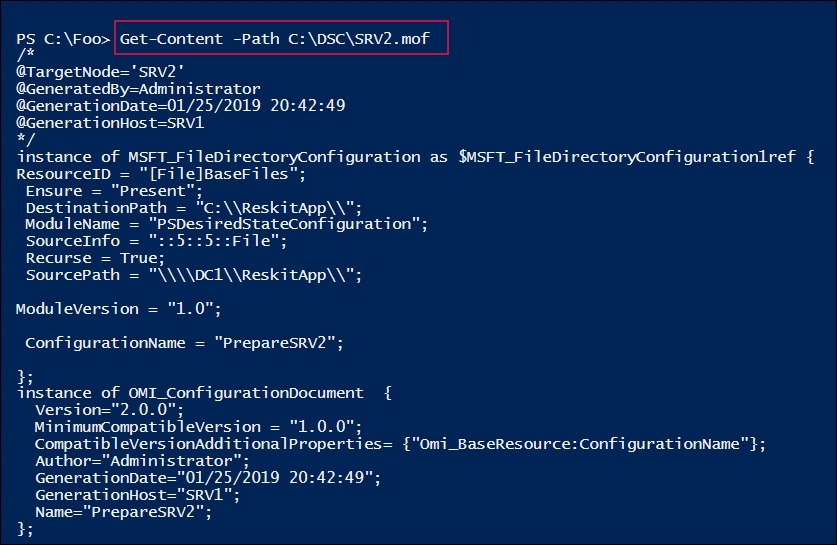
- View the MOF file, as follows:
Get-Content -Path C:DSCSRV2.mof
- Make it so, Mr. Riker!
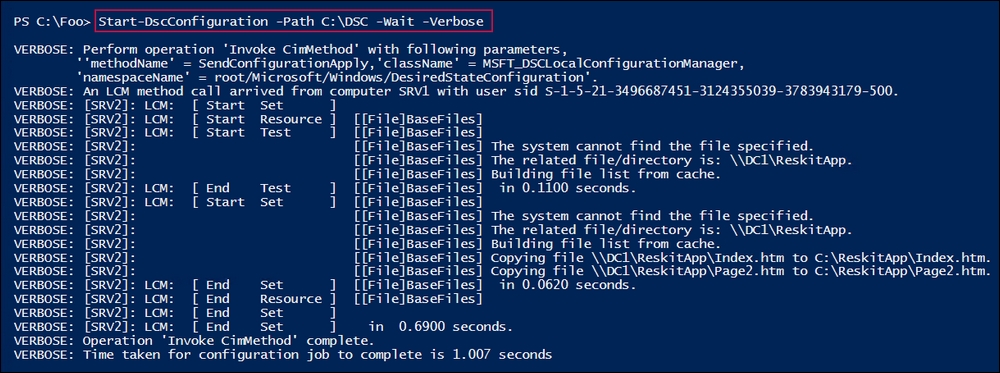
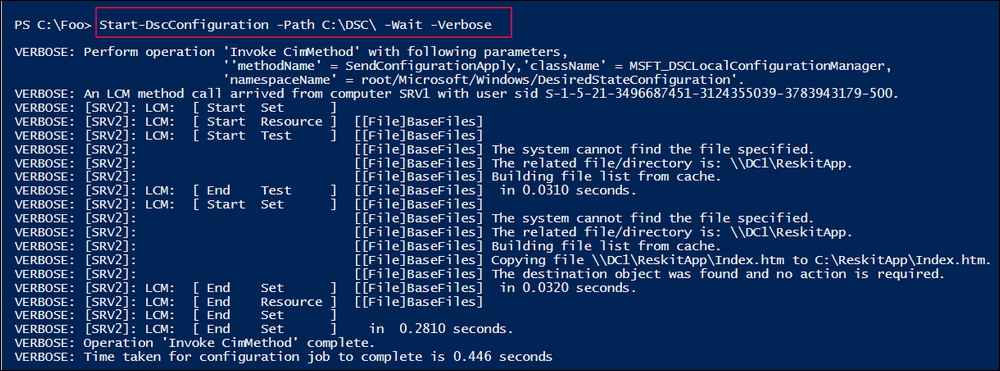
Start-DscConfiguration -Path C:DSC -Wait -Verbose
- Observe the results using the following code:
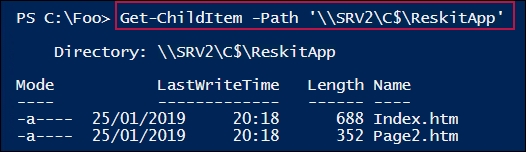
Get-ChildItem -Path '\SRV2C$ReskitApp'
- Induce a configuration drift using the following code:
Remove-Item -Path \SRV2C$ReskitAppIndex.htm
- Fix the configuration drift using the following code:
Start-DscConfiguration -Path C:DSC -Wait -Verbose
- What happens if there is no configuration drift?
Start-DscConfiguration -Path C:dsc -Wait -Verbose
In step 1, you discover the DSC resources on SRV1, which looks like this:

In step 2, you use the Get-DSCResource to discover more information about the in-built file DSC resource. The output from this step is shown in the following screenshot:

In step 3, you use the Get-DSCResouce cmdlet to determine the syntax for the File DSC resource, as follows:
In step 4, you define a configuration block. When you execute this configuration block, PowerShell compiles it into a function. There is no output from this step.
In step 5, you view the function definition for this compiled configuration block, which looks like this:

In step 6, you create a folder on SRV2. This folder is where you want the DSC process to place the files specified in the configuration block. There is no output from this step.
In step 7, you execute the PrepareSRV2 function, which creates a MOF file corresponding to the configuration. The output looks like this:

In step 8, you view the MOF file that PowerShell generated in step 7, which looks like this:
In step 9, you push the DSC configuration to SRV2. You use the -Wait and -Verbose switches to create rich output, which looks like this:
After pushing the new configuration to SRV2 in step 9 and step 10, you examine the effect. The output from this step looks like this:
In step 11, you delete a file on SRV2, thereby introducing configuration drift. This step produces no output. With step 12, you rerun Start-DSCConfiguration to correct the configuration drift, which looks this:
In step 13, you observe the results of running Start-DSCResource in the case where there is no configuration drift. This looks like the following:

In this recipe, you push the DSC configuration to the target node (SRV2) using the Start-DscConfiguration cmdlet. Using the -Wait and -Verbose switches produces some great output that helps you to trace precisely what DSC is doing. In step 9, DSC could not find the files on SRV2, and so it copies them from DC1. In step 12, DSC discovers a missing file and corrects that.
With Start-DscConfiguration, if you do not specify the -Wait switch, PowerShell runs the DSC configuration silently as a background job. If you do not specify the -Verbose switch specified, PowerShell produces minimal output. You should use both parameters when you are learning DSC.
In step 1, you discover the DSC resources on SRV1. As you can see, there are not many built into Windows Server 2019. The good news is that there is a wealth of additional DSC resources that you can leverage, as you can see in the Using DSC with resources from the PS Gallery recipe.
In step 4, when you execute the configuration block, PowerShell compiles in a similar way to how PowerShell compiles a function. With configurations, PowerShell creates a function of the same name, as you can see in step 5.
In step 8, you view the MOF generated by running the function created by running the configuration. Fortunately, IT pros do not need to understand the MOF file format as it is automatically generated by PowerShell. Further, PowerShell uses the MOF file to apply the DSC configuration on the target node. All you need to do is to keep track of the MOF files themselves.