
Nested Hyper-V is a cool feature of Windows 2019 and Windows 10 (Anniversary Update and later). Nested Hyper-V enables a Hyper-V VM to host VMs that also have virtualization enabled. You could, for example, take a physical host (say, HV1) and on that host run a VM (PSDirect). With nested Hyper-V, you could install Hyper-V in the PSDirect VM to enable that VM to host further VMs.
Nested VMs have a number of uses. First, nested VMs hosted in one VM are provided hardware isolation from nested VMs run in other VMs. This provides a further level of security for virtual machines. Nested Hyper-V is also useful for testing and education/training. In a training course, you could give a student one VM (running in a large blade server) and enable the student to create additional VMs as part of the course. You could, for example, run the recipes in this chapter using nested VMs.
Enabling nested Hyper-V is very simple. First, you must update the virtual CPU in the VM you want to support nesting. Therefore, in this recipe, you adjust the virtual CPU in the PSDirect VM to expose the virtualization extensions. This has to be done while the VM is turned off. After you restart the VM, you install the Hyper-V feature and create the NestedVM VM. This recipe does not show the details of configuring the NestedVM, which are left as an exercise for the reader.
This recipe uses the PSDirect VM running on the HV1 Windows Server 2019 system with Hyper-V loaded. You created the Hyper-V server in the Installing and configuring Hyper-V recipe. You also make use of the PSDirect VM, which you created in the Creating a virtual machine recipe. You also updated the VM's hostname (to Wolf) in the Configuring Hyper-V networking recipe.
- Stop the
PSDirectVM:Stop-VM -VMName PSDirect
- Change and view the VM's processor to support virtualization:
$VMHT = @{ VMName = 'PSDirect' ExposeVirtualizationExtensions = $true } Set-VMProcessor @VMHT Get-VMProcessor -VMName PSDirect | Format-Table -Property Name, Count, ExposeVirtualizationExtensions - Start the
PSDirectVM:Start-VM -VMName PSDirect Wait-VM -VMName PSDirect -For Heartbeat Get-VM -VMName PSDirect
- Create credentials for the
PSDirectmachine. Note that this assumes the VM has been renamedWolf:$User = 'WolfAdministrator' $PHT = @{ String = 'Pa$$w0rd' AsPlainText = $true Force = $true } $PSS = ConvertTo-SecureString @PHT $Type = 'System.Management.Automation.PSCredential' $CredRK = New-Object -TypeName $Type -ArgumentList $User,$PSS - Create a script block for remote execution:
$SB = { Install-WindowsFeature -Name Hyper-V -IncludeManagementTools } - Install Hyper-V inside the
PSDirectVM:$Session = New-PSSession -VMName PSDirect -Credential $CredRK $IHT = @{ Session = $Session ScriptBlock = $SB } Invoke-Command @IHT - Restart the VM to finish adding Hyper-V to the
PSDirectVM:Stop-VM -VMName PSDirect Start-VM -VMName PSDirect Wait-VM -VMName PSDirect -For IPAddress
- Create a nested VM inside the
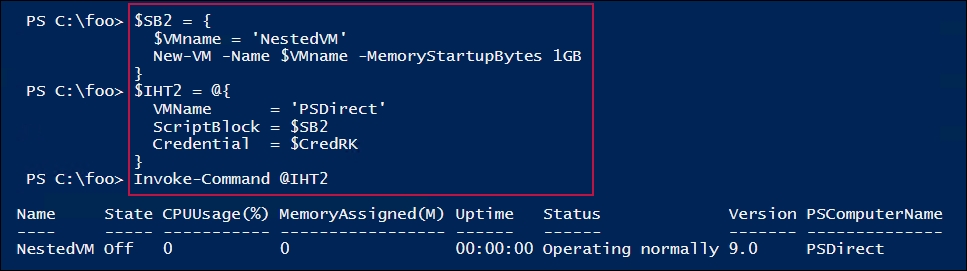
PSDirectVM:$SB2 = { $VMname = 'NestedVM' New-VM -Name $VMname -MemoryStartupBytes 1GB } $IHT2 = @{ VMName = 'PSDirect' ScriptBlock = $SB2 } Invoke-Command @IHT2 -Credential $CredRK
This recipe stops, reconfigures, then restarts the PSDirect VM. Once the VM is running, you create an embedded VM (NestedVM) inside the PSDirect VM.
In step 1, you stop the PSDirect VM on the HV1 server, which produces no output.
In step 2, you update the virtual CPU in the PSDirect VM to expose the virtualization extensions (in the PSDirect VM), which looks like this:

In step 3, you restart the PSDirect VM, which looks like this:

In step 4, you create a credentials object. In step 5, you create a script block for execution on PSDirect. These two steps produce no output.
In step 6, you install the Hyper-V feature inside the PSDirect VM, adding the management tools, which looks like this:

In step 7, after you install the Hyper-V to the PSDirect virtual machine, you reboot the VM, then wait for it to start. There is no output from this step.
In step 8, you create a VM, NestedVM, inside the PSDirect VM, which looks like this:
In step 2, you look at the properties of the virtual CPU(s) in the PSDirect VM. If you have not yet executed the Configuring VM hardware recipe previously, you may see a different CPU count.
In step 5, you stopped then started the PSDirect VM. As an alternative, you could have used the Restart-VM cmdlet.
In step 6, you create a new VM, but you have not loaded an operating system or configured the VM. Naturally, you can use the techniques in this chapter to configure your new VM as needed.