
Each VM is essentially another host in your infrastructure. It’s important therefore to set up networking for your Hyper-V hosts. There are three basic types of networking:
- External: This enables a VM to share the host’s physical NIC and participate in host-to-host networking
- VM to VM only: This is a secure network that enables traffic between VMs only
- VM to VM and VM Host: This is a fairly secure network that shares traffic between VMs and the VM host
You start the configuration process by creating a VM switch. If you create either an external or VM to VM and VM host switch, then Windows adds a NIC into the VM host to enable the host to communicate via the VM Switch. Once you have the VM switch(es) set up, you can configure a VM’s NIC to use a specific switch. This recipe shows some of the basic steps involved in getting started with Hyper-V networking.
You run this recipe on HV1, which you set up in the Installing and configuring the Hyper-V feature recipe. HV1 has no switch defined—you create a virtual switch in this recipe. Additionally, this Hyper-V server has a VM, PSDirect, which you have set up and configured in earlier recipes in this chapter. This VM has a hostname of Tiger. Also, the local administrator has a password of Pa$$w0rd.
- Get NIC details and IP address from the
PSDirectVM:Get-VMNetworkAdapter -VMName PSDirect
- Create a credential, then get VM networking details:
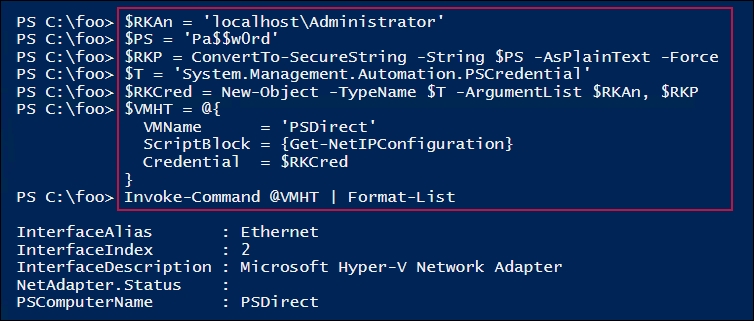
$RKAn = 'localhostAdministrator' $PS = 'Pa$$w0rd' $RKP = ConvertTo-SecureString -String $PS -AsPlainText -Force $T = 'System.Management.Automation.PSCredential' $RKCred = New-Object -TypeName $T -ArgumentList $RKAn, $RKP $VMHT = @{ VMName = 'PSDirect' ScriptBlock = {Get-NetIPConfiguration } Credential = $RKCred } Invoke-Command @VMHT | Format-List - Create a virtual switch on
HV1:$VSHT = @{ Name = 'External' NetAdapterName = 'Ethernet' Notes = 'Created on HV1' } New-VMSwitch @VSHT - Connect
PSDirectto the switch:Connect-VMNetworkAdapter -VMName PSDirect -SwitchName External
- See the VM's network adapter information:
Get-VMNetworkAdapter -VMName PSDirect
- With
PSDirectnow in the network, observe the IP address in the VM:$NCHT = @{ VMName = 'PSDirect' ScriptBlock = {Get-NetIPConfiguration} Credential = $RKCred } Invoke-Command @NCHT - View the hostname on
PSDirect, reusing the hash table from step 6:$NCHT.ScriptBlock = {hostname} Invoke-Command @NCHT - Change the name of the host in
VM1, making use of the hash table from step 6 and step 7:$NCHT.ScriptBlock = {Rename-Computer -NewName Wolf -Force} Invoke-Command @NCHT - Reboot and wait for the restarted
PSDirect:Restart-VM -VMName PSDirect -Wait -For IPAddress -Force
- Get the hostname of the
PSDirectVM:$NCHT.ScriptBlock = {hostname} Invoke-Command @NCHT
In step 1, you get the NIC details and IP addresses assigned to the PSDirect VM, which looks like this:

In step 2, you create a credential object for the PSDirect virtual machine. Then, you use this to execute a script block on PSDirect, which returns the host's network IP configuration, and looks like this:
In step 3, you create a new virtual switch on HV1 with the switch name set to External. The output of this step looks like this:

In step 4, you add the NIC in the PSDirect VM to the new External switch. This step produces no output.
With the VM now having network connectivity, in step 5, you look at the VM's networking details, which look like this:

In step 6, you get the host's networking details, showing the IP address and DNS servers (obtained from the DHCP server), like this:

In step 7, you view the hostname of the PSDirect VM, which looks like this:

In step 8, you change the name of the PSDirect VM to Wolf, which looks like this:

In step 9, you restart the PSDirect VM, producing no output. In step 10, you re-check the PSDirect VM's hostname, which looks like this:

In step 1, you use the Get-VMNetworkAdapter for the PSDirect VM. The output from this step shows that the virtual NIC inside the PSDirect VM is not connected to any switch. It also shows that the VM has assigned an IPV4 Automatic Private IP Address (APIPA) address to the NIC (in this case, 169.254.141.180). Since the address chosen by Windows is random, you may see a different address in the 169.254.0.0/16 network. Note that even though Windows has an IP address for the NIC, since you have not connected the VM's NIC to a Hyper-V switch, no networking is possible with the VM until you execute the subsequent steps that resolve that issue. In such cases, using PowerShell Direct, as shown in the Using PowerShell Direct recipe, is useful.
In step 3, you create a new switch. If you already have an External switch created on your Hyper-V host, you can use it in this recipe as opposed to the External switch created in this step.
In step 5 and step 6, you view the PSDirect VM's networking configuration after you created the External VM switch and added the NIC in the PSDirect VM to the switch. The initial IP address, which you saw in step 1, was automatically assigned when the VM was unable to obtain a DHCP address. After connecting the VM to the network, the VM was able to contact the DHCP server that you set up in the Installing and authorizing a DHCP server recipe, and configured in the Configuring DHCP Scopes recipe. This DHCP server is used to get an IP address for the PSDirect VM.
In step 7, you obtain the VM's configured hostname. If you created the VM simply from the default installation via the product DVD, Windows automatically creates a hostname, such as WIN-O5LPHTHBB5U. In the Using PowerShell Direct recipe, you installed Windows Server 2019 to the PSDirect VM and gave the VM a host name of Tiger. In this recipe, regardless of the current hostname, you update the hostname to Wolf.