
By default, every time IIS receives a request from a client, it logs that request to a log file. You can use PowerShell to modify this behavior. You can turn off logging, change the logging frequency, or changing the folder where IIS stores its log files.
Log files are a great place to look when troubleshooting a web server or when analyzing your website's traffic. IIS web server logs are also useful for capacity planning and to help you to analyze the behavior of the traffic (for example, where is it coming from, what clients are being used, which sites/pages are being accessed, and so on).
By default, IIS creates a separate log file every day. This has advantages, but on a busy web server with many sites, managing log files can become a challenge. A web server that has been up and running for a month would have 30 separate log files. You may wish to change log files less frequently.
Also, since IIS puts log files inside the C:Windows folder by default, you may wish to change the location of log files. You could move the log files to a separate folder in your C: drive, or to a separate drive altogether, depending on the sizes of your IIS logs.
In this recipe, you configure logging in IIS using PowerShell and the IIS provider that you load from the WebAdministration module. This technique uses Set-ItemProperty to configure IIS logging.
- Import the web administration module to ensure that the IIS provider is loaded:
Import-Module WebAdministration
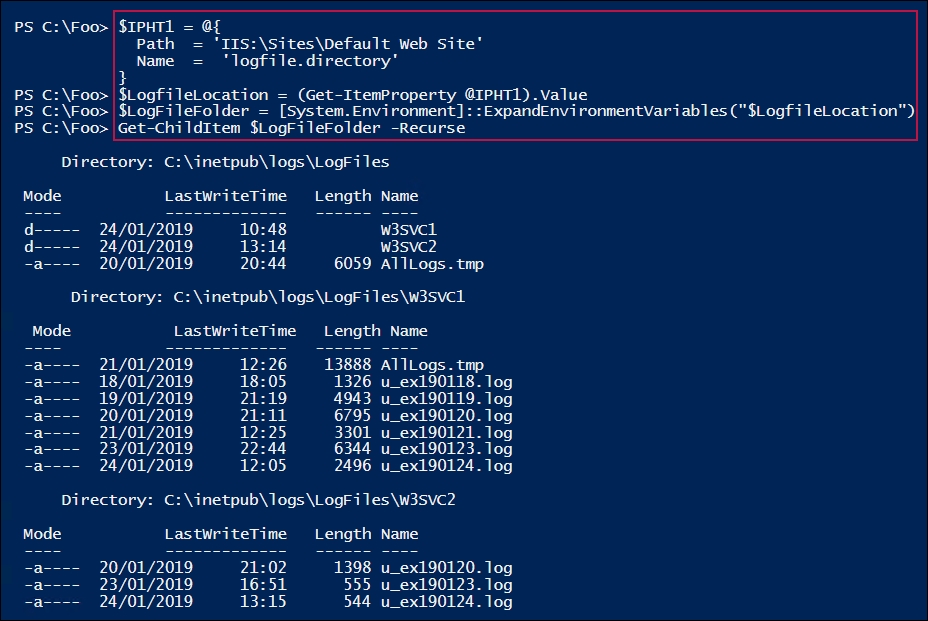
- Look at where you are currently storing log files:
$IPHT1 = @{ Path = 'IIS:SitesDefault Web Site' Name = 'logfile.directory' } $LogfileLocation = (Get-ItemProperty @IPHT1).value $LF = [System.Environment]::ExpandEnvironmentVariables("$LF") Get-ChildItem $LogFileFolder -Recurse - Change the folder to
C:IISLogs:$IPHT2 = @{ Path = 'IIS:SitesDefault Web Site' Name = 'logfile.directory' } Set-ItemProperty @IPHT2 -Value 'C:IISLogs' New-Item -Path C:IISLogs -ItemType Directory | Out-Null - Change the logging style, as follows:
$IPHT3 = @{ Path = 'IIS:SitesDefault Web Site' Name = 'logFile.logFormat' } Set-ItemProperty @IPHT3 -Value 'W3C' - Change logging change file frequency:
$IPHT3 = @{ Path = 'IIS:SitesDefault Web Site' Name = 'logFile.period' } Set-ItemProperty @IPHT3 -Value Weekly - Change the logging to use a maximum log size:
$IPHT4 = @{ Path = 'IIS:SitesDefault Web Site' Name = 'logFile.period' } Set-ItemProperty @IPHT4 -Value 'MaxSize' $Size = 1GB $IPHT5 = @{ Path = 'IIS:SitesDefault Web Site' Name = 'logFile.truncateSize' } Set-ItemProperty @IPHT5 -Value $size - Disable logging, as follows:
$IPHT5 = @{ Path = 'IIS:SitesDefault Web Site' Name = 'logFile.enabled' } Set-ItemProperty @IPHT5 -Value $False - Delete all of the log files over 30 days old, as shown here:
$LogDirs = Get-ChildItem -Path IIS:Sites |
             Get-ItemProperty -Name logFile.directory.value |
               Select -Unique
$Age = 30                              # days to keep log files
$DaysOld = (Get-Date).AddDays(-$Age)   # how long ago that was
Foreach ($LogDir in $LogDirs){
 $Dir = [Environment]::ExpandEnvironmentVariables($LogDir)
 Get-ChildItem -Path $Dir -Recurse -ErrorAction SilentlyContinue |
   Where-Object LastWriteTime -lt $DaysOld  |
     Remove-Item
}
In step 1, you import the WebAdministration module explicitly, which loads the IIS provider, creates an IIS: PSDrive on your system, and produces no output.
In step 2, you use the IIS provider to retrieve the location of IIS logs for SRV1 and display the existing log files. Depending on how much you have used the two websites created in this chapter's recipes (that is, the default website created in the Installing IIS recipe and the WWW2 site created in the Configuring IIS bindings recipe), the output might look like this:
In step 3, you create a folder at C:IISLogs and change the log file folder to this one. In step 4, you change the logging type to W3C; in step 5, you set the frequency that IIS uses to change log files, and in step 6, you set a maximum log file size. In step 7, you disable logging for the default website. Finally, in step 8, you remove any log files over 30 days old. These six steps produce no output.
In step 2, you look at the log files created so far. Your output is likely to be different, depending on how many clients you have used to access the two websites created in the recipes in this chapter. In the output, you may notice that the logging file folder root (C:inetpublogsLogFiles) has two sub-folders that both contain individual daily log files. The log files that you see in the W3SVC1 sub-folder relate to the default website, while the log files in the W3SVC2 sub-folder relate to the WWW2.Reskit.Org site.
In step 3, you changed the folder that holds the IIS logs. In production, you may choose to hold IIS log files on separate disks, which is a best practice.
In step 4, you adjusted the log file format for IIS logging to W3C. You have several options for log file formats. See https://docs.microsoft.com/en-us/iis/manage/provisioning-and-managing-iis/configure-logging-in-iis for more information on IIS log file formats.
In step 6, you change the logging to use a maximum size log file. This does keep the size of log files in check, but means that you may not record all events.
In step 7, you disable logging for the default website. This would enable your IIS server to be a little more efficient (due to not having to log events) and means that runaway disk space usage is less likely. As with most Windows logging, IIS logging is turned on by default, but you can easily turn it off or reconfigure it, based on your requirements.
In step 8, you deleted any log files over 30 days old. Instead of deleting them, you may wish to copy them to a central site for more in-depth analysis. The regular logs are great for simple analysis, but for longer term capacity planning, having more data could be useful.
You may also want to keep your log files on your web servers for less than 30 days. To avoid the logs from clogging up your web servers, you can update this recipe to copy the oldest log file(s) to a central repository.
Log files can consume a significant amount of space. You might also consider saving them to a folder that you compress using NTFS file compression, or by using something like WinZIP or WinRAR to compress the files (and decompress them, if you need to do more analysis).
For more information on how to resolve application issues using IIS log files, see https://www.sumologic.com/blog/log-management-analysis/iis-logs-troubleshooting/.