
PowerShell V5 introduced a new extension to DSC known as partial configurations. A partial configuration is a DSC configuration that makes up part of a given node's overall desired state. Each node can then pull (and apply) some or all of those partial configurations.
Partial configurations allow you to share the configuration of a node between multiple teams. For example, you might want the central IT team to define the basic configuration of a node. Another team could be responsible for deploying a web application to that same node. The alternative is to have a single MOF document fully describing a node's desired state, which can be organizationally challenging.
To support partial configurations, you configure a node's LCM to define the partial configurations that the node should pull and how the node is to be configured. Each partial configuration can be either pushed or pulled as appropriate. This provides considerable flexibility in deploying DSC partial configurations.
In this recipe, you configure SRV2 to pull two partial configurations from SRV1.
In this recipe, you use two servers, SRV1 and SRV2, which you used in the other recipes in this chapter.
- Remove the existing certificates for
SRV1, then create a self-signed certificate for the FQDNSRV1.Reskit.Orgusing the following code:Get-ChildItem Cert:LocalMachine oot | Where Subject -EQ 'CN=SRV1.Reskit.Org' | Remove-Item -Force Get-ChildItem Cert:LocalMachinemy | Where Subject -EQ 'CN=SRV1.Reskit.Org' | Remove-Item -Force $CHT = @{ CertStoreLocation = 'Cert:LocalMachineMY' DnsName = 'SRV1.Reskit.Org' } $DscCert = New-SelfSignedCertificate @CHT - Copy the certificate to the root store on
SRV2andSRV1using the following code:$SB1 = { Param ($Rootcert) $C = 'System.Security.Cryptography.X509Certificates.X509Store' $Store = New-Object -TypeName $C ` -ArgumentList 'Root','LocalMachine' $Store.Open('ReadWrite') $Store.Add($Rootcert) $Store.Close() } $ICHT1 = @{ ScriptBlock = $SB1 ComputerName = 'SRV2.Reskit.Org' Verbose = $True ArgumentList = $DscCert } # run script block on SRV2 Invoke-Command @ICHT1 # and copy it to root on SRV1 $ICHT3= @{ ScriptBlock = $SB1 ComputerName = 'SRV1.Reskit.Org' Verbose = $True ArgumentList = $DscCert } Invoke-Command @ICHT3 - Check the certificate in the root certificate store on
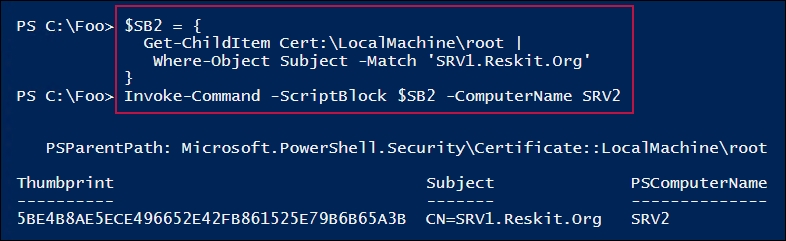
SRV2using the following code:$SB2 = { Get-ChildItem Cert:LocalMachine oot | Where-Object Subject -Match 'SRV1.Reskit.Org' } Invoke-Command -ScriptBlock $SB2 -ComputerName SRV2 - Remove the existing DSC configuration on
SRV1andSRV2using the following code:$SB3 = { $RIHT = @{ Path = 'C:WindowsSystem32configuration*.mof' ErrorAction = 'SilentlyContinue' } Get-Childitem @RIHT | Remove-Item @RIHT -Force $EASC = @{ ErrorAction = 'SilentlyContinue' } New-Item -Path c:DSC -ItemType Directory @EASC | Out-Null Remove-DscConfigurationDocument -Stage Current } Invoke-Command -ComputerName SRV1 -ScriptBlock $SB3 Invoke-Command -ComputerName SRV2 -ScriptBlock $SB3 - Ensure that the
xPsDesiredStateConfigurationmodule is installed on bothSRV1andSRV2using the following code:$SB2 = { Install-Module -Name xPSDesiredStateConfiguration -Force } Invoke-Command -Computer SRV1 -ScriptBlock $SB2 Invoke-Command -Computer SRV2 -ScriptBlock $SB2 - Create the desired state configuration for
SRV1using the following code:Configuration WebPullSrv1 { Param ([String] $CertThumbPrint) Import-DscResource -Module PSDesiredStateConfiguration Import-DscResource -Module xPSDesiredStateConfiguration $Regfile= 'C:Program FilesWindowsPowerShellDscService'+ 'RegistrationKeys.txt' Node SRV1 { $Key = '5d79ee6e-0420-4c98-9cc3-9f696901a816' WindowsFeature IIS1 { Ensure = 'Present' Name = 'Web-Server' } File DSCConfig-Folder { DestinationPath = 'C:DSCConfiguration' Ensure = 'Present' Type = 'Directory' } File DSCResource-Folder{ DestinationPath = 'C:DSCResource' Ensure = 'Present' Type = 'Directory' } WindowsFeature DSCService { DependsOn = '[WindowsFeature]IIS1' Ensure = 'Present' Name = 'DSC-Service' } xDscWebService WebPullSRV1 { Ensure = 'Present' EndpointName = 'PSDSCPullServer' Port = 8080 PhysicalPath = 'C:inetpubPSDSCPullServer' CertificateThumbPrint = $CertThumbPrint ConfigurationPath = 'C:DSCConfiguration' ModulePath = 'C:DSCResource' State = 'Started' UseSecurityBestPractices = $true DependsOn = '[WindowsFeature]DSCService','[WindowsFeature]IIS1'} File RegistrationKeyFile { Ensure = 'Present' Type = 'File' DestinationPath = $Regfile Contents = $Key } } # End of Node configuration } # End of Configuration - Remove any existing MOF files on
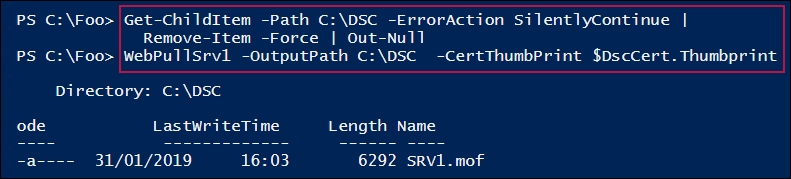
SRV1, then create an MOF file forSRV1using the following code:Get-ChildItem -Path C:DSC -ErrorAction SilentlyContinue | Remove-Item -Force | Out-Null $TP = $DscCert.Thumbprint WebPullSrv1 -OutputPath C:DSC -CertThumbPrint $TP - Configure
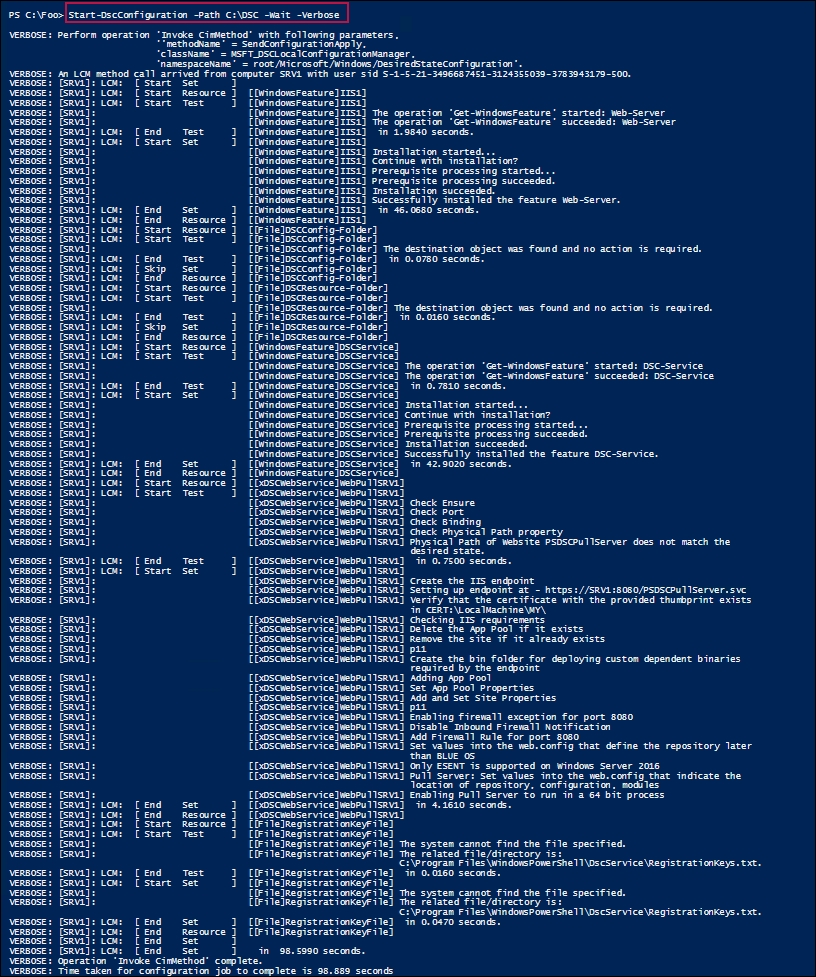
SRV1to host the DSC web service using the following code:Start-DscConfiguration -Path C:DSC -Wait -Verbose $DscCert | Set-Item -Path IIS:SslBindings�.0.0.0!8080
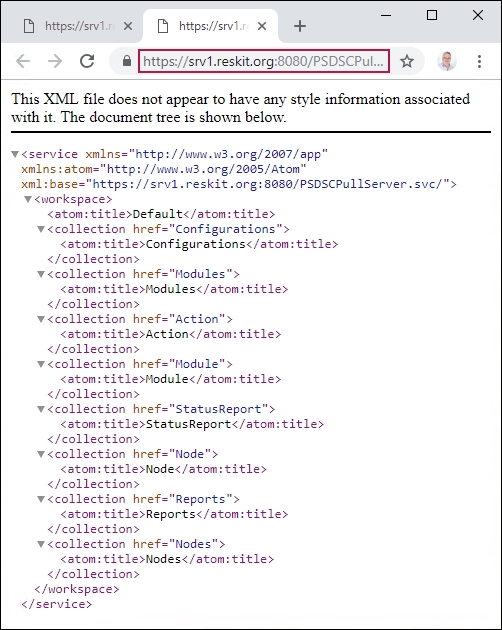
- Check on the results using the browser with the following code:
$URI = 'https://SRV1.reskit.org:8080/PSDSCPullServer.svc/'
Start-Process -FilePath $URI
- Create a metaconfiguration to make
SRV2pull two partial configuration blocks fromSRV1using the following code:[DSCLocalConfigurationManager()] Configuration SRV2WebPullPartial { Node SRV2 { Settings { RefreshMode = 'Pull' ConfigurationModeFrequencyMins = 30 ConfigurationMode = 'ApplyandAutoCorrect' RefreshFrequencyMins = 30 RebootNodeIfNeeded = $true AllowModuleOverwrite = $true } ConfigurationRepositoryWeb DSCPullSrv { ServerURL = 'HTTPS://SRV1.Reskit.Org:8080/PSDSCPullServer.svc' RegistrationKey = '5d79ee6e-0420-4c98-9cc3-9f696901a816' ConfigurationNames = @('NFSConfig','SMBConfig') } PartialConfiguration NFSConfig { Description = 'NFS Client Configuration' Configurationsource = @('[ConfigurationRepositoryWeb]DSCPullSrv')} PartialConfiguration SMBConfig { Description = 'FS-SMB1 Client Removal' Configurationsource = @('[ConfigurationRepositoryWeb]DSCPullSrv') DependsOn = '[PartialConfiguration]NFSConfig' } } # End Node 2 Configuration } - Run the configuration to create the MOF file to configure DSC LCM on
SRV2using the following code:SRV2WebPullPartial -OutputPath C:DSC | Out-Null
- Configure the LCM on
SRV2with the updated configuration using the following code:$CSSrv2 = New-CimSession -ComputerName SRV2 $LCMHT = @{ CimSession = $CSSrv2 Path = 'C:DSC' Verbose = $true } Set-DscLocalConfigurationManager @LCMHT - Create the NFS client partial configuration and related build MOF file, then rename the partial configuration using the following code:
$Guid = '5d79ee6e-0420-4c98-9cc3-9f696901a816' $ConfigData = @{ AllNodes = @( @{ NodeName = '*' ; PsDscAllowPlainTextPassword = $true}, @{ NodeName = $Guid } ) } Configuration NFSConfig { Import-DscResource –ModuleName PSDesiredStateConfiguration Node $Allnodes.NodeName { WindowsFeature NFSClientPresent { Name = 'NFS-Client' Ensure = 'Present' } } } $CHT1 = @{ ConfigurationData = $ConfigData OutputPath = 'C:DSCConfiguration' } NFSConfig @CHT1 $RIHT = @{ Path = "C:DSCConfiguration$Guid.mof" Newname = 'C:DSCConfigurationNFSConfig.MOF' } Rename-Item @RIHT - Create and compile the SMB client partial configuration, which ensures that SMB is not installed, using the following code:
$Guid = '5d79ee6e-0420-4c98-9cc3-9f696901a816' $ConfigData = @{ AllNodes = @( @{ NodeName = '*' ; PsDscAllowPlainTextPassword = $true}, @{ NodeName = $Guid } ) } Configuration SMBConfig { Import-DscResource –ModuleName 'PSDesiredStateConfiguration' Node $AllNodes.NodeName { WindowsFeature SMB1 { Name = 'FS-SMB1' Ensure = 'Absent' } } } $SMBHT = @{ ConfigurationData = $ConfigData OutputPath = 'C:DSCConfiguration' } SMBConfig @SMBHT | Out-Null $RIHT = @{ Path = "C:DSCConfiguration$Guid.mof" NewName = 'C:DSCConfigurationSMBConfig.MOF' } Rename-Item @RIHT - Create DSC checksums for the two partial configurations using the following code:
New-DscChecksum -Path C:DSCConfiguration
- Observe the configuration documents and checksum using the following code:
Get-ChildItem -Path C:DSCConfiguration
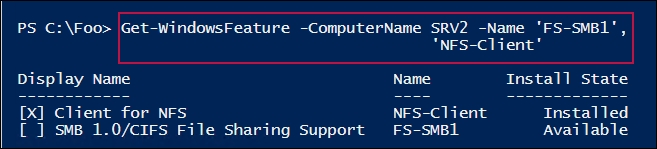
- Wait, then check the status of the features on
SRV2using the following code:Start-Sleep -Seconds (30*60) # wait for 30 minutes $FeatureNames = @('FS-SMB1', 'NFS-Client') Get-WindowsFeature -ComputerName SRV2 -Name $FeatureNames - Test the DSC configuration for
SRV2using the following code:Test-DscConfiguration -ComputerName SRV2 -Verbose
In step 1, you remove any existing certificates for SRV1.Reskit.Org, then you create a new self-signed certificate that you store in the local machine's MY certificate store. In step 2, you copy that certificate to the local machine's ROOT certificate store on SRV1 and SRV2. These two steps produce no output.
In step 3, you examine the certificate in the local machine's ROOT certificate store on SRV2, which looks like this:
In step 4, you remove all DSC configurations from both SRV1 and SRV2. In step 5, you ensure that the xPsDesiredStateConfiguration module is installed on both SRV1 and SRV2. In step 6, you create a DSC Configuration block for SRV1. These three steps produce no output.
In step 7, you remove any old MOF files in C:DSC on SRV1, then create the MOF file to configure SRV1 to be a pull server. This step produces output like this:
In step 8, you use Start-DSCConfiguration to configure SRV1 to be a pull server. This produces output like this:
In step 9, you check to see whether the DSC web-based pull service is running on SRV1, which looks like this:
In step 10, you create a metaconfiguration to make SRV2 pull two partial configuration blocks from SRV1. In step 11, you create the MOF file for SRV2. These steps produce no output.
In step 12, you configure SRV2 to pull partial configurations from SRV1, which looks like this:

In step 13, you create a partial configuration to install the NSF client. In step 14, you create and compile another partial configuration to ensure that SMB1 is absent. In step 15, you create DSC checksum files for these two configurations. These three steps produce no output.
In step 16, you examine the configuration information available in the C:DSCConfiguration folder (which is now available to nodes via the DSC pull service). The output looks like this:

Once you have completed deploying the partial configurations, you wait for the LCM in SRV2 to recheck its configuration and deploy the two partial configurations. In step 18, you examine the state of the two features on SRV2 (now configured as per the partial configurations), which looks like this:
In step 18, you test the DSC configuration on SRV2 (to see whether the node is in the desired state), which looks like this:

In step 1, you create a self-signed certificate that you make trusted on SRV1, and in step 2, you make this certificate trusted on SRV2. In an ideal world, you should create an enterprise certificate authority (CA), then issue certificates signed by that CA. With an enterprise CA, your root certificates can be autopublished, making the SRV1 server's certificate trusted by everyone.
In step 2, you use .NET to copy the certificate to SRV2. The certificate provider in PowerShell does not support a copy operation, allowing you to use Copy-Item to copy the certificate between certificate stores on SRV1 and SRV2. But .NET provides a mechanism to copy the certificate to SRV2.
With step 3, you view the certificate contained in the SRV2 server's local machine's trusted root certificate store. Note that the thumbprint is the same as the thumbprint shown in step 2. In effect, what you have done is to make the certificate in the local machine's personal certificate store trusted on SRV2 (and, using step 1, on SRV1).
Note that you could set DSC up to not use SSL (and therefore require certificates). This is, in general, not a good idea as it does not protect us from a man-in-the-middle attack. It also means that the MOF documents transmitted from a pull server are in plain text. For configurations that contain credentials or other internal secrets, the best practice is to use SSL.
In step 5, you ensure that the DSC resources that you need (which are contained in the (xPSDesiredStateConfiguration module) have been copied to SRV2. You could also have placed it on the pull server (SRV1) to enable the pull client to download it. This is probably a better approach for production use—just put all the resources in one place, and let the nodes pull that module when necessary.
In step 17, you check that DSC has configured SRV2. Depending on how long you take between step 16 and step 17, you may not see SRV2 being in the desired state. As was the case in the Implementing a web-based DSC pull server recipe, you need to wait until the LCM in SRV2 checks the consistency (and applies the partial configurations). One way to speed this up would be to reboot SRV2 after step 16. After the reboot, SRV2 would check for DSC consistency without waiting.