We are going to use
late bound classes for our sample application. We will create a custom ASP.NET website for our on-premise deployment. If you are reading chapters continually, you will be aware of the hotel management system application that we created in Chapter 4, Implementing Business Logic through Plugins. We are going to deploy our custom asp.net website for the same application. We will create an editable grid to keep food item details for the customer. We will place our editable grid in the Contact entity by using IFRAME. Hotel staff can use this application to add, delete, and update food item details.
So let's create our sample web application. Perform the following steps to create a web application:
- Open Visual Studio 2010.
- Select New | Web Site....
- Select Visual C# | ASP.NET Empty Web Site.
- Name it
FooditemsDetails.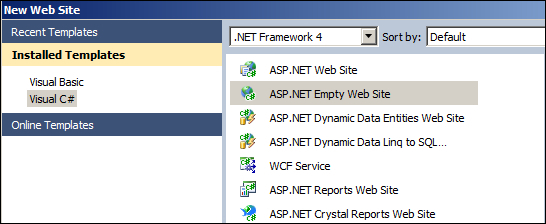
- Right-click on the website and select Add New Item.
- Select Web Form and name it
FoodItemDetails.aspx.
Now we have our page ready, let's add a reference to Microsoft CRM 2011 SDK. Perform the following steps to add an SDK reference:
- Right-click on the website and select Add Reference.
- Browse to
microsoft.xrm.sdk.dllto add to our website.
First, we need to add the class to connect to our organization. As we are using on-premise deployment and AD authentication, we need to pass user credentials to create the CRM service object. We can store this information in the web.config file, which can be changed if required during deployment of our web application.
Right-click on our website, add a new class, and name it crmutility.cs. First, we need to get the Organization service object to query Microsoft CRM 2011 data. We can create an Organization service object as per the following code snippet:
private void CreateService()
    {//read user name from web.config file
string UserID = ConfigurationManager.AppSettings["UserID"];
        string ServiceURL = ConfigurationManager.AppSettings["OrganizationServiceURL"];
        string Password = ConfigurationManager.AppSettings["Password"];
        string _DomainName = ConfigurationManager.AppSettings["DomainName"];
        ClientCredentials Credentials = new ClientCredentials();
        Credentials.Windows.ClientCredential = new System.Net.NetworkCredential(UserID,Password,_DomainName); CredentialCache.DefaultNetworkCredentials;
        Uri OrganizationUri = new Uri(ServiceURL);
        using (OrganizationServiceProxy serviceProxy = new OrganizationServiceProxy(OrganizationUri, null, Credentials, null))
        {
   _iOgranizationService = (IOrganizationService)serviceProxy;
        }
     }
Now we need to write three main functions to create, update, and delete the Food Details entity record. We will see three fields in our grid view menu, which is an option set field that contains the cost and quantity of the food.
Let's write our Add function, which will add a new record to the Food entity. For this, we will use the Create method of the Organization service. Our function should look like the following code:
public void AddFoodItem(int _MenuValue,Decimal Cost,int Quantity,Guid contactid)
    {
        Entity _Food = new Entity("new_food");
        _Food.Attributes["new_menu"] = new OptionSetValue(_MenuValue);
        _Food.Attributes["new_quantity"] = Quantity;
        _Food.Attributes["new_cost"] = new Money(Cost);
        _Food.Attributes["new_fooddetailsid"] = new EntityReference("contact", contactid);
        _Food.Attributes["new_orderdate"] = DateTime.Now.ToLocalTime();
        _iOgranizationService.Create(_Food);

    }
Microsoft CRM 2011
now uses native .NET types for most of the data types, so we used the Money field to typecast the Currency field. You can refer to http://msdn.microsoft.com/en-us/library/gg328507.aspx to get information about new Microsoft CRM 2011 data types. In the previous function, we also used the DateTime.Now.ToLocalTime() property to get the time in the local time format. Microsoft CRM 2011 will convert it automatically to the UTC format because Microsoft CRM 2011 stores all date fields in the database in the UTC format.
We also need a function to delete the selected record, so for deleting a record we can use the following code:
    public void Delete(Guid _Foodid)
    {_iOgranizationService.Delete("new_food", _Foodid); }
Now, let's write a function to fetch all food details for a particular contact. We will pass the current contact ID to our web application. We will use the same contact ID to fetch data from Microsoft CRM 2011 for the Food entity. Our function should look like the following code snippet:
public DataTable GetFoodItemsDetails(Guid ContactID)
    {  //First create data table
DataTable _Food = new DataTable();
        _Food.Columns.Add("Menu");
        _Food.Columns.Add("Cost");
        _Food.Columns.Add("Quantity");
        _Food.Columns.Add("ID");
    //build query to fetch data from Microsoft CRM 2011
        QueryExpression _Query = new QueryExpression
            {   EntityName = "new_food",
                ColumnSet = new ColumnSet("new_menu", "new_cost", "new_quantity"),
                Criteria =
                {   FilterOperator = LogicalOperator.And,
                    Conditions =
                        { new ConditionExpression                            {   AttributeName="new_fooddetailsid",
                                Operator=ConditionOperator.Equal,
                                Values={ContactID}
                             } }  }    };
 EntityCollection _Entities = _iOgranizationService.RetrieveMultiple(_Query);
           foreach (Entity _Contact in _Entities.Entities)
            {  DataRow dr = _Food.NewRow();
                if (_Contact.Attributes.Contains("new_menu"))
                {dr["Menu"] = RetrieveOptionSetValue(((OptionSetValue)_Contact.Attributes["new_menu"]).Value);}
                if (_Contact.Attributes.Contains("new_cost"))
                { dr["Cost"] = ((Money)_Contact.Attributes["new_cost"]).Value;}
                 if (_Contact.Attributes.Contains("new_quantity"))
                {  dr["Quantity"] = _Contact.Attributes["new_quantity"].ToString();}
                 dr["ID"] = _Contact.Id;
                _Food.Rows.Add(dr);
            }
           return _Food; }
The last function that we need is used to update existing food details, and it should look like the following code snippet:
    public void UpdateFoodItem(int _MenuValue, Decimal Cost, int Quantity, Guid contactid,Guid Foodid)
    {
        Entity _Food = new Entity("new_food");
        _Food.Attributes["new_foodid"] = Foodid;
        _Food.Attributes["new_menu"] = new OptionSetValue(_MenuValue);
        _Food.Attributes["new_quantity"] = Quantity;
        _Food.Attributes["new_cost"] = new Money(Cost);
        _Food.Attributes["new_fooddetailsid"] = new EntityReference("contact", contactid);

        _iOgranizationService.Update(_Food);

    }
We have used
the Update method of the Organization service. Based on the primary fields, we are updating the Food entity data.
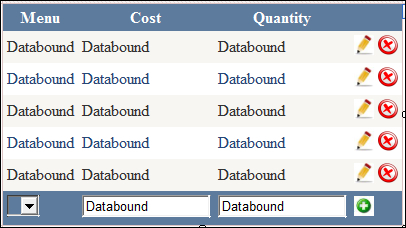
Now, we have all the required functions, so let's design our editable grid view. Open the web form that we added to our website, go to design mode, and add a grid view control to our web page. We need to add a template field in our grid view. Perform the following steps to add a template column:
- Click on the grid view task button and click on Edit Column.
- Add four template fields, as shown in the following screenshot:
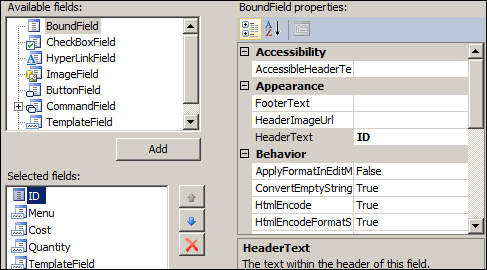
We will be using the ID field to hold the Food entity record GUID. Once TemplateField is added, let's modify the template column to add required controls.
Click on the grid view task button and select Edit Template.
We need to add controls in the edit template, as shown in the following screenshot:
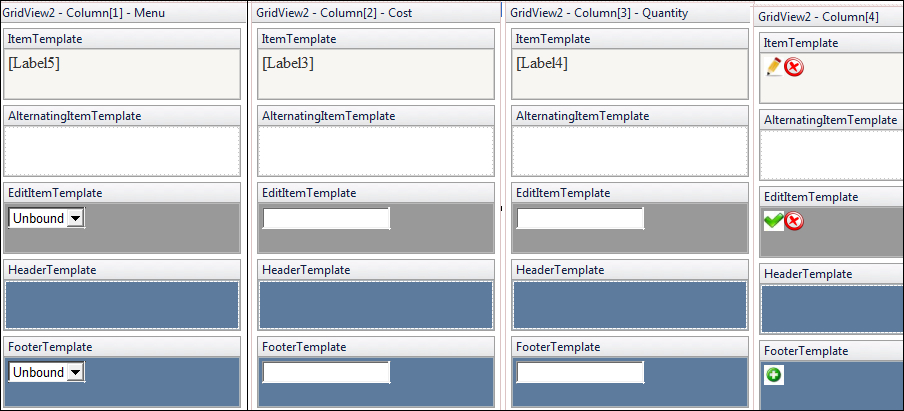
We can also apply Auto Format from the grid view task button. After making these changes, our grid view should look like the following screenshot:
First, we need to write a function to bind data to our grid view. We need to get all Food entity data based on the contact ID and the bind result set to our grid view. Our data bind function should like the following code snippet:
private void DataBind()
    {   DataTable dt = _object.GetFoodItemsDetails(contactid);
        if (dt.Rows.Count > 0)
        {   GridView2.DataSource = dt;
            GridView2.DataBind();
         }
        else
        {
            dt.Rows.Add(dt.NewRow());
            GridView2.DataSource = dt;
            GridView2.DataBind();
            int columncount = GridView2.Rows[0].Cells.Count;
            GridView2.Rows[0].Cells.Clear();
            GridView2.Rows[0].Cells.Add(new TableCell());
            GridView2.Rows[0].Cells[0].ColumnSpan = columncount;
            GridView2.Rows[0].Cells[0].Text = "No Records Found";
        }
    }
Now we need to add an event to our grid view. Perform the following steps to add an event to the grid view:
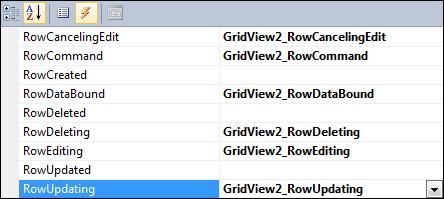
Once these events are generated, we need to write code for them. You can get the full code from Chapter6CodeFooditemDetails in the code bundle.