
Now it's time to deploy
our web application to Microsoft CRM 2011. In Microsoft CRM 4.0, we used to deploy custom web applications in the ISV folder, but in Microsoft CRM 2011, calling the Microsoft Dynamics CRM 2011 web services from the <crmwebroot>ISV folder is no longer supported. The ISV folder has officially been deprecated, so any custom code or custom web page deployed in this folder must use only 2007 service endpoints. Let's create a virtual directory for our website under IIS. Perform the following steps to set the virtual directory:
- Open Internet Information via Control Panel | Administrative Task | Internet Information Services.
- Select Server Name | Sites | Default Web Site.
- Right-click on Default Web Site and select Add Application.
- Enter the following information:
- Alias:
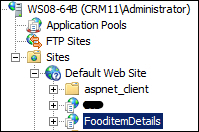
FooditemDetails - Physical Path: Select the location for your web project.
- Application Pool: Keep it at the default value.
- Alias:
- Click on OK.
Once configuration has been done, the website tree should like the following screenshot:
Now let's access our web application in Microsoft CRM 2011:
- Open the
Developmentsolution that we created in Chapter 4, Implementing Business Logic through Plugins. - Navigate to Web Resources.
- Click on New to create a new web resource.
- Enter the following information in the web resource dialog box:
- Name:
contactWR.js - Display Name:
contact - Type:
Script (JavaScript)
- Name:
- Open the text editor and enter the following code:
function ShowCustomWeb() { var ID=Xrm.Page.data.entity.getId(); var URL="http://localhost/FoodDetails/FooditemDetails.aspx?id="+ID //get iframe var IFRAME=Xrm.Page.getControl("IFRAME_fooddetail").setSrc(URL); } - Click on Save and publish the web resource.
Now we have our web resource ready and need to attach this web resource to the Customer entity. We also need to add the IFRAME in the Customer entity form. Perform the following steps to customize the Customer entity:
- Navigate to the Customer entity and open the Customer form to customize it.
- Remove Sub-Grid from the Food Details section.
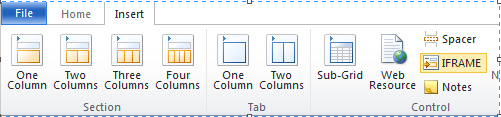
- Navigate to the Insert tab from the form ribbon toolbar and select IFRAME:
- Enter the following information in the IFRAME tab:
- Name:
IFRAME_fooddetail - URL:
#
- Name:
- Uncheck the Restrict cross frame scripting checkbox.
- Click on Form Properties in our web resource.
- Attach the ShowCustomWeb function to form the OnLoad event:
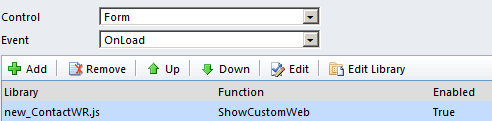
- Click on Save to save the changes, and then click on Publish to publish the form.