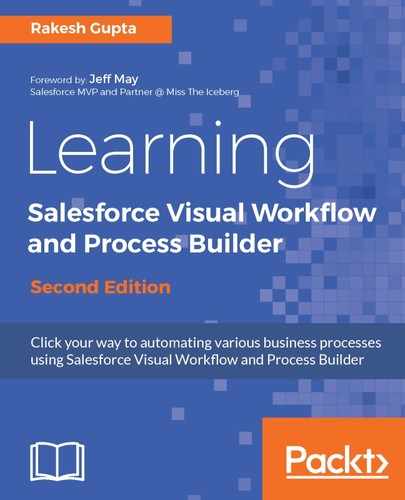
Process Builder is a tool that allows you to implement business requirements by creating a process (without any code). It has almost all the features that are offered by Workflow Rule, plus it also contains some new features, such as Post to Chatter, Launch a Flow, Create a Record, Update Records, and Submit for Approval. From now on, we will use Lightning Experience to create or manage processes using Process Builder and create or manage Visual Workflows. The Process Builder user interface has different functional parts, which are shown in the following screenshot:

The different functional parts of the user interface of Process Builder are as follows:
-
Button bar: The following are the buttons available in the button bar:
- Activate: Use this button to activate your process. You can't make any changes once a process is activated.
-
Deactivate: This button is available on the button bar only if the process is activated. Use this button to deactivate a process.
-
Edit Properties: This will show you the Process Name, API Name, and Description fields of your process. It allows you to change the process name and description as long as the process is not activated. You can't change the API Name field after you've saved it the first time. The Properties window will look like what is shown in the following screenshot:

-
Clone: The Clone button lets you make a copy of the current process. You can perform this activity with these two Clone As options using this button: Version of current process and A new process.
-
View All Processes: Once you click on this button, it will redirect you to the Processes management page. From there, you can see all the processes created in the current Salesforce organization.
-
Collapse All: Collapse actions on the canvas.
-
Expand All: Expand actions on the canvas.
-
Process canvas: This is the main area where you can use point-and-click to develop a process. To edit any element in the process canvas, double-click on it.
-
Add object: Select the object on which you want to create a process and choose the evaluation criteria (changes that will cause the process to run).
-
Add criteria: Use this to define the criteria and set the filter conditions.
-
IMMEDIATE ACTIONS: Use this to define immediate actions for the process.
-
SCHEDULED ACTIONS: Use this to define scheduled actions for the process.