The next step is to add a Wait element into the Flow. The Wait element allows you to set the time interval, so before executing the next step, it will wait for a defined time period:
- Click on the Palette tab, then click on the LOGIC section, and drag and drop the Wait element onto the canvas; it will open a new window, where you have to enter the following details:
- Name: Enter the name for the Subflow element. In this case, enter Wait for 1 hrs as the name.
- Unique Name: This will be autopopulated based on the name.
- Description: Write some meaningful text so that another developer or administrator can easily understand why this Wait element was used.
- Events: Click on Add Event available on the left-hand side of the overlay to define each additional event that you need. For each event, you have to define the following things:
- Name: Enter the name for the event. In this case, enter After 1 hrs as the name.
- Unique Name: This will be autopopulated based on the name.
- Event Type: Select the event type based on which different input parameters are available:
- Alarm: Absolute Time: This waits for a defined time that is based upon an absolute date/time value. For example, send an e-mail to the system administrator 1 day after starting the Flow interview.
- Alarm: Relative time: This waits for a defined time that is based upon a date/time field on a record. For example, send an e-mail to the Opportunity owner 3 days after closing ofthe Opportunity. In this case, select Alarm: Relative time.
- Event Conditions: Based on the event type that you have selected, different input parameters are available. Parameters that appear automatically are required. Map Record ID with the VarTNew_OppId variable. For Base Date/Time Field, you can enter the API name of any date/time field on the particular record; for Object Type, enter the name or ID of the object that contains Date/Time field; for Offset Unit, you can only use Hours or Days, and for Offset Number, enter the number to offset the alarm by.
- Waiting Conditions: Optionally, it allows you to set the waiting condition. For example, you want your Flow to wait for the event only if additional conditions are met. In this case, leave this box unchecked.
- Variable Assignments: Use this to pass the event's outputs to Flow variables. In this case, remove all rows.
Finally, it will look like what is shown in the following screenshot:

- Once you are done, click on the OK button.
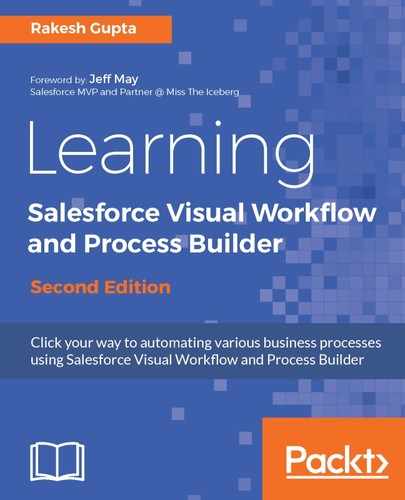
- The next step is to find the ID for Sales Executive Chatter group. Click on the Palette tab and drag and drop the Record Lookup element onto the canvas; it will open a new window for you, where you have to enter following details:
- Name: Enter the name for the Record Lookup element. In this case, enter Find Chatter Group Sales Executive Id as the name.
- Unique Name: This will be autopopulated based on the name.
- Description: Write some meaningful text so that another developer or administrator can easily understand why this Record Lookup element was created.
- Look up: Select the object for which you want to search the record. In this case, select the CollaborationGroup object. The next task is to define the search criteria; for this example, we will filter by group name = Sales Exec. If you want to add multiple fields to the search criteria, then click on the Add Row link to add a new row.
- Assign the record's field value to variables: Optionally, you can save the field's values into variables so you can use it later in the Flow. Let's create a Text variable with the name VarTChatterGroupId by expanding the CREATE NEW section of the drop-down list, setting Input/Output Type as Input and Output, and mapping it with the record Id field.
This will look like what is shown in the following screenshot:
- Once you are done, click on the OK button.
- The next step is to add a Record Create element to auto-add a new Opportunity to the Sales Executive Chatter group. Click on the Palette tab and drag and drop the Record Create element onto the canvas; it will open a new window for you, where you have to enter following details:
- Name: Enter the name for the Record Create element. In this case, enter Add Record to Chatter Group as the name.
- Unique Name: This will be autopopulated based on the name.
- Description: Write some meaningful text so that another developer or administrator can easily understand why this Record Create element was created.
- Create: Select the object for which you want to create the record. In this case, select the CollaborationGroupRecord object. The next task is to assign the value or resource to the object fields (data types must match). To assign values to multiple fields, click on the Add Row link.
- Variable: Optionally, you can save the new record's ID into a variable, so you can use it later in the Flow.
It will look like what is shown in the following screenshot:

- Once you are done, click on the OK button.
- Use a connector to connect the Subflow, Wait, Record Lookup and Record Create elements. Set the referenced Flow Create an Opportunity as the Start element, as shown in the following screenshot:

- Save your Flow with the name Understanding Sub-flow and Wait element, Type set as Autolaunched Flow, and click on the Close button to close the canvas. Don't forget to activate the Flow.