18.2. Managing Web Part Connections
While the exercise in the previous section should have familiarized you with the basic process of creating a Web part connection by using SharePoint Designer, in this section, I discuss some peculiarities that you can exploit while working with the Web part connections on a Web page.
18.2.1. Creating and modifying Web part connections
The Web Part Connections Wizard is the primary interface in SharePoint Designer to create Web part connections between Web parts. You can access the Web Part Connections Wizard either by right-clicking on a Web part and then choosing Web Part Connections from the popup menu or by using the Web Part Connections menu option in the Common Data View Tasks menu.
The Web Part Connections Wizard provides a set of actions available for the source Web part. These actions might change depending on the Web part being used as a source Web part. For example, if the source Web part is a DataFormWebPart, the following source actions are available for use:
Get Filter Values From: Allows you to filter the source Web part based on data received from a target Web part
Get Parameters From: Allows you to use the data sent from the target Web part as input values for parameters being used in the source Web part
Send Row of Data To: Allows you to send data rows to the target Web part
Based on the selection made for the source action, the options available as target actions automatically change to accommodate the source action. For example, if you choose the Send Row of Data To as the source action, the actions available for the target Web part would be Get Filter Values From and Get Parameters From.
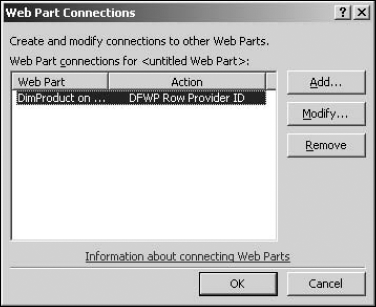
To view the existing Web part connections associated with a Web part, simply right-click on it and then choose Web Part Connections from the popup menu. If there are no Web part connections for the Web part, the Web Part Connections Wizard is initiated. However, if the Web part has any Web part connections associated with it, the Web Part Connections dialog box, as shown in Figure 18.7, opens.
When you click Add, the Web Part Connections dialog box links to the Web Part Connections Wizard. This allows you to add new Web part connections to the selected Web part.
If you want to modify the existing Web part connection, select it in the list of Web part connections for the Web part and then click Modify. The Web Part Connections Wizard opens again, this time with all the settings for the Web part connection loaded. You can then change the settings to modify the Web part connection. To remove a Web part connection, simply select it from the list and then click Remove.
Figure 18.7. Adding and modifying connections by using the Web Part Connections dialog box
18.2.2. Using cross-page connections
The Web Part Connections Wizard also allows you to create Web part connections between Web parts that exist on separate Web pages in a SharePoint Site. As shown in Figure 18.8, you can choose the Web page inside the site that has the target Web part you want to use for the connection.
When you click Next, the Web parts that support Web part connections and reside on the chosen Web page are available as choices for the target Web part in the Web Part Connections Wizard. From here on, you use the same process to create a Web part connection between Web parts.
18.2.3. Creating parameters
You may have already noticed the power and extensibility that Data Form Web Parts parameters provide. Web part connections help you utilize these parameters to channelize data from the source Web part to the target Web part or vice versa. You can have the parameter values be provided by the source Web part and then use these parameters like you would in the target Web part for filtering, sorting, advanced XSLT expressions, conditional formatting, etc.
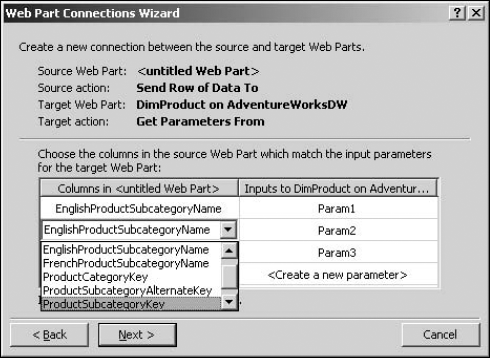
When you choose the target action Get Parameters From while creating the Web part connection, you see the screen shown in Figure 18.9.
Clicking the Create a new parameter row opens the Data View Parameters dialog box, where you can create new parameters. You can't change the parameter source because you use the Web part connection as the source for the parameter. As shown in Figure 18.10, after you create the parameters, they're available to match with the columns from the source Web part.
Figure 18.8. Creating cross-page connections by using the Web Part Connections Wizard
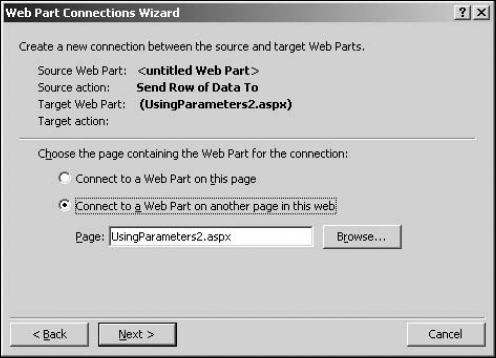
Figure 18.9. Creating new parameters for a Web part connection
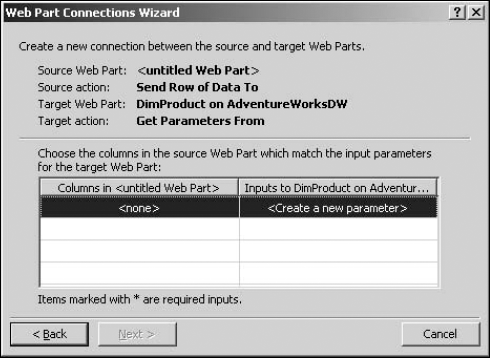
Figure 18.10. Matching columns with parameters to identify the source of values
For DataFormWebParts, the Set up conditional formatting on the consumer Web part check box appears on the Finish screen of the Web Part Connections Wizard. Clicking this check box configures the XSL of the data view to enable application of conditional formatting.
Once the Web part connection is created successfully, you can use these parameters created and matched by using the Web Part Connections Wizard to perform filtering and formatting operations on the target Web part. The values of these parameters are made available by the selection made in the source Web part.
NOTE
If you're connecting to a Web part on a different page, you only see the parameters already available in the target Web page. To create new parameters, open the Web page connecting the target Web part and then create new parameters by using the Data View Parameters dialog box.
18.2.4. Connecting with the Form Web Part
The Form Web Part is a Web part available in SharePoint that allows you to create simple HTML-based forms that can be used for requesting user input on a Web page. While with the Data Form Web Part in SharePoint Designer you have much more advanced form capabilities, you might just want to use this Web part to create and display an HTML form on a SharePoint site.
The following exercise shows how you can use the Form Web Part to create simple HTML forms by using the SharePoint site interface and then use Web part connections to provide data to and filter another Web part. You don't really need SharePoint Designer for this exercise; however, you can create Web part connections between form Web part and other Web parts with relative ease in SharePoint Designer. Follow these steps:
Open the home page of your SharePoint (WSS v3) Web site and then choose Site Actions
 Edit Page.
Click the Add Web Part bar to open the Add Web Parts Web dialog box, select the Form Web Part and the target Web part in the list of Web parts, and then click OK. The Form Web Part is available in the Miscellaneous section in this dialog box.
For the Form Web Part, choose Edit
 Modify Shared Web part to open the Properties pane for the Form Web Part. This is illustrated in Figure 18.11.
Change the HTML of the form to suit your requirement. Notice the default code that exists in the text editor. As shown in the following code, by default, you have an HTML text field <input type="text" name="T1> and an HTML button <input type="button" value="Go" onclick="javascript:_SFSUBMIT_"/>. When you click the HTML button, a JavaScript function is called that submits the form:
<div onkeydown="javascript:if (event.keyCode == 13) _
   SFSUBMIT_"><input type="text" name="T1><input type="button"
   value="Go" onclick="javascript:_SFSUBMIT_"/></div>
You might want to keep the HTML button intact to avoid any issues with the Form Web Part. Simply add the HTML tags that make up your form.
Click Save to implement the HTML form changes to the Form Web Part.
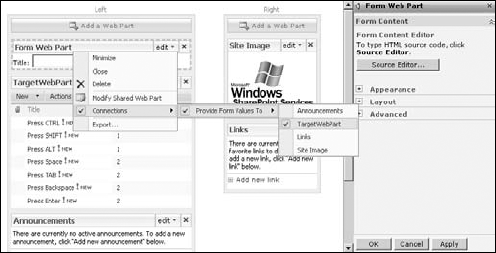
On the Form Web Part, choose Edit
 Connections
  Provides Form Values To
  TargetWebPart, as shown in Figure 18.12, to create a Web part connection.
Match the form field to the corresponding column in the target Web part to configure the connection and then click Next.
Click Exit Edit Mode to save the changes to the Web page.
When you type a value in the Form Web Part and then click Go, the corresponding matching records are displayed in the target Web part. While this is no match for the advanced SharePoint Designer forms, I used this example to illustrate that basic form search capabilities can be implemented using Web part connections right through the SharePoint Web site interface.
NOTE
Creating connections between Web parts placed on the list form pages (for example, dispform.aspx, editform.aspx, etc.) doesn't work beyond one Web part connection. That means you can't create multiple Web part connections on these SharePoint pages.
Figure 18.11. Modifying Form Web Part properties
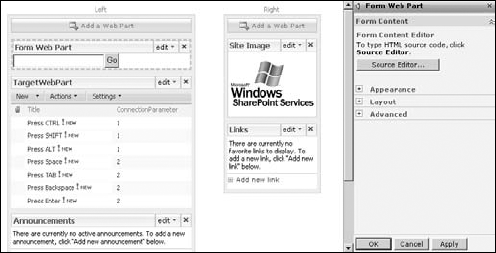
Figure 18.12. Creating Web part connections by using the Form Web Part