
18.1. Exploring Web Part Connections
To dive a little deeper to understand how Web part connections work, I take you through the following steps to create a simple Web part connection between a ListViewWebPart and a DataFormWebPart by using SharePoint Designer. Then, I help you explore the key code components that enable the Web part connections:
Create a new ASPX page in SharePoint Designer and then open it in the Design view.
Place the cursor on the Web page at the location where you want to insert the source Web part. For this exercise, the source Web part is a ListViewWebPart rendering data from a SharePoint List.
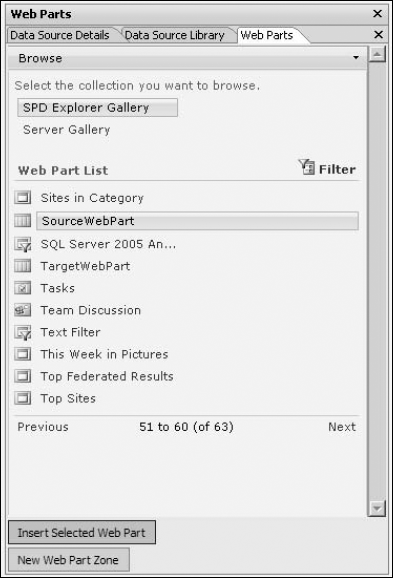
In the Web Parts List, select the SourceWebPart and then click Insert Selected Web part to insert it on the Web page. This is illustrated in Figure 18.3.
Ensure that the data source you selected for the data view has matching data to filter by using the values from the source Web part.
Using the Data Source Library and Data Source Details task panes, insert a data view on the Web page.
Right-click on the source Web part and then choose Web Part Connections from the popup menu to open the Web Part Connections Wizard, as shown in Figure 18.4.
Using the Choose the action on the source Web Part to use for this connection dropdown menu, select Provide Row To and then click Next. In the top section of the Web Part Connections Wizard, the details of the connection appear as the connection is built.
On the next screen, click the Connect to a Web Part on this page radio button in the Choose a page containing the Web part for this connection section and then click Next.
As illustrated in Figure 18.5, select the target Web part and the target action in the Choose the target Web part and action for the connection section and then click Next. If you have multiple Web parts that support connections on the Web page, you should see them all listed in the Target Web Part listed. Based on the target action selected on the last screen, the options in the next screen change.
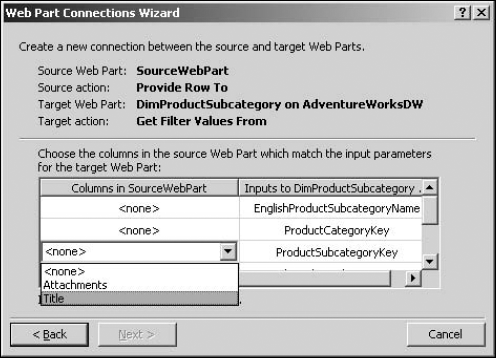
Select the matching columns and then click Next. As shown in Figure 18.6, this screen allows you to match columns in both data sources to filter the data.
Figure 18.3. Inserting a ListViewWebPart by using the Web Parts task pane
Click Finish to complete the creation of the Web part connection, save the Web page, and then preview it in a browser.
When you click the radio button for the row in the source Web part, the target Web part becomes filtered based on the selection. If you click the Code view tab of the Web page where you just inserted the Web parts and connected them by using Web part connections, the HTML code that enables the Web part connections appears.
Figure 18.4. Using the Web Part Connections Wizard
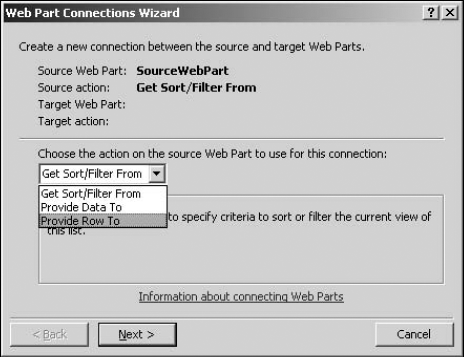
Figure 18.5. Choosing the target Web part for the connection

Figure 18.6. Matching columns for filtering by using the Web Part Connections Wizard
18.1.1. Understanding data providers and data consumers
There are two important sections in the HTML code that enable the Web part connections for the Web page. These sections are illustrated in the following code:
<SPWebPartConnections>

<WebPartPages:spWebpartconnection ID="g_
   C81C15B21EA842B0B254CFA49A9A4F9C" ConsumerConnectionPointID="DFWP
   Filter Consumer ID" ConsumerID="g_e14badef_e22f_42ab_b91b_
   a831f878a3e1" ProviderConnectionPointID="ListViewRowProvider_
   WPQ_" ProviderID="g_19a7a140_8d41_4410_ac36_7fa5175e22ee">

<asp:rowtoparameterstransformer ProviderFieldNames="LinkTitle"
   ConsumerFieldNames="@ProductSubcategoryKey" />

</WebPartPages:spWebpartconnection>
</SPWebPartConnections>
The WebPartPages:spWebpartconnection control stores the relation that establishes the connection between the Web parts. The attributes assigned in this control define which Web part serves as the data provider for the connections and which one is the data consumer. For each connection that you establish between a set of Web parts on the Web page, you get a WebPartPages:spWebpartconnection control in the HTML code.
The asp:rowtoparameterstransformer lists the matching columns in the two Web parts to be used for comparison.
18.1.2. Investigating the Web part connection string
Looking closely at the WebPartPages:spWebpartconnection control shows that the control has its own ID and has the ConsumerID and the ProviderID:
<WebPartPages:spWebpartconnection ID="g_
   C81C15B21EA842B0B254CFA49A9A4F9C" ConsumerConnectionPointID="DFWP
   Filter Consumer ID" ConsumerID="g_e14badef_e22f_42ab_b91b_
   a831f878a3e1" ProviderConnectionPointID="ListViewRowProvider_
   WPQ_" ProviderID="g_19a7a140_8d41_4410_ac36_7fa5175e22ee">
The ConsumerID matches the id attribute of the source Web part on the Web page, and the ProviderID matches the id attribute of the target Web part. Obviously, if the Web part connection control doesn't find a provider or consumer matching the IDs it has, the control errors out with an error similar to the following: Could not find the connection provider Web Part with ID "g_19a7a140_8d41_4410_ac36_7fa5175e22ee."
|