
5.4. Using Tables and Table Layouts
Tables have been widely accepted as a versatile tool for laying out Web pages for the Internet. Using tables, you can design the structure of a Web page and then fill in the content pieces as needed. The use of tables also reduces formatting and positioning issues that might occur because of the differences in computer screen size and resolution.
SharePoint Designer provides three main interface components to work with tables and related features:
Table menu: Allows you to insert, modify, and delete tables on Web pages. You can also use this menu to convert text to tables and vice versa.
Layout Tables task pane: Allows you to create table layouts for Web pages and provides an intuitive interface to format and resize tables and cells. The task pane also allows you to choose from a set of table layout templates on which to base your table layout.
Table toolbar: This provides shortcuts to the most commonly used tasks in the Table menu and the Layout Tables task pane.
To create a table on a Web page, follow these steps:
In the Design view, open the Web page in which you want to create the table.
NOTE
If you want to ensure that new tables created in SharePoint Designer are assigned unique IDs for identification, click the Assign unique IDs to new tables check box in the General tab of the Page Editor Options dialog box. This ensures that when you copy and paste tables in the Design view, the unique IDs are used for easy identification of tables.
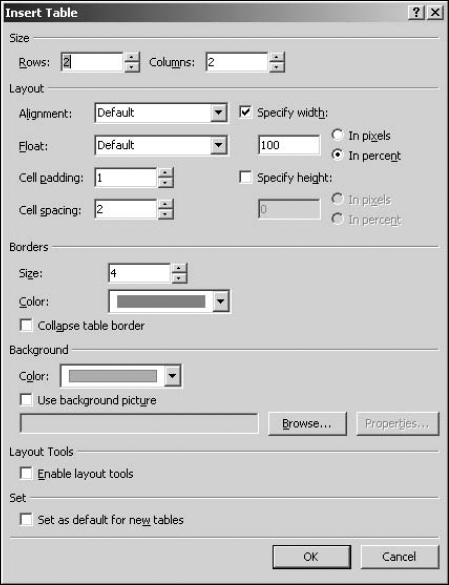
Choose Table
 Insert Table to open the Insert Table dialog box, as shown in Figure 5.19. The Insert Table dialog box allows you to set the properties for the new table.
In the Size section, specify the number of rows and columns you want for the table. You can type a rough estimate, as the number of columns and rows can be changed later.
In the Layout section, specify the text alignment, width, and height of the table and cells. You can also set the cell padding and cell spacing values in this section. Cell padding specifies the amount of space from the border of the cell where text can be placed. Cell spacing determines the amount of space between adjoining cells of the table.
In the Borders section, specify the width and color of the table border. You can also click the Collapse table border check box if you want the adjacent borders of the table and cells to overlap.
In the Background section, specify the background color to use for the table. If you want to enable the layout tools for tables (discussed later in this chapter), click the Enable layout tools check box. Also, you can click the Set as default for new tables check box if you want to keep the settings you made in the previous steps for new tables
Figure 5.19. The Insert Table dialog box
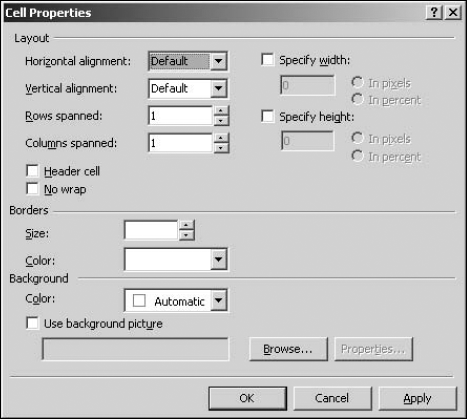
After the table is created, you can modify its properties by right-clicking on the table and then choosing Table Properties from the popup menu. When you right-click on the table, the Cell Properties menu option also appears. As shown in Figure 5.20, you can use the Cell Properties dialog box to modify the properties of the corresponding cell in the table.
Besides the ability to set formatting properties such as width, height, and text alignment, these settings for the cells are also available:
Header cell: You can specify whether the corresponding cell is a table header. Table headers are cells specified with the <th> tag and have special formatting applied to them (such as center alignment and bold text).
No wrap: Keep the No wrap check box deselected if you want the noncontiguous text in the cell to be wrapped once the table width is reached. If this check box is selected, the width of the table is increased to accommodate the text without wrapping it.
Figure 5.20. The Cell Properties dialog box
Also, when you right-click on a table, a set of menu options is available for inserting, selecting, modifying, and deleting the rows and columns of the table:
Insert: Allows you to add a column, row, or cell to the left side or the right side of the column, row, or cell where the cursor exists in the Design view
Select: Allows you to choose the row, cell, or column where the cursor is active
Delete: Allows you to delete the row, column, or cell in the table
Modify: Allows you to merge or split cells and tables, apply predefined formatting to tables, and auto-fit the tables to text inside them
In the next exercise, you use the auto-format feature to automatically format tables by using some predefined formatting templates:
Choose Table
 Insert Table to open the Insert Table dialog box and then create a new table with the number of rows and columns of your choice.
Open the Table AutoFormat dialog box by either right-clicking on the table and then choosing Modify
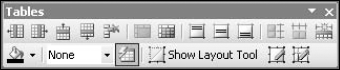
 Table AutoFormat from the popup menu or clicking on the Table AutoFormat button on the Tables toolbar, as shown in Figure 5.21.
Figure 5.21. The Tables toolbar
Choose the format that you want to use for your table by using the Formats list in the Table AutoFormat dialog box, as shown in Figure 5.22. Choosing a format shows a preview of the format in the Table AutoFormat dialog box.
Figure 5.22. The Table AutoFormat dialog box
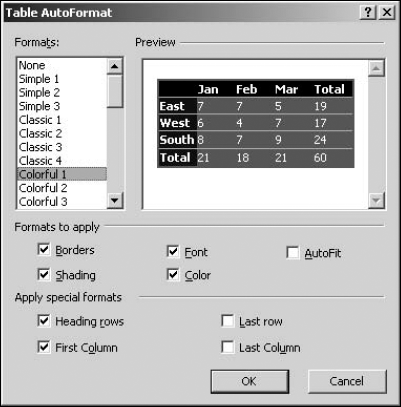
Use the Formats to apply and Apply special formats sections to specify where you want to apply the styles configured in the format selected in step 3.
Click OK. A new table with auto formatting is created.
When you apply auto formatting to the table, a number of CSS styles are created inside the Web page. These styles are used to implement the formatting applied to the table and can be modified by using the CSS SharePoint Designer interface.
SharePoint Designer also inherits the FrontPage 2003 feature for creating and managing tables and cells called Table Layouts. A layout table or cell is nothing but an HTML table or cell that has SharePoint Designer layout tools enabled for it. Layout tools provide for resizing and management of the tables. As mentioned earlier, you can have the layout tools enabled for a table inserted by choosing Table ![]() Insert Table and then clicking the Enable layout tools check box in the Layout Tools section.
Insert Table and then clicking the Enable layout tools check box in the Layout Tools section.
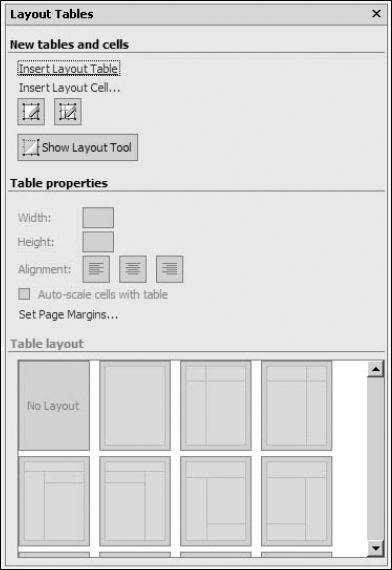
You can insert layout tables and cells by using the Layout Tables task pane, as shown in Figure 5.23. You access this task pane by choosing Task Panes ![]() Layout Tables.
Layout Tables.
The Layout Tables task pane has some default layout plans for tables that you can use to design your Web pages. These layout tables are listed in the Table layout section of the Layout Tables task pane. To insert a layout table based on a template, simply open a Web page, place the cursor at the location where you want the layout table to be placed on the page, and then click the template in the task pane.
The following exercise can help you understand how you can use the layout tools to design your tables in SharePoint Designer. If used correctly, layout tools can be of great help in resizing and formatting table layouts. In this exercise, you use the Layout Tables task pane to create a new layout table and then insert and resize layout cells in it:
Click the Insert Layout Table button in the Layout Tables task pane. A new table with one row and one column, with layout tools enabled, appears on the Web page. By default, a layout table is represented with a green border in the Design view when you hover over the table border. You can click the green border to see the resizing tools. You can view the properties of this table by using the Table Properties dialog box, just like with any other HTML table. On all four sides of the table, you have dropdown menus showing the width of that side. Clicking on the dropdown menu on the top or the bottom of the table shows these options:
Change Column Width: Allows you to change the width of the selected column
Make Column Autostretch: Specifies the width in percentages and uses it to auto-stretch the columns based on the width of the page
Use Column Spacer Image: Inserts a placeholder image (a white-colored image of the width and height of the column) in the table cell
Click the dropdown menu for the top table side and then choose Make Column AutoStretch. The display text of the dropdown menus on the top and bottom sides changes to reflect the percentage of page width being used.
Keep the defaults in the Layout Cell dialog box and then click OK. The one cell that exists in the layout table is now converted into the Layout Cell. By default, a layout cell is represented by a blue border in the Design view. You can click the blue border to enable the resizing tool for the layout cell.
Use the resizing boxes (small square boxes) on the blue border to resize the layout cell to half the height and width of the layout table.
Ensure that the layout cell is selected (a blue border shows with the resizing boxes) and then click the Insert Layout Cell button on the Layout Tables task pane. The Insert Layout Cell dialog box opens.
In the Insert Layout Cell dialog box, click the Vertical radio button in the Layout section and then click OK. This ensures that the new layout cell is inserted vertically next to the existing layout cell.
Using the resizing boxes, change the height of the new layout cell to half the height of the layout table.
Click the layout cell inserted in step 8 and then click the Insert Layout Cell button in the Layout Tables task pane to insert another layout cell in the table.
Keep the defaults in the Insert Layout Cell dialog box and then click OK.
Change the width of the newly created cell to half the width of the table.
Click the Insert Layout Cell button again to insert another layout cell vertically after the cell inserted in step 10. In the Insert Layout Cell dialog box, click the Vertical radio button in the Layout section.
Click OK.
|

You now have a layout table with four layout cells in it. If you click the Code view tab, SharePoint Designer recognizes layout tables by using HTML comments placed inside the HTML code of the table and the cell:
<table cellpadding="0" cellspacing="0" style="width: 986px; height:
450px">
<!-- MSTableType="layout" -->
<tr>
<td valign="top">
<!-- MSCellType="empty" -->
</td>
<td valign="top" style="height: 213px">
<!-- MSCellType="empty" -->
</td>
</tr>
<tr>
<td valign="top" style="width: 537px">
<!-- MSCellType="empty" -->
</td>
<td valign="top" style="height: 237px; width: 449px">
<!-- MSCellType="empty" -->
</td>
</tr>
</table>As highlighted in the previous code, there's one layout table and four layout cells.
NOTE
It's important to understand that you can't resize a cell if there's no room for the resizing. For example, using the layout table you created in the previous steps, if you try to resize the bottom-right cell from the top or the left outline, it won't resize because there's no space to resize. Instead, resize the adjacent cells to make room for the cell and then resize it accordingly.