
8.2. Using SharePoint Designer Behaviors
Behaviors allow Web site designers to create DHTML effects and functionality on Web pages without having to write a lot of JavaScript code. SharePoint Designer has prewritten JavaScript actions that provide a large set of functions. In this section, I discuss these actions and show you how to use them for Web page development.
8.2.1. Understanding behaviors
Behaviors are basically predefined JavaScript functions that can be used with various DHTML events to obtain a specific functionality. Table 8.1 shows a list of behaviors available in SharePoint Designer.
The basic process of implementing a behavior on an HTML element is as follows:
Choose the HTML tag or element that you want to apply the behavior on in the currently open Web page.
Choose the behavior that you want to use and then specify the settings for the behavior by using the associated dialog box.
Choose the DHTML event on which the behavior should fire.
8.2.2. Working with the Behaviors task pane
The Behaviors task pane is the SharePoint Designer interface to create behaviors and associate them with HTML tags. As shown in Figure 8.3, the Behavior task pane is contextual — that is, only the behaviors associated with the current selection in the Web page are displayed in the task pane.
Figure 8.3. The Behaviors task pane
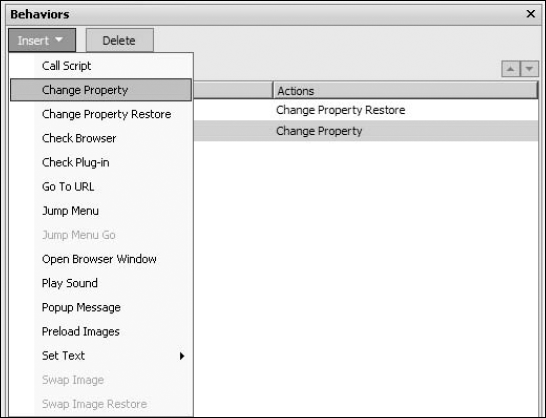
The Tag label indicates the selected tag for which the behaviors are being displayed. The list of the behaviors and the associated DHTML events applicable to the selected tag are displayed in the Behaviors list. You can insert new behaviors by using the Insert menu and delete existing ones by first selecting them from the list and then clicking Delete.
8.2.3. Inserting behaviors on HTML elements
To demonstrate how you can use SharePoint Designer behaviors to dynamically change HTML attributes, follow these steps:
In the Design view, open your Web site and then create a new Web page. Ensure that the Behaviors task pane is open.
Type some text inside the paragraph. Ensure that the Behavior task pane shows the selected tag as a <p> tag. You see this in the Tag: label in the top section of the Behaviors task pane.
In the Behaviors task pane, choose Insert
 Change Property. The Change Property dialog box, as shown in Figure 8.4, opens.
Figure 8.4. The Change Property dialog box
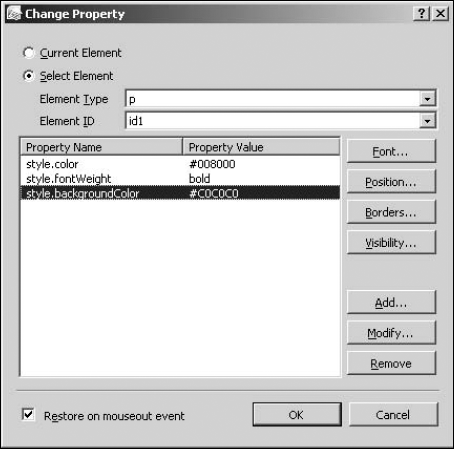
Choose Bold in the Font Style and then change the color to Green.
Click the Restore on mouseout event check box and then click OK. Two behaviors are then applied to the selected paragraph. The first behavior changes the look of the paragraph when the mouse is hovered over it, and the second behavior restores the original look of the paragraph when the mouse is moved away from it.
Save the page and then preview it in a browser.
You can use the behavior in a similar manner on other HTML tags and elements. In the next exercise, you use a combination of behaviors to show and hide content on a Web page.
8.2.4. Implementing dynamic effects by using behaviors
To begin this exercise, first create a new Web page using the following HTML code:
<html xmlns="http://www.w3.org/1999/xhtml">

<head>
<meta http-equiv="Content-Language" content="en-us" />
<meta http-equiv="Content-Type" content="text/html;
   charset=windows-1252" />
<title>Untitled 10</title>
<style type="text/css">
.style1 {
   border: 2px solid #ffffff;
   background-color: #ffffff;
}
</style>
</head>

<body>

<table style="width: 100%" class="style1">
   <tr id="tr1">
         <td style="width: 305px">First Paragraph</td>
   </tr>
   <tr id="tr2">
         <td style="width: 305px">Second Paragraph</td>
   </tr>
</table>
<p id="p1" style="visibility:hidden">This is the text of the first
   paragraph.</p>
<p id="p2" style="visibility:hidden">This is the text of the second
   paragraph.</p>

</body>

</html>
The page simply contains a table with two rows and two columns. The first row, tr1, has the text First Paragraph in it, and the second row, tr2, has the text Second Paragraph. Later in the code, there are two paragraphs (p1 and p2) with the visibility:hidden style applied to them.
The exercise is to use behaviors to show the p1 paragraph when the mouse moves over the tr1 row and show the p2 paragraph when the mouse moves over the tr2 row. To do this, follow these steps:
Click Visibility and then click the Visible radio button. The resulting selection is shown in Figure 8.5.
Figure 8.5. Using behaviors to show and hide content
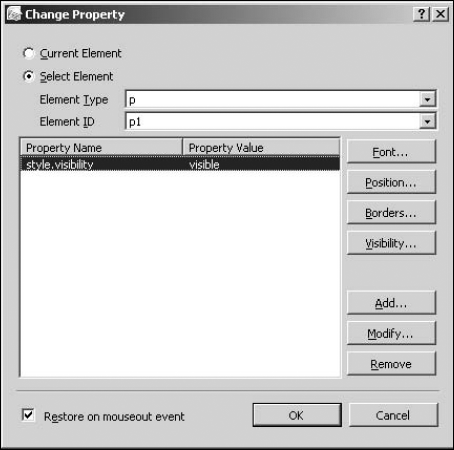
Click the Restore on mouseout event check box and then click OK.
Repeat the previous steps for the tr2 row and the p2 paragraph.
Save the page and then preview it in a browser.
|
