12.2. Working with Styles
SharePoint Designer provides you with a new, intuitive user interface to create, modify, and apply CSS on Web pages. The new interface includes a number of task panes that can be used to authoritatively implement advanced style sheets on Web sites. In this section, I help you understand how to use SharePoint Designer to apply and manage styles for your Web sites. While the New Dialog box allows you to choose from a list of CSS templates on which to base your CSS files, I show you how you can create styles in new style sheets from scratch.
However, before discussing the SharePoint Designer interface to create and modify styles, I want to take you through some general settings for CSS in SharePoint Designer. The Page Editor Options dialog box, available by choosing Tools ![]() Page Editor Options, allows you to set some specifics that you want SharePoint Designer to follow while working with CSS on Web sites.
Page Editor Options, allows you to set some specifics that you want SharePoint Designer to follow while working with CSS on Web sites.
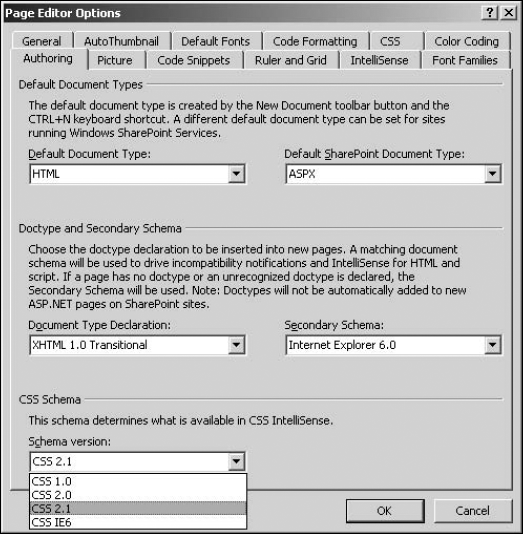
As shown in Figure 12.5, the Authoring tab in the Page Editor Options dialog box allows you to set the CSS schema that SharePoint Designer should follow when providing you with suggestions related to CSS properties and attributes in the Code view. While SharePoint Designer chose the CSS 2.1 schema, you might want to set this to the preferred schema for your Web site's CSS implementation.
As shown in Figure 12.6, the CSS tab in the Page Editor Options dialog box allows you to specify defaults for how styles should be applied for various property categories. For example, by default, the Page properties on the <body> tag are set to CSS (inline styles). This means that the page properties are applied by default as in-line styles inside the <body> tag.
Figure 12.5. Choose CSS schema by using the Page Editing Options dialog box.
So, if you right-click in a Web page and then choose Page Properties from the popup menu to open the Page Properties dialog box and make changes in the Formatting tab, the changes are implemented by using in-line styles in the <body> tag of the Web page:
<body style="background-color: #FF00FF">
However, if you want to change this behavior of SharePoint Designer, you can do so by using the CSS tab in the Page Editor Options dialog box. This allows you to have flexibility for how the CSS styles should be generated by SharePoint Designer user interface tools.
Figure 12.6. Selecting style applications by using the Page Editor Options dialog box

12.2.1. Creating, modifying, and deleting styles
The three main access points to the SharePoint Designer user interface for working with styles are the Apply Styles, Manage Styles, and CSS Properties task panes. Available through the Task Panes menu, these panes combine most of the SharePoint Designer features to work with styles. Besides these task panes, you can also use the Styles and Styles Application toolbars for implementing styles on Web pages. Figure 12.7 shows the SharePoint Designer interface for working with style sheets.
On the right are the Manage Styles and Apply Styles task panes, which are used to create and manage styles on Web pages. The CSS Properties task pane on the left provides a Visual Studio–like interface to modify CSS declarations.
12.2.1.1. Creating styles
You create new styles in SharePoint Designer by using the New Style dialog box. The New Style dialog box is accessible by using the Apply Styles and Manage Styles task panes, choosing Format ![]() New Style, or clicking the New Style button on the Style toolbar.
New Style, or clicking the New Style button on the Style toolbar.
Figure 12.7. The various style task panes in SharePoint Designer
As shown in Figure 12.8, key specifics of the New Style dialog box include:
Selector: Allows you to choose the tag you want to use as the selector for the CSS rule. Alternatively, you can type the name of the CSS class you want to create. Remember that a CSS class syntactically begins with a dot. Or you could choose the in-line style option if you want to create an in-line style. The Apply new style to document selection check box is used to indicate whether you want to apply the newly created style to the selected element or content in the document.
Define in: Allows you to choose whether you want to create the new style in the currently opened document, a new style sheet, or an existing style sheet. When you select the Existing style sheet option in this dropdown menu, the URL text field is highlighted and allows you to specify the location of the CSS file.
Category: This section provides a graphical list of available CSS properties, which are categorized into various areas of formatting. The categories for which the properties have been set are highlighted in bold.
Preview: This section shows you a short preview of how the style appears when implemented on the content.
Description: This box specifies the actual code of the style that you created with the New Style dialog box. As you proceed with the creation of the style, this box is updated to show the code for the style.
Figure 12.8. The New Style dialog box

To create a new CSS class in a new style sheet and then apply it to the selection in a Web page, follow these steps:
Open a Web page in the Design view and then select the content on which you want to apply the newly created style.
Choose Format
 New Style to open the New Style dialog box.
In the Selector dropdown menu, type the name of the CSS class you want to create. Ensure that the Apply new style to document selection check box is selected.
Using the Category list, choose the CSS properties that you want to use for the style and then set the values for these properties.
Review the style in the Preview box before clicking OK.
Click Yes when the message shown in Figure 12.9 appears.
The newly created style is applied to the selection you made in step 1 of the previous exercise. Also, a new CSS file is created, which holds the definition of the new style. You should save this file and the Web page.
If you review the code of the Web page, the style sheet link is automatically added to your Web page to attach the newly created style sheet to the Web page:
<link rel="stylesheet" type="text/css" href="myCSS.css" />
Figure 12.9. Attaching a style sheet to the document

12.2.1.2. Modifying styles
You can view and modify the styles associated with the content of your Web page or CSS by using the Manage Styles, Apply Styles, and CSS Properties task panes. When you select the content on the Web page where the style has been applied, the CSS Properties task pane highlights in blue the properties of the style associated with the selection.
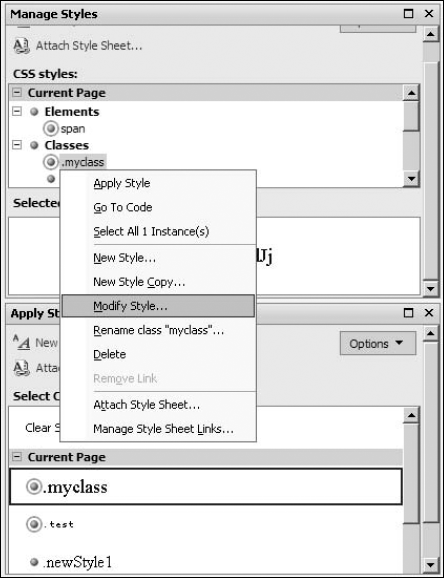
Also, as shown in Figure 12.10, the Manage Styles and Apply Styles task panes show and highlight the style applied to the selection.
To modify a style using these panes, simply right-click on a style and then choose Modify Style from the popup menu. The Modify Style dialog box opens, allowing you to change the properties associated with the style. The user interface for the Modify Style dialog box is similar to the New Style dialog box.
Figure 12.10. Modifying styles by using SharePoint Designer
12.2.1.3. Deleting styles
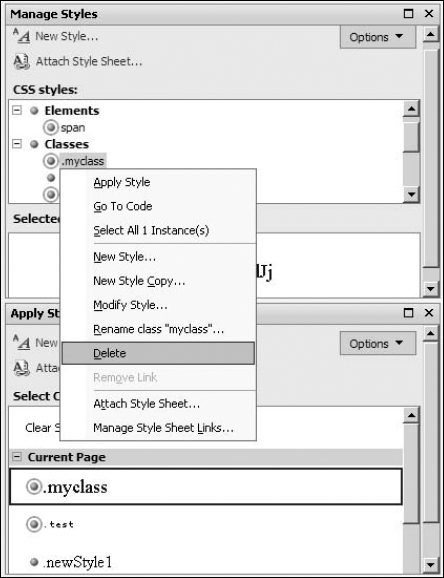
You can delete a style by using the Manage Styles and Apply Styles task panes simply by right-clicking on a style and then choosing Delete from the popup menu, as shown in Figure 12.11.
When you confirm that you want to delete a style, the style is removed from the location (for example, a style sheet) where it was defined. After deleting a style, you need to save the file where the style was stored. SharePoint Designer automatically opens the associated file so that you can save it.
12.2.2. Using the Apply Styles task pane
In this section, I use the SharePoint core style sheet called core.css to illustrate the use of the Apply Styles task pane.
Figure 12.11. Deleting styles by using SharePoint Designer
NOTE
While there are a number of style sheets that help you completely implement formatting and styles for SharePoint Web sites, the core.css stores most of the styles that define the look and feel of SharePoint Web pages.
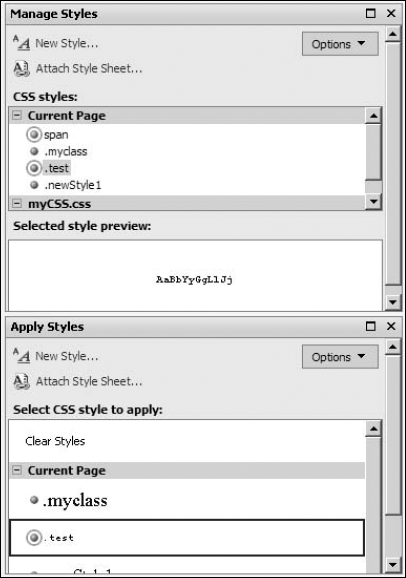
To view the styles applied to a SharePoint Web page, open the Web page in SharePoint Designer. When you open the Apply Styles task pane, a number of styles appear in the Select CSS style to apply list, as shown in Figure 12.12.
The Apply Styles task pane lists the CSS styles that are applied to the Web page that's active in SharePoint Designer. The CSS styles from the style sheets attached to the active Web page are listed along with the styles that have been applied in-line or in-page. The Apply Styles task pane also shows a preview of the style in the Select CSS style to apply list. If you hover over a style, the code for the style is displayed in a screen tip.
The Apply Styles user interface uses the following icons to differentiate among the various styles:
Green Dot: Indicates that the style is a CSS class either defined in-line on the Web page or in a separate style sheet
Encircled Green Dot: Indicates that the style is a CSS class being used on the current page
Blue Dot: Indicates that the style is a CSS rule either defined in-line on the Web page or in a separate style sheet
Encircled Blue Dot: Indicates that the style is a CSS rule being used in the current page
Red Dot: Indicates that the style is a CSS rule, which matches using the id attribute of a tag
Encircled Red Dot: Indicates that the style is a CSS rule based on matching id and is being used in the current page
NOTE
Depending on the number of in-page style tags on a Web page, the Current Page header repeats in the Apply Styles task pane list of styles. For example, as shown in Figure 12.13, the currently opened Web page has two style tags. This becomes more understandable when you collapse the headers in the list. Because the core.css is the main style sheet file for SharePoint Web sites, you almost always see styles from this file listed in the Apply Styles task pane when working with SharePoint Web pages.
The Options dropdown menu in the top-right corner of the Apply Styles task pane allows you to categorize the styles being shown in the Select CSS style to apply list in the following ways:
Categorize By Order: Selected by default, categorizes the styles in the order they're encountered in the associated file
Categorize By Type: Categorizes the styles based on the type. For example, with this option selected, the CSS classes are grouped together.
Show All Styles: Selected by default, shows all the styles that are available either in-line, in-page, or in an external style sheet linked to the Web page active in SharePoint Designer
Show Styles Used In Current Page: Shows styles that are being used on the current page only. Selecting this option ensures that you only see the encircled green or blue styles in the list.
Show Style Used On Selection: Shows the styles being used on the currently selected item in the active Web page
Preview Background Color: Allows you to change the background color used when showing the style in the Select CSS style to apply list
Figure 12.12. The Apply Styles task pane showing the styles in the core.css style sheet
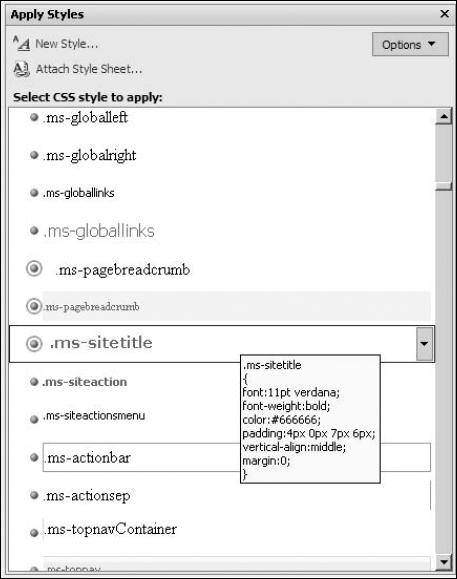
Figure 12.13. The collapsed view of the list of styles in the Apply Styles task pane
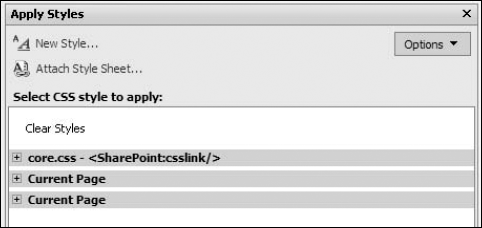
The Select CSS style to apply list shows the Clear Styles option at the top of the list. This option can be used to clear the styles from the selection made in the currently active Web page.
When you right-click on a style that shows up in the Select CSS style to apply list, a popup menu appears with the following options:
Apply Style: Applies the style to the selection made in the document
Go to Code: Takes you to the location on the Web page or the style sheet where the style is defined
Select All Instances: Highlights all instances where the style is being used on the currently active Web page
New Style: Allows you to create a new style by using the New Style dialog box
New Style Copy: Allows you to create a new style based on the selected style
Modify Style: Allows you to modify the style by using the Modify Style dialog box
Rename Class: Allows you to change the name of the CSS class
Delete: Deletes the CSS style
Remove Link: Enabled when the header in the Select CSS style to apply list is right-clicked on, this option allows you to remove the link to the style sheet from the document.
Attach Stylesheet: Allows you to attach a style sheet to the active Web page by using the Attach Stylesheet dialog box
Manage Stylesheet Links: If you have multiple style sheets associated with the active document, you can use this option to manage style sheet links.
Remove Class: Removes the CSS class from the selection in the active Web page
Remove ID: Removes the CSS IDs from the selection in the active Web page
Remove Inline Style: Removes in-line styles from the selection in the active Web page
The Apply Styles task pane also allows you to attach new style sheets to the currently active document by using the Attach Style Sheet link. As shown in Figure 12.14, the Attach Style Sheet dialog box that opens when you click the Attach Style Sheet link allows you to specify the URL of the external style sheet.
Figure 12.14. The Attach Style Sheet dialog box
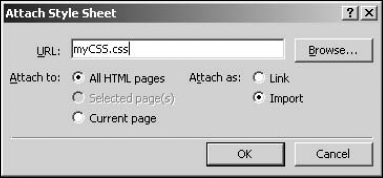
You can choose if you want to add the style sheet link only to the current page, selected pages, or all HTML pages inside a Web site. If you choose to attach as a link, a style sheet link is inserted into the Web page. Choosing to import the style sheet copies all the styles from the style sheet into the Web page as in-page styles.
12.2.3. Using the CSS Properties task pane
The CSS Properties task pane is useful primarily if you're used to working with a Visual Studio–like interface for setting properties. This task pane shows a contextual view of the properties associated with the selection made in the active Web page. When you make a selection on a Web page in the Design or Code view, the CSS Properties task pane shows the associated properties in a categorized manner. By default, the properties that have been set by using styles are displayed on top of the list of properties in a given category.
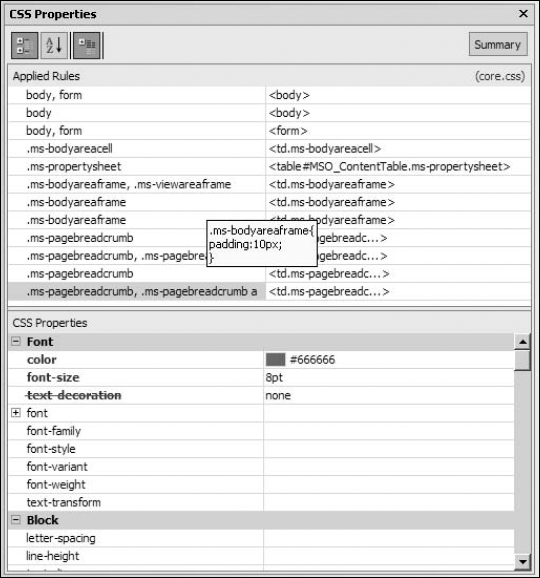
One of the really cool features of the CSS Properties task pane is that it shows a hierarchical view of the CSS rules implementation on the current selection on a Web page. As illustrated in Figure 12.15, the Applied Rules section in the CSS Properties task pane shows the CSS implementation on the HTML tags from the topmost to the currently selected tag.
As you can see, the topmost <body> tag matches two CSS rules: body, form, and body. The next child tag, <form>, only matches one CSS rule body: form. This hierarchy continues until you reach the container of the currently selected tag.
If you hover over a CSS rule, a screen tip shows the code associated with that CSS rule. When you right-click on a rule, a popup menu very similar to the Select CSS style to apply list opens, allowing you to create and modify styles. Also, on the top-right corner of the CSS Properties task pane, the link to the style sheet where the CSS rule has been defined is shown.
Figure 12.15. The applied rules in the CSS Properties task pane
12.2.4. Working in the Manage Styles task pane
While the Apply Styles task pane is oriented toward Web pages where the styles need to be applied and shows the styles that are active on an HTML selection, the Manage Styles task pane allows you to work on the CSS styles directly. When you open a CSS by using SharePoint Designer, the Manage Styles task pane lists all the CSS rules and classes defined in the style sheet. Similarly, opening a Web page in SharePoint Designer allows the Manage Styles task pane to list in-line, in-page, and external styles associated with a Web page.
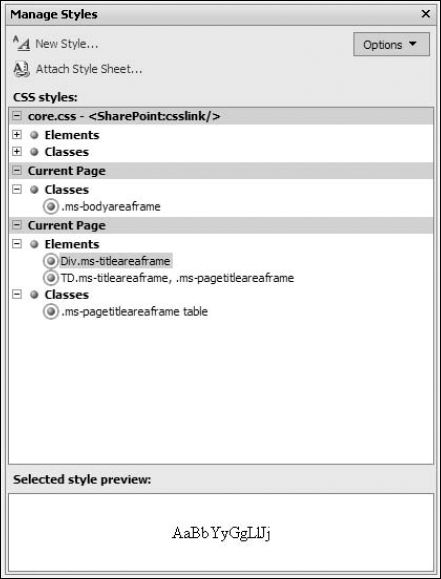
Figure 12.16 shows the Manage Styles task pane for a SharePoint Web page. Like the Apply Styles task pane, the user interface represents the CSS rules, elements, and classes by using the same indicators. For example, the styles that are being used on the Web page are encircled.
However, while the Apply Styles task pane mostly showed CSS classes, the Manage Styles task pane allows you to also work with CSS rules and elements. You can simply select the CSS style in the code of the Web page or the CSS file, and the style is highlighted in the Manage Styles task pane.
Then, you can use the task pane to modify the style by using the familiar tools for styles creation and modification. As in the case of the Apply Styles task pane, the Manage Styles task pane also shows a quick preview of the style by using the Preview pane at the bottom of the task pane.
Figure 12.16. The Manage Styles task pane