
If you want to use a container hosted on a virtual machine in Azure, perform the following steps:
- If you have not already done so, you can sign up for an Azure subscription at https://azure.microsoft.com and start with a free account.
- Now that we have an Azure subscription, we need to create a virtual machine within that subscription. This virtual machine will host a Business Central environment inside a Docker container. To make this easy, there is an Azure Resource Manager (ARM) template available for you to use.
You can access the template at https://aka.ms/getbc. Make sure to use your Azure subscription login credentials.
The template contains a lot of options, but for our purposes, we're going to focus on just a few of them. Once you're familiar with the process, take a look at the other options and do things such as connecting your sandbox to an Office 365 account! See the options in the following table:
| Option | Comment |
| Resource Group | Select Create new to create a new resource group for this virtual machine. You can name it whatever you like. |
| Location | Choose the region closest to where you are connecting from. Selecting a region on the other side of the world from you will impact connection performance. |
| VM Name | Give your machine a name – any name you want! Azure will make sure that the name you choose is acceptable. |
| Time zone Id | Select the time zone you wish to work in. |
| Accept EULA | You must accept the End User License Agreement (EULA) by selecting Yes for this option. The EULA can be found at https://go.microsoft.com/fwlink/?linkid=861843. |
| Remote Desktop Access | Use this option to configure whether you are able to use Remote Desktop Protocol (RDP) to remotely log in to the virtual machine. Set this to an asterisk (*) if you want to connect to this machine from any machine. |
| VM Admin username | You can leave this as the default value, vmadmin, or change it to one that suits you better. This login will be used to remote connect (via RDP) to the machine. This login is configured as the local administrator for the virtual machine. |
| BC Admin username | You can leave this as the default value, admin, or change it to one that suits you better. You will use this login to launch the Business Central Web Client. This user is configured as a super user in the Business Central system. |
| Admin Password | Set this to any password you want. This password applies to both the virtual machine and BC admin logins. Azure will ensure that the password you enter is strong enough. |
| BC Docker Image | Here, you can configure the Docker image you wish to use. Set this option to microsoft/bcsandbox:xx, where :xx represents the country localization you want (for example, microsoft/bcsandbox:ca for Canada). For the list of countries available, see https://hub.docker.com/_/microsoft-businesscentral-sandbox. |
| License File URL | If you uploaded a Business Central license to an online storage account, specify the secure URL to the file in this option. You can leave this option blank if you want to use a demo license. |
- Once you have filled in the ARM template, accept the terms and conditions at the bottom of the screen and then click the Purchase button.
Now, you can just sit back and relax, and if your template was configured properly, your virtual machine will be created. Go grab a coffee and check back later.
- To test the connection to your Azure virtual machine, you need to remotely connect to the machine to get some information from it. You need to use the Azure web portal (https://portal.azure.com) to find the address of your virtual machine:
- In the Azure web portal, click on Virtual Machines in the navigation pane on the left:
- If you do not see Virtual Machines, press All Services and search for Virtual Machines to select it.
- Select the name of the virtual machine that you just created.
- Look for the DNS Name and take note of the address listed below it:
- For example, myvirtualmachine.canadaeast.cloudapp.azure.com
- In the Azure web portal, click on Virtual Machines in the navigation pane on the left:
- We can monitor the status of the virtual machine configuration by navigating to the virtual machine landing page:
- In your web browser, navigate to the DNS Name you noted previously.
- Click the View Installation Status link. Here, you can see when the virtual machine configuration is complete and is ready to use for development.
Once the virtual machine has been fully configured, the landing page will look similar to this:
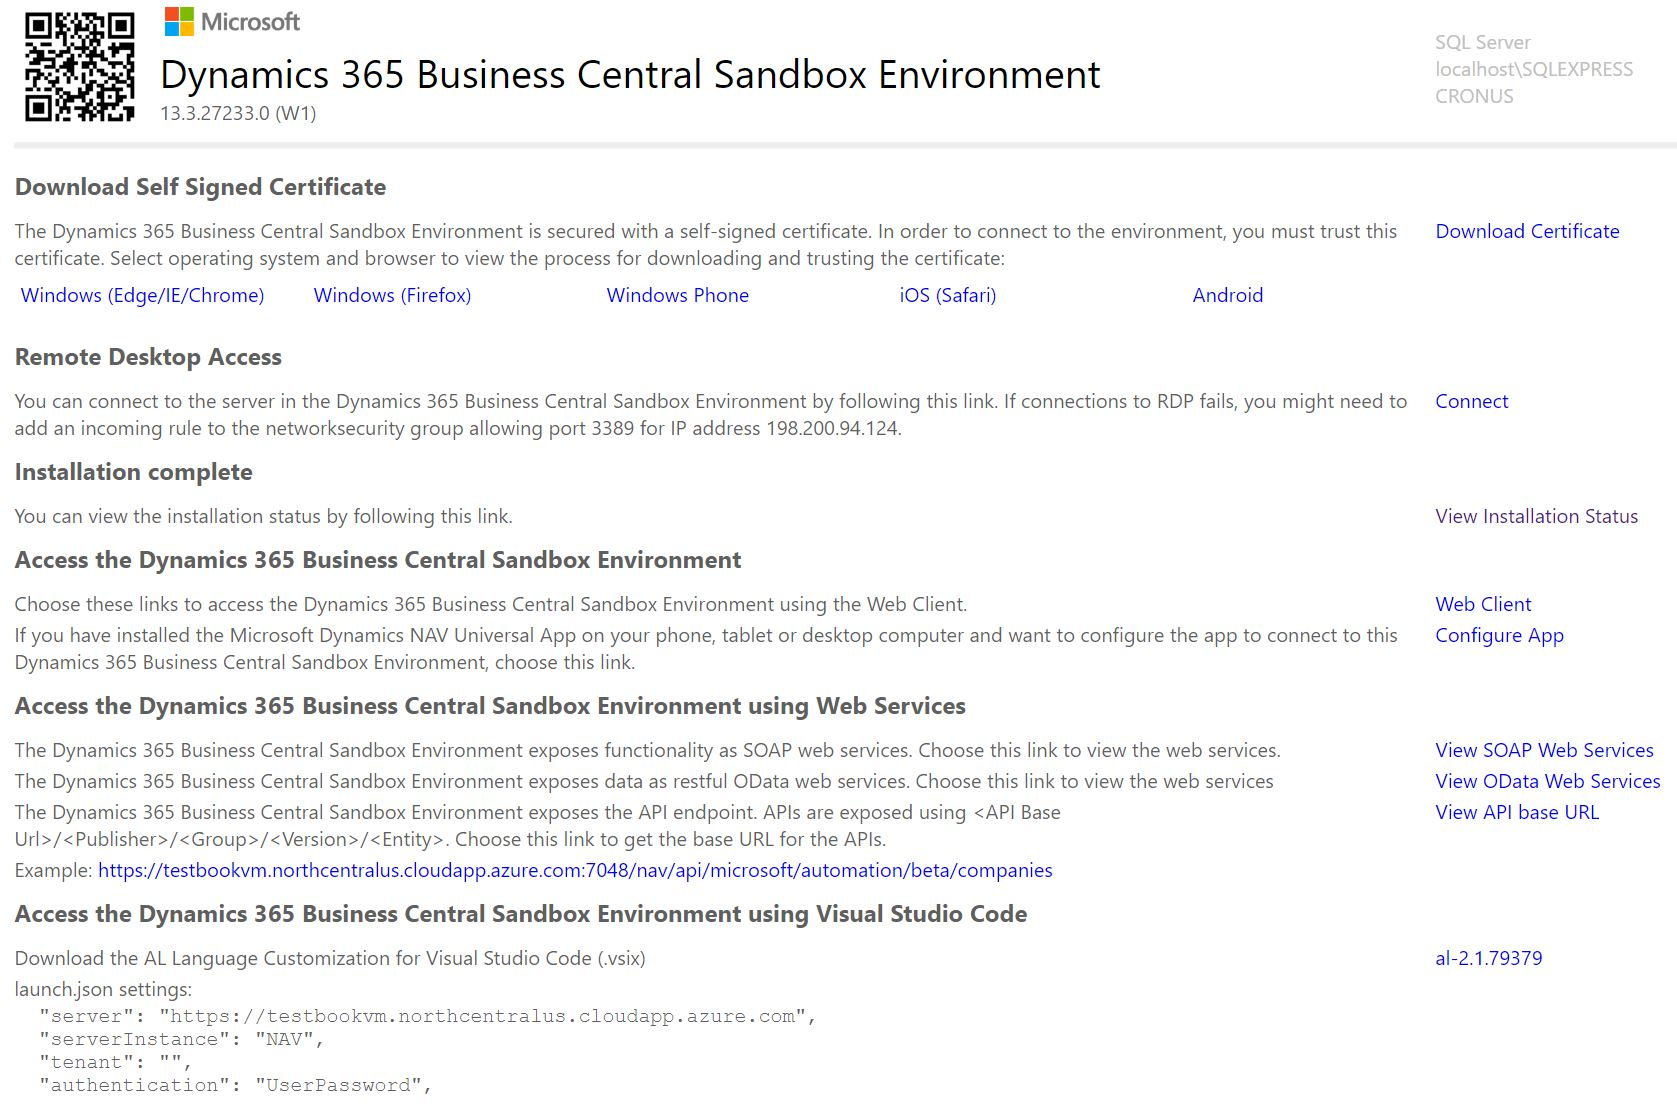
- Now, we need to take note of a few pieces of information, for later.
At the bottom of the landing page is a section named Access the Dynamics 365 Business Central Sandbox Environment using Visual Studio Code. In this section, take note of the following values:

- Before we close the landing page, we need to install the security certificate so that we can connect to the sandbox:
- On the landing page, click the Download Certificate link and save the file to your local machine.
- Depending on which web browser you are using, click either the Windows (Edge/IE/Chrome) or the Windows (Firefox) link and follow the onscreen instructions to install the certificate.
- Let's check to make sure we can connect to the Business Central Web Client:
- Close your web browser and navigate to the landing page for your virtual machine.
- Click the Web Client link on the right-hand side of the page.
You should now be looking at the Business Central login page:

- Install the AL Language extension from the Visual Studio Code Marketplace: https://marketplace.visualstudio.com/items?itemName=ms-dynamics-smb.al.