
Configuring a Modem
If you are going to connect to the Internet using a modem that works over phone lines, sometimes called a dial-up adapter, you have to tell Linux what serial port your modem is connected to. You also have to set various network configuration settings. Your Internet service provider (ISP) should supply these. It's a good idea to make sure you have all the configuration information supplied by your ISP before you try to enter your settings in Linux.
To choose a serial port:
1. | |
2. | Select the serial port your modem is connected to. |
3. | Click OK to close the dialog box. |
Tip
For information on using Windows to determine your hardware settings before you install Linux, see Chapter 1.
Tip
The default—and most usual—serial port for a modem is com 2. The Linux device name for com 2 is ttyS1.
Tip
If all else fails, use trial and error. After all, there are only four possible settings.
Tip
You'll know you have the right serial port—after you have entered the other network settings—if you hear a dial tone and the modem starts to dial when you turn on networking. I'll explain this and show you how to test your connection to the Internet later in this chapter.
To enter DNS information:
1. | Open the Network Configurator applet. |
2. | |
3. | Type the tuplets (series of numbers) provided by your ISP in the Nameservers box. |
4. | Click Save to close the dialog box. |
Figure 4.4. Use the Modem Configurator Applet to tell your system what serial port your modem is connected to.

Figure 4.5. Enter the DNS information provided by your ISP in the Nameservers box.
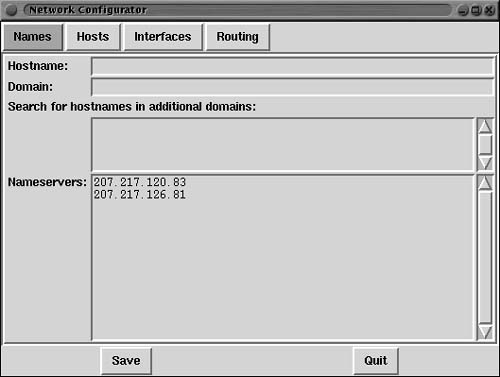
Figure 4.6. The Interfaces tab of the Network Configurator dialog box is used to add and modify network connections.

Figure 4.7. Use the Interface Type dialog box to select the type of network interface.

Tip
Domain name servers (DNSs) are used to look up locations on the Internet based on text the URL supplied. Locations on the Internet are indicated by a series of four numbers, called a tuplet. For example, www.bearhome.com translates (or resolves) to 204.0.134.135.
Tip
The tuplets entered on the Names tab of the Network Configurator applet are used to tell your system where to look for DNS resolution—in other words, the translation of text URLs to physical tuplets.
Tip
Generally, your ISP will supply a primary and a secondary DNS tuplet. Enter the primary DNS tuplet in the Nameservers box above the secondary tuplet.
Tip
To find this information if it has been entered on a Windows computer, right-click on the Network Neighborhood icon and select Properties. On the Configuration tab, select the TCP/IP component that you use to access the Internet. Choose Properties. To read the information, select the DNS Configuration tab of the TCP/IP Properties dialog.
To add a PPP interface:
1. | |
2. | Click the Add button at the lower left of the Interfaces page. The Interface Type dialog will open (Figure 4.7). |
3. | |
4. | Enter your ISP's phone number, your user name, and your password in this dialog box. |
5. | |
6. | Use your mouse to highlight the interface (labeled PPP0) and click the Edit button. |
7. | Enable the Allow Any User to De(Activate) Interface setting (Figure 4.10). This allows any user—not just root—to dial and hang up. |
8. | Click Done. |
9. |
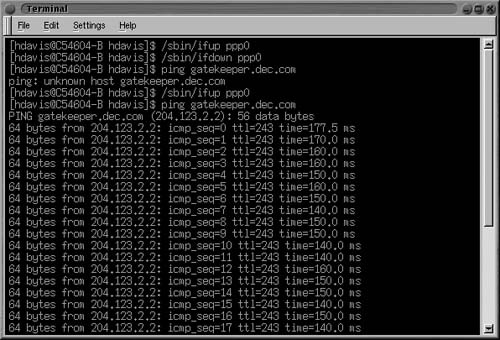
To dial your ISP:
1. | |
2. | Enter the following at the prompt: /sbin/ifup ppp0
If all is well, you should hear your modem dialing, following by the connection tones. |
To check the connection:
-
With the terminal window still open (Figure 4.11), enter the following command to attempt to communicate with an important domain at Compaq computers:
ping gatekeeper.dec.com
You should receive a series of reply messages with the time of a round-trip journey to the computer you are pinging (Figure 4.11). If you receive a message back, it verifies that the two computers can communicate.
Figure 4.8. Your ISP phone number and identification information should be entered in the Create PPP Interface dialog box.

Figure 4.9. Once a new interface has been added, you can edit its properties using the Interfaces tab.
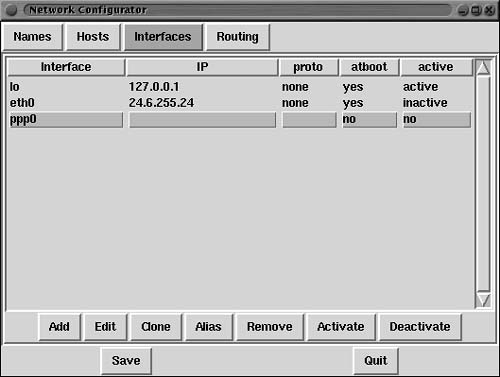
Figure 4.10. It's a good idea to allow any user—not just root—to activate and deactivate the network connection.
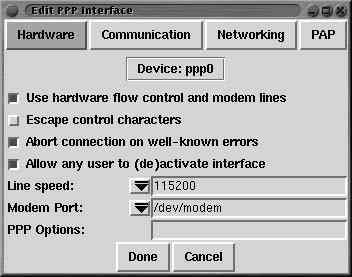
Figure 4.11. Use a terminal window to enter the commands to dial up your ISP, test the connection, and disconnect.
Tip
You can ping any computer you want to test your connectivity. For example, enter ping informix.com
To close the connection:
1. | |
2. | Enter the following at the prompt: /sbin/ifup ppp0 If all is well, you should hear your modem dialing, following by the connection tones. |
To check the connection:
-
With the terminal window still open (Figure 4.11), enter the following command to attempt to communicate with an important domain at Compaq computers:
ping gatekeeper.dec.com
You should receive a series of reply messages with the time of a round-trip journey to the computer you are pinging (Figure 4.11). If you receive a message back, it verifies that the two computers can communicate.
To close the connection:
-
In the terminal window (Figure 4.11), type /sbin/ifdown ppp0