
Chapter 3
Building a Site Without Spending a Fortune
IN THIS CHAPTER
![]() Planning a well-structured business website
Planning a well-structured business website
![]() Finding out how to build your own website
Finding out how to build your own website
![]() Using HTML commands effectively
Using HTML commands effectively
![]() Building web pages with specific software tools
Building web pages with specific software tools
![]() Hiring the right professional to help you design your site
Hiring the right professional to help you design your site
In the early days of the Internet, simply having a website was a way to differentiate your business from the competition. As interest in the web developed and grew, companies of all shapes and sizes focused their efforts on capturing people’s attention with websites. Because of this growth in online competition, planning a site and building a distinctive design and proposition became increasingly important. After all, an outstanding site encourages current customers to stay with your business and promotes your site’s presence to the new shoppers who come online every day.
The same basic principles of website design apply as much now as they did when the web took off in the mid-1990s. Technologies used on the web might come and go, but you don’t have to include the latest and greatest technology on your site. Customers are drawn to sites that are simple, focused, easy to use, well organized, and useful. Everything else is just sound and fury.
In this chapter, we present the steps for creating a website that serves your business and your customers. We direct you to spend some time defining exactly what you want on your site, and then we show you ways to implement your ideas, either by yourself or with the help of a professional. In either case, we specify the issues you need to consider and the traps you need to avoid so that you can focus on designing your website and then move on to the next phase of your business.
Mapping Your Route to a Successful Site
When people opt to build a new house or commercial building, they don’t just hire a contractor, bring over the concrete and tools, and say “Go for it.” Before construction even begins, they craft a carefully detailed plan that they review, edit, and approve. Your website should be treated the same way. The best sites aren’t dreamed up by eccentric designers and thrown together quickly. Good sites require a clear road map from the people who run the business to ensure that the focus of the business is never lost.
Thinking about your website before you start its design is important. Start by making a list of all the functions you want to provide on your site. If you’re tempted to believe that your site has just one function — to sell stuff — we encourage you to break down that function into subfunctions, by answering these questions:
- What kinds of products do you want to sell? The number and organization of pages you have on your site depends on the makeup and complexity of your products or services. For example, you should have at least one page for each type of service that you offer.
- How many distinct categories of products will you sell? You might need a separate page for each product category. Think about splitting up categories such as consumer electronics and computer products, for example.
- Will customers be able to create an account on your site? If so, you need to provide a page where customers can log in, update their personal information, view their orders, and enter payment information.
- Will you provide customers with additional content, original or not? Some websites make money by offering a subscription for their customers to read premium content such as special articles, interviews, and video, audio, and photo excerpts.
- How will customers pay for their orders? You need to be able to take credit card orders, as well as consider popular online payment methods such as PayPal or Google Wallet. In extreme situations, you may consider providing a mailing address if you accept personal checks or money orders.
- Will you tell people about you and your business mission? Some companies think that having a web page about their mission statement isn’t important, whereas others use this page as a way to connect with customers.
- Will you provide instructions for using your website? It has been a common practice for websites to create a page for frequently asked questions (FAQs) to help their customers use the site properly and find everything that’s available.
After you come up with your list of site functions, the next step is to draw a map showing the web pages you need to accomplish those functions and showing how the pages relate to one another. At this point, don’t even think about how the website or the individual pages will look; just identify the different pages that need to exist on your site. Assign each page to a box on your map, and check off the function that the page will handle. When you’re done, you should have a map of your site that looks like a flowchart.
At the top of your map is the home page, which is your launch pad to the rest of the website (see Figure 3-1). This page answers all the basic questions that customers have about your business, just like the friendly receptionist in the lobby of a 50-story building. Whether this visit is the first — or the fiftieth — for your customers, the home page has to answer their questions in a clear, concise, organized way or be able to point them in the right direction quickly.

FIGURE 3-1: The home page on your website leads into all your categories.
 You can build a web page that holds a text version of the map you created and make it available to your customers. Just like a road atlas helps drivers follow their route, this site map helps your online customers find anything available on your site without taking a wrong turn — or, in this case, a wrong click.
Below the home page are your main category pages. Although your first draft might look like the one shown in Figure 3-1, the beauty of such a simple map is that your site plan can expand and grow from that basic model. As you design more complex and function-intensive websites, you can add more levels to your website map. When you build your site map this way, you can visualize how your entire site operates, because you capture how your pages support each other.
Setting reasonable expectations
When your website is in the paper-and-pen phase of design, you might find that you’re adding a bunch of boxes (pages) and dreaming up the ultimate website. After all, you haven’t designed or written the pages yet, so creating a gigantic, robust, fully functional site for any customer is easy — on paper.
Although we don’t want to take the wind out of your sails (or is that sales?), we definitely advise you to keep these expectations and guidelines in mind as you begin to turn your road map into your virtual store:
- Don’t put too much stuff on one page. Avoid tying together several product lines. If a page become bloated — too filled with information and graphics, for example — it becomes too long for customers to read and takes too long to load and display on their screens. More important, as a growing part of the population uses mobile devices like smartphones and tablets to surf the Internet, your pages need to be optimal for mobile devices to load quickly.
- Position key information at the top. Keep your pages short, and put key information at or near the top of the page. Newspapers place key articles above the fold (the top half of the newspaper page) because not all readers take the time to flip over the paper to read the bottom half. On the Internet, if you’re asking your customers to scroll down the page to see something important, you’re taking the risk that they won’t do it and might leave your site without seeing your business’s main functions.
-
Keep the number of steps to a minimum. One reason why customers come back to a site such as Amazon is that they can find an item, click once, and have the item shipped to them. Customers turn to online shopping for convenience, so offer them a quick or smooth process to navigate the critical areas of your site. Even though some customers stay to look around, take advantage of your content, or use other functions, your site needs to appeal to the customers who want to get in, get what they want, and get out.
One way to check the complexity of your website is to look at your road map. If you have too many levels between the home page and a finishing point for placing an order, consider revamping your plan to provide a smoother path. - Remember that good design takes time. Don’t expect to have your site up in a day. Although the broad strokes of creating a website (such as creating the navigation bar and home page layout) can happen quickly, the refinement and fine-tuning of the site (such as defining button colors or the number of columns) can take much longer. Then again, fine-tuning can separate you from the competition in your customers’ eyes. Give your designer enough time to do good work but not free reign to create a masterpiece.
Avoiding common holdups in developing a site
The last part of any website design process involves looking at the site map and page count and then estimating how much time you need to create the site. Expert designers typically estimate a number (of hours, days, or weeks, for example), and then pad that number by adding extra time to complete the project. You might ask, “Why pad the estimate?” After all, if someone is just implementing your well-structured plan, what can go wrong?
Developing your site can take longer than you expected for a variety of reasons. As you move from website design to implementation, beware of these traps:
- Trying to design and build the site at the same time: People like to dive in with only a few pages on their maps (before the design is complete) and then add pages as they build out their sites. The constant starting, stopping, and thinking about which extra pages are needed can slow you down when you’re trying to build the site.
- Not having the right capabilities for your site: Some people envision having a graphics-rich, interactive, advanced website and then find out in the design process that their Internet service provider (ISP) can’t support certain programs or supply bandwidth to display video properly. Careful planning helps you create specifications, which you can verify with your site provider to make sure that your site capabilities are what you want — before you buy.
- Not updating the entire site when you make a change: Even the most carefully laid website plans can require some modification when you implement them. Remember that good sites link back and forth between different sections. The last thing you want is to update one section without updating the links in the rest of your site. If this happens, your customers can get lost while surfing around — and might leave for good.
-
Forgetting about the message: As your website grows and expands, you can easily lose focus on what the site should accomplish. At any time, you must be able to go back to your home page — or any other page — and determine the site focus by viewing the page for a few seconds. If you spend longer than 10 or 15 seconds interpreting the message, you’re off track.
 No matter how many changes you make, never let the message of your site get lost or obscured.
 - Not having the content ready: You can have the plan built and promise to deliver your data or content to your website developer by a certain date. If you miss this date for some reason, you throw the developer’s plans — not to mention the project’s workflow — into chaos.
- Not having a reliable developer: The best-laid plans are just plans until someone turns them into a website. If you’re depending on someone with specialized skills, make sure that he or she has the time available to deliver your site when you need it.
You Can Do It! Making a Build-It-Yourself Site
The thought of turning site maps, content lists, and other plans into a full-blown website can intimidate almost anyone — especially someone who has never created a web page. To create web pages in the early days of the Internet, you had to know the specialized computer code HyperText Markup Language (HTML) and be able to write that code by using a program such as Notepad. Nowadays, you can find many tools to help you design your own site without having an extensive knowledge of HTML, but you can also benefit from knowing how to implement some of the helpful features in the current HTML5 version of markup language.
Therefore, knowing how to use some HTML (specifically, HTML5) is still a good idea because this knowledge gives you more control over the site-building process. Although website tools can create a lot of HTML code and help you build functions quickly, you might have to edit the work those tools do to make your site faster, smoother, and easier for customers to use. You have to direct these efforts to make sure that your site is an effective communications tool for your customers to do business with you. These website tools can help you get something done, but you have to provide the “why’s” of the web page: Why is it being built, and why should customers use it?
A good first step is checking with your web-hosting company to find out which site development tools it provides. Most hosting companies have site design tools and templates that work with their servers, and can get you up and running with basic web page designs. You can update those basic designs with your own content, labels, and products.
If your web host doesn’t provide any site-building tools or you’re not happy with its offerings, don’t worry — you have more options, as outlined in this list:
-
Free tools online: You can find a number of free or inexpensive site builder tools on the Internet. Table 3-1 lists some of these tools.
You might also find free web tools from your Internet service provider. Companies such as your cable or Internet provider offer free web-hosting space and some basic tools for building your personal website. You can use these same tools to help create your e-commerce site. As your site grows, you should consider transitioning it to a paid account because free hosting accounts usually come with a lot of restrictions. - Your word processor: You can even use your word processor to build a website. Microsoft Word can save any document you create as an HTML file so that you can type your site map and create web pages without much stress.
- Advanced site builder software: Later in this chapter, the section “Going modern with WordPress, Adobe Dreamweaver, and more” introduces some advanced, superfunctional programs that can help you build a rich, complex site for your business.
TABLE 3-1 Companies with Site-Building Tools
|
Company Name |
URL |
CoffeeCup |
|
Creating Online |
|
Trellian WebPage |
|
Web Starts |
Using HTML: The old-fashioned way to build a page
Regardless of the web design tool you use to build your website, you need a basic understanding of how HTML works. This understanding helps you edit your pages and figure out what your tools are creating.
Unlike software code that has to be translated, compiled, and otherwise prepared before a consumer can use it, HTML code is written, saved as a file, and then interpreted by the program that reads the file. Usually, the software program that reads the HTML file is a web browser, such as Microsoft Internet Explorer. The web browser opens the HTML file and finds these two elements:
- Text represents the titles, headings, paragraphs, links, and other elements that you want customers to see when they visit your website.
- Commands, or HTML markup tags, tell the web browser how to mark up, or format, the text that’s in the file and, therefore, control how the text looks to customers.
The browser reads all the instructions that you place in these markup tags and draws the web page on the computer screen according to your specifications. Because this language is uniform and structured, most web browsers interpret the commands in the same way. Your customers see the same design regardless of the computer or operating system they’re using.
Commands are marked in the HTML file by command-start and -stop symbols: the < and > signs. They look like this:
<command>
Typically, HTML commands are implemented by indicating, in this order:
- The start of the command
- The text that will be affected by the command
- The end of the command
For example, if you want a word to appear bolded on your web page, you write
<B> word </B>
The <B> command indicates that you’re turning on (starting) the Bold command. Adding a slash (/) to the ending command tag indicates that you’re turning off the command. Your web browser looks at this code and creates an effect as though you’re holding down the Bold key, typing a word, and then releasing that key and moving on to the next section.
If you don’t provide the command tag to end a particular command, the web browser continues to format the rest of the file by using that command. If you put a <B> (the Bold command) in your file and then forget to end the command, the rest of the text in your web page appears as bold text.
Every HTML file has certain essential commands that should always be present. The following listing shows a skeleton HTML file:
<HTML>
  <HEAD>
  <TITLE>Basic webpage title</title>
  </HEAD>
  <BODY>
  The content of your web page would go here.
  </BODY>
</HTML>
Always put the <HTML> tag on the first line of your HTML file. This tag tells the web browser that it can find HTML code inside your file. Next, your web page contains two sections: the header (marked by <HEAD>) and the body (marked by <BODY>).
Your header section should contain all the information that defines your web page, which includes — but isn’t limited to — these elements:
- Title: Your website title appears on the browser’s title bar and should instantly tell customers the purpose of the web page.
- Function definitions: For example, if you’re creating a web page for customers to search your catalog, make sure to define the function as a search page.
- Author information: Fill in the author’s information, whether it’s you, your business name, or your web designer. That way, customers know whom to thank for a well-planned website, interesting content, and a creative design.
- <META>tags: This type of tag tells your web browser the definition and keywords of your web page. See Book 6, Chapter 6 for more information on these tags.
The body section contains everything else related to the web page, especially anything visible to your customers, such as
- Your content: For example, a description and photographs of your products or services, and any information you’re displaying for your customers, might appear in this section.
- Navigation information: Usually, every web page has a consistent set of links that can take your customers to every main section of your website with one click.
- Links to other parts of your website: If your web page needs to reference another part of your website, make sure the link is present in the page.
- Links to other websites: Many times, a website offers links to other websites that are complementary to it or partners with them for co-promotion efforts.
- Forms asking customers to fill in information: For example, you need the name and shipping address of any customers who decide to order something or join your mailing list.
Sometimes, designers put all the information in the body and very little in the header section. Although your web page still loads and presents itself to your customers, the lack of a divider between header and body information makes it harder to update your web pages properly (for example, when you need to change some functions on your website) and maximize your outreach to the Internet community. Similarly, putting main content inside the header section can distort the display of your web page because some web browsers try to condense the header to the top of the screen.
Qualifying your HTML commands
Some HTML tags require markup instructions other than the caret signs (< and >) and the command name. These needy tags require specific information, known as attributes, which your web browser uses to implement the command. Like the commands, these attributes are written inside the caret signs to separate the markup instruction from the regular text of the file.
Suppose that you want to provide a web link so that when customers click the words Order Here from your home page, their web browsers open your catalog page. Although the command for building a web link is <A>, you have to assign the attribute of the destination page, which is known as Hypertext REFerence, or HREF. You would write the following HTML code:
<A HREF="catalog.html">Order here!</A>
You turn on the web link command with <A, assign the destination catalog.html as your web link (HREF), add the words Order here! as the text your customers see, and end the command with </A>. Notice that you do not have to close out the attribute separately; just define it within the carets surrounding the opening tag.
Table 3-2 shows some common HTML commands that have important attributes to define.
TABLE 3-2 HTML Commands That Require Attributes
|
Command |
Attribute |
Element That It Assigns |
|
|
Background color |
|
Color of text in the body |
|
|
Color of web links |
|
|
Color of visited web links |
|
|
|
Color of the font |
|
Size of the text using this font |
|
|
|
Source of the image file |
If you don’t assign attributes such as background color or size, your web browser uses the default attributes that the customer set up on his or her computer or that was supplied with the web browser software. Typically, the link color is set to blue, visited links are set to purple, and the background color is set to white.
Using tables to organize your page
After you understand the basics on how to set up a web page, you want to find ways to organize all the text, graphics, and data that you present on your web page. Specifically, if you want to show an array of products on your website, you organize the product photo, description, Buy Now button, and other specifics in a smooth, centered format. One popular way that website designers ensure a smooth presentation is to use HTML tables.
Originally designed to show numbers and data in a spreadsheet-style format, tables are now becoming the building blocks for aligning every element in a web page. Many navigation toolbars, whether they run across the top or left side of a web page, are in fact HTML tables that space the navigation commands evenly, no matter which web browser or computer screen is being used.
The easiest way to build a table is to use an automated website builder (such as the ones we discuss in the next section). However, understanding how tables are created in HTML helps you make any necessary edits, in case the builder tools don’t properly create all aspects of the table.
Follow these steps to define a table in HTML:
- Type the <TABLE> command wherever you want to start building a table in your HTML file.
-
For every horizontal row you want to build in your table, type the <TR> command to start the row and the </TR> command to end the row.
You can assign as many rows to a particular HTML table as you want. Although there’s no minimum number, you should try to put at least one row in each table you create.
-
For each column cell you want within a row, type the <TD> command to start the cell and the </TD> command to end the cell.
Although you define the number of rows in the table, your web browser interprets the number of columns in your table by counting the number of cells created with
<TD>and</TD>. If you create different numbers of cells within your rows of a table, your web browser tries to compensate by evenly spacing out the cells. This compensation, however, can result in an uneven display. When necessary, create cells with no content by simply putting
 <TD></TD>in the necessary rows. - When you’re finished building the table, type the </TABLE> command.
Be careful if you build tables to place inside other tables. Every table on your page uses a <TABLE> command, and if you start building tables within tables, you might mix up the matching commands. If you don’t provide the correct number of </TABLE> commands to end your tables, your web browser tries to format the rest of your web page into the tables you created, which can cause a disjointed appearance on your page.
To give you an idea of what a complete table definition looks like in HTML, we show you a basic three-row, three-column table that contains four different prices for a product:
<TABLE BORDER=1>
<TR>
<TD>JOEL'S SNOWBOARDS</TD>
<TD><B>UNPAINTED</B></TD>
<TD><B>PAINTED</B></TD>
</TR>
<TR>
<TD><B>MODEL 1000</B></TD>
<TD>$79.99</TD>
<TD>$129.99</TD>
</TR>
<TR>
<TD><B>MODEL 2000</B></TD>
<TD>$99.99</TD>
<TD>$179.99</TD>
</TR>
</TABLE>
Using this code sample results in something like the table shown in Figure 3-2.
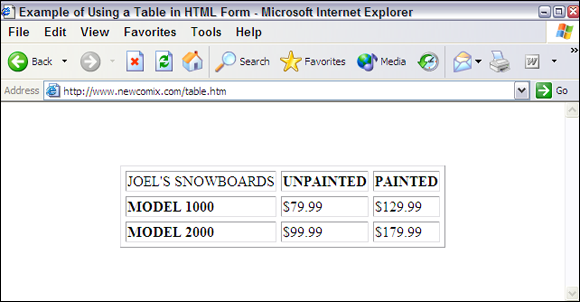
FIGURE 3-2: This web page has a table with three rows and three columns.
Notice how the <TABLE> command has an attribute named BORDER. If you set the BORDER to 0, no lines are drawn between rows or columns. This way, your website visitors see only the contents of your table, not any defining lines.
By default, your table takes the entire width of your web page. You can assign the WIDTH attribute to your <TABLE>, <TR>, or <TD> commands to manually space a particular cell, row, or table to appear on the web page. Using the preceding example, suppose that you want the cell containing the painted price to occupy just 20 percent of your table width. To accomplish this task, you can use this line of code:
<TD WIDTH="20%">$129.99</TD>
You need to assign the WIDTH attribute for all cells in the table for that same column. Otherwise, you risk throwing off the spacing for the entire table.
Your tables can contain much more than just text. You can assign pictures, buttons, text fields, or whatever elements you want to your table cells. Just make sure that you’re assigning an equal amount of content to each cell and keeping track of how much is in each one. You don’t want to throw off the alignment of your table by putting three pictures in one cell and only one picture in the next cell.
Going modern with WordPress, Adobe Dreamweaver, and more
Web pages have many elements you can specify, and keeping track of them all is hard when you design pages using only HTML. The growing number of commands available in HTML fueled the need for software programs to help organize all these elements. These programs create the HTML commands automatically so that you can focus on the layout, design, and content of your web page rather than worry about whether you defined all your table cells properly.
One of the most popular software applications for web page design is WordPress, which was developed by a core set of volunteer programmers. Preprogrammed templates and plug-in applications that work with WordPress enable those with little coding skill to quickly develop a dynamic website. The other program that some people use is Adobe Dreamweaver. This program provides many buttons and menus to help you place HTML commands as though you’re writing a paper in Microsoft Word. The software prompts you for specific information and then displays a sample of what your web page will look like, as you’re building the page. This way, you can try a command to see how it will look and then change it right there, if necessary, before continuing with your development.
The pros and cons of using automated site builders
You can use a website builder tool or application, such as WordPress, to create sophisticated web pages without having much specific knowledge, which is why millions of people buy these tools every year. However, using automated site builders isn’t without a downside, and you can fall into certain traps if you rely solely on these tools.
Here are some reasons to use a site builder tool:
- Ease of use: A builder tool is designed to make the process of creating web pages as easy as possible. It looks like any other software program you’re familiar with using and offers either templates or buttons, menus, and wizards to help you construct the building blocks of your web page.
- Wide array of options: A builder tool is programmed with every available HTML command as well as with functions that combine these commands. This combination gives you many options for creating your web pages, and the tool’s ease of use ensures that you don’t have to search through documentation to figure out a specific name and definition for a function.
- Total control: You can rely on the code that a builder tool generates (or can be purchased) or insert your own code whenever it’s needed. Site builder tools help you easily validate your work by color-coding the commands in your file for easy visibility, for example.
Despite the attraction of these features, you should also see the drawbacks of relying on a builder tool:
- Unneeded code: These programs have a particular way of inserting code into your HTML files, and sometimes they insert too much code or unnecessary code that web browsers can interpret incorrectly. You should optimize your code after a builder tool creates it so that your pages load faster and cleanly. You can use a tool such as HTML Optimizer from iWebtool (
www.iwebtool.com/html_optimizer) or the W3C Markup Validation Service (validator.w3.org) to help you go through your HTML files. - Exclusive functions: Some builder tools, especially Dreamweaver, offer powerful functions that you can insert into your web pages. These functions are sometimes written with special commands that can be interpreted by only specific web server programs. Web servers advertise this capability as including extensions, and whoever is hosting your website has to have the right extensions file for your web pages to work properly.
- Cost: A full version of Adobe Dreamweaver software can cost hundreds of dollars. Although the software offers a huge array of options, sometimes the cost isn’t justified for the website you truly need for your business.
Creating Your Site with the Pros
One way that entrepreneurs get ahead is by understanding their strengths and weaknesses: They focus on their strengths and have other people handle their weaknesses. Many people who want to operate their own online businesses aren’t necessarily skilled website designers, and nothing is wrong with that. In the earlier section “You Can Do It! Making a Build-It-Yourself Site,” we outline tools and technologies that can help you create your own website. You can choose another approach, however: Make the investment to have a professional website designer create your business site. The right interactions and communications with a professional designer can fuel an excellent site, and can even improve your overall business model so that increased orders and higher visibility help you recover the time and money you spent.
Some people consult with professional designers to create their sites and then give the business owners the tools to maintain their sites without any additional help. Other business owners contract with professionals to create and maintain their sites so that the designers can introduce new styles and functions as their businesses progress. Either approach can be beneficial for your business. You should decide how much help you want, as either a one-time investment or an ongoing expense.
Seeking experience: Choosing the right website designer
Half the battle of finding a website designer is deciding that you need to hire one in the first place. The other half of the battle involves knowing where to look and talking to potential candidates until you find the right fit. Finding the right designer is similar to finding other specialists you need to solve specific problems. Whether you’re looking for an auto mechanic, a plumber, a dentist, or in this case, a web designer, consider these methods for finding a qualified professional:
- Listen to word-of-mouth advice. Talk to your friends, business associates, partners, or anybody you do business with online or in person. Find out which website designers they have used and solicit their opinions of these professionals.
- See the designer’s work. Look at websites that you like or enjoy. Most of the time, a small link or reference at the bottom of the home page or About Us page mentions whether a professional designer created the site. Follow the link back to the designer’s site for more information.
- Evaluate the designer’s portfolios. Use search engines, read relevant magazines in your area, or look around on freelancer sites like Upwork (
www.upwork.com) or review sites like Yelp (www.yelp.com) to find a few companies. Then evaluate the samples or references they provide, to see whether their work for other people is good enough or fits the style you want for your own business.
Hooking up with a web design firm
From the early days of the Internet, some web design companies have focused on providing quality work for their clients. Going to a design firm gives you specific benefits for completing your project:
- Reliability: If a particular designer is having a bad day, week, month, or even year, a design firm can shift the workload away from that person and find backup or additional resources to cover the job. Design firms typically have contacts with freelance designers who come into the firm when needed to help tackle a big problem.
- Coordination: If several designers are working on your project, a design firm can coordinate the work and give you a single point of contact who communicates your ideas and tasks to the design team.
- Experience: Design firms have a portfolio of past projects and experience that lends itself to your project. They can bring their know-how and expertise to your project without having to navigate a large learning curve.
Going with a freelancer
When you ask around to find the right website design professional, you might be pointed toward talented individuals who work on a freelance basis and take on specific clients and projects that fit into their schedules. Some freelance professionals take assignments outside their full-time jobs, as a way to make some extra money. Others have enough clients to make their freelance jobs become their full-time careers.
Choosing a freelance designer over a design firm has several benefits. A freelancer
- Costs less to hire: When you hire a design firm, part of the cost goes toward maintaining the overhead costs of the company. Although that overhead is beneficial to ensure the reliability of your project, a freelance designer typically charges less per hour or per project than the average design firm.
- Works more nimbly: You might find that a design firm you choose requires decisions and work to be done in various committees, with approval required at all stages by the firm’s managers. This system can slow the progress of a website’s development, and if speed is a top concern, a freelance designer who can focus on your project can produce a quicker result because the only approval that’s needed is yours.
- Provides a unique style: Although designing a website is definitely a mixture of art and science, the creativity you want might not come from a firm that has developed procedures and processes for cranking out its various clients’ websites. An individual freelance designer can bring his or her own quirky, creative, unique style to your project, which is what might draw you to this designer in the first place.
You can use a website such as Upwork to find the right freelance designer for your project. Simply go to www.upwork.com and choose from qualified professionals. After you create a client account with Upwork, you can click the Post Job button (see Figure 3-3) to post your time and cost requirements and then receive bids from freelancers.

FIGURE 3-3: Post your requirements on Upwork so that freelancers come to you.
Comparing apples to apples
While you’re deciding whom to hire as your website designer, comparing quoted prices is a natural consideration for making up your mind. If you don’t consider certain factors, however, they can skew the math and thereby make your comparison invalid.
For example, a price for designing a website is normally determined in one of two ways:
- Flat fee: One price covers the complete site development.
- Per-hour pricing: You’re billed a rate per hour of development time.
Knowing a few key items from your designer or firm can help you compare prices more evenly. In this section, follow the advice that applies to your situation to find out the specific details.
If a designer or firm charges a flat fee for the entire project:
- Ask for a specific list of what’s provided for that fee. You might assume that the price you’re quoted is the only fee you have to pay but find out at the end of the project that the flat fee excludes extras that you assumed were included.
- Ask what happens if someone has to spend overtime hours to complete the project. One benefit of having a flat fee is knowing that you don’t have to worry about the number of hours your designer is spending to build your website. This way, someone can’t dawdle on a function to run up the bill, for example. Some design professionals offer a flat fee on the assumption that the project will take a maximum number of hours to complete. In this case, the contract stipulates that if the project exceeds that maximum number, the client pays more.
If a designer or firm charges by the hour:
- Ask for time estimates on the various pieces of the project, function by function. Website design professionals might give you different numbers for the total number of hours needed. Rather than compare total numbers, you can compare detailed quotes to know whether one firm is spending more time on specific functions or one person is forgetting to factor in pieces that other designers know are essential.
- Ask for limits to be put into place. A website designer can easily quote a specific number of hours and then exceed that number and keep the bill running while you pay for his or her excesses. That’s why you must establish limits for various pages, especially less complicated pages. The designer should be forced, at the least, to call you if he or she needs to spend more time than quoted so that you can hear an explanation and make the decision.
Regardless of how you’re charged, find out who pays if you find a bug or an error in the work after the fact.
Sometimes, web designers can offer a lower quote because they refuse to cover the cost of fixing the work when the project is complete. Although the initial price is low, you could pay more if a lot of reworking or correction is needed, and then you don’t save anything. Request assurances that the designer will spend the time necessary at the end, and specify that no one will be fully paid until the project is completed to your satisfaction.
Your best bet is to ask your designer to provide a full checklist of every action that’s necessary to build your website and then to review that checklist as your site is being designed. To ensure that the review takes place, many people tie their designer’s payments to the completion of the checklist. For example, when the designer can show that 50 percent of the items were completed, he or she receives 50 percent of the payment. This strategy helps prevent someone from receiving a full payment upfront and then quitting before completing all the agreed-on tasks.
Speeding up the process
Regardless of whom you choose to be your website designer, take the time to get the following “ducks in a row” to ensure that your designer is working as efficiently as possible — and costing you less in the end:
- Prepare site specifications upfront. First and foremost, you should have a clear idea of what your site should contain before your first meeting with the designer. Prepare a written road map of your site (as discussed in the section “Mapping Your Route to a Successful Site,” earlier in this chapter) and notes on the various web pages that you feel are essential. You can brainstorm with your web designer about your website, but starting with your road map and making small changes is quicker and easier than starting with a clean sheet of paper and spending hours writing down the basics.
-
Have your content ready. Make sure that the content you want for your site is typed and available in electronic format. You’re paying the designer by the hour, most likely, and you don’t want to pay a skilled professional to type reams of data for you.
If necessary, hire a copywriter separately from your web designer, and give that copywriter the sole responsibility of creating electronic text or Word document files with your information. - Establish firm milestones. When you meet with your web designer, work to establish rough dates for checking the progress or various milestones, which can be the end dates for specific portions of your site. Although some web designers don’t like specific hard-and-fast dates, you can reasonably expect to see portions of the project completed by certain dates. This way, you can see the progress of your site, make changes (if necessary) before everything is done, and ensure that the project is progressing.
- Be readily available to assist the designer. Make sure that you’re available to answer questions and feed information to your website designer. The designer shouldn’t be stuck waiting days (or weeks) to receive specific and necessary information from you. Even if you’re incredibly detail oriented and spell out everything in advance, your designer might need to ask you a question, get approval for a change, or find out more information about your business before proceeding.
Keeping an eye on your business interests
When you hire a website design professional, the expectation is that you don’t need to know how to use HTML or have any design skills. That is, after all, why you’re hiring the professional. However, your design professional will have expectations about how you participate in the project, how your business operations are reflected in the site, and who owns the rights to the resulting site and its content. You must know your role in this process so that you can contribute to a successful site that contributes in turn to your business success.
Keep in mind the concept of scope when you’re hiring someone to develop your site. Scope, in this case, refers to the amount of information and areas of concern that affect your website developer. She should operate within her role as specified in the contract or agreement between you and her. Don’t involve your developer in other aspects of your business or create expectations that she will contribute to your business plan. Keep the developer’s activities focused on the job at hand so that she can deliver your site as specified.
Drawing up your contract or agreement with a website developer provides a learning exercise for both parties. Spell out exactly what you need, and specify whether other people, yourself included, are providing pieces of the puzzle (such as product databases) that interact with their work. This way, you both know the extent of the site developer’s responsibilities.
Staying true to your business and customers
As the business owner, you determine how your site fulfills your business goals. Although an eager website developer might want to build something to highlight his specialties, they can conflict with your business purpose. If you’re focusing on a pure e-commerce site with little extra content, you need to communicate that fact so that your designer doesn’t hand back a content-rich, bloated site.
Know your customers and the audience you want your site to attract. Talented designers can build your site in different ways to appeal to different audiences, and you must point them in the right direction to “hook” the right people. Without any specific targets, your designer might produce something that speaks to every group but says nothing of value to any of them.
Supplying the designer with the right stuff
You can’t just drive your car into a service station, toss the guy the keys, say “Fix it,” and then walk away and expect to get a fully repaired car hours later. The same situation applies to designing your website: You must provide the right information to your designer, and at the right time during the process, so that your site is built correctly from the start. Here are some tips:
-
Outline your business practices. Your website designer isn’t necessarily a businessperson and can’t be expected to understand the intricacies of your business. You need to explain how your site should operate and why. If you have certain rules or exclusions for how you sell your goods and services, spell them out before development begins. For example, if you need to enforce a minimum order or disallow certain product combinations in the same order, those business rules must be a part of the proposal. Don’t expect your designer to implicitly know how your business operates or understand its specific requirements.
- Supply all relevant content. At some point, you need to provide the content that will fill your website. This content consists of not only the names and descriptions of products but also any product databases, pictures, pricing information, or other data that has to interact with your site. Unless your designer is creating your company logo, you have to provide your logo, mission statement, contact information, and anything else that needs to appear on your site. Some of this information is spelled out in your agreement; other pieces, such as a customer database, can be handed in down the road or even at the end of the process.
- Make your systems available when needed. Your developer also counts on having you and your computer systems available while building your site. This statement is especially true for more complex sites that operate on a web server and communicate with programs such as a database, a supplier’s inventory system, and a third-party payment solution. The quicker you can provide access, and the more documentation and notes you can provide about these interlocking programs, the quicker the designer can turn around and build you the correct website.
Clarifying who owns what
When you’re hiring someone to design and build your website for you, establish the ownership of this work after it’s complete. You might assume — because you’re paying a professional to do the work — that this constitutes a work-for-hire agreement where you automatically own full rights to the resulting site and its content.
Never assume that you have a work-for-hire situation, and — as part of your contract — spell out the ownership rights of everything the web developer provides to you. In addition, make sure that items such as photos, graphical images, and functions don’t carry any unexpected royalties or licenses that you have to pay to use.
After the job is done, ask the web designer for a copy of your website, either available online as a backup copy on a cloud storage service like Dropbox, or on a DVD or USB drive. This way, if something happens to your web server or you have a falling-out with your designer, you still have a full copy that you can use to keep your site running. Make sure that all the images, icons, logos, buttons, and other types of graphics — not just the HTML files — are included in your copy. If your web designer also designed your company logo, ask for the logo in different file formats and sizes.