
Chapter 3
Web-ify Your Store with Shopify
IN THIS CHAPTER
![]() Setting up a Shopify e-commerce store
Setting up a Shopify e-commerce store
![]() Adding products to your store catalog
Adding products to your store catalog
![]() Designing your store web pages
Designing your store web pages
![]() Comparing package solutions
Comparing package solutions
![]() Calculating the fees for using Shopify
Calculating the fees for using Shopify
![]() Using marketing systems to bring in more customers
Using marketing systems to bring in more customers
![]() Evaluating the success of your Shopify store
Evaluating the success of your Shopify store
One big advantage of using Shopify is how it enables you to easily create your own store. Shopify walks you through the steps necessary to create, design, fill, and maintain your own store. Over the years, smaller companies have folded or changed or were acquired by other companies, so customers of these companies aren’t sure what to expect. With Shopify, though, you know that your website will be fully functional and available because Shopify’s popularity ensures that Shopify professionals will provide the technical expertise to keep all its websites running smoothly.
In this chapter, we talk about the many features that Shopify e-commerce stores offer you, the basic platform of the small-business solution, and how you perform basic navigation and item creation. We cover the different packages and describe how Shopify makes its money with this service. Finally, you discover how you can make more money with your Shopify store through marketing, customer relationships, and data analysis.
Why Open a Shopify Store?
Although you can order different levels of solutions with Shopify, a powerful base platform comes with every solution. Here are 10 functions that every Shopify store can enjoy:
- Built-in shopping cart: You can put an unlimited number of products into your Shopify store. Its shopping-cart software presents those items to your customers and lets them add them to, or delete them from, their own shopping baskets. Then the software interfaces with shipping companies and tax tables to show customers their costs when they check out.
- Detailed sales reports: Shopify provides a set of detailed reports so that you can see what’s selling, what’s being clicked, and what’s being searched. You even see which websites send you the most traffic and which web pages on your site are the most viewed.
- Inventory tracking: If you don’t want to sell out of your hottest product or you need an alert when your available inventory gets too low, Shopify has you covered. It manages your inventory and automatically stops selling a product if inventory drops to zero.
- Unlimited space and bandwidth: If you have large image files or audio or video, you can relax. You get an unlimited amount of storage with each account and an unlimited amount of bandwidth to send those massive files each time a customer comes a-knockin’.
- Mobile app and support: Not only does Shopify ensure that your store is optimized for customers using a mobile device, but also its mobile app allows you to manage your store operations on the go, as all your data is synched between your store and your mobile device.
- Secure technology: With Shopify, your customers can enter information safely because you can create secure web pages by way of Secure Sockets Layer (SSL) technology (with a free SSL certificate) that encrypts sensitive data (such as credit card numbers) when customers transmit that info to you. Shopify will make sure your store is Level-1 PCI–compliant, which will protect your customers’ data.
- Search engine optimization tools: Shopify lets your customers leave SEO-friendly product reviews on your website, as well as help you customize important SEO practices like your meta tags, titles, and headers.
- Social media integration: Shopify gives you the ability to have your website integrate with your different social media channels, from Facebook and Twitter to Pinterest, Instagram, and Tumblr. Shopify provides options such as Facebook Buy buttons, where customers can buy products while staying on your Facebook page.
- Automatic backups of your website: Shopify takes a snapshot of your website every day and lets you go back and forth between those versions. If you accidentally lose data, you can restore the last version quickly. Shopify makes the backups without even asking or reminding you.
Setting Up Shop
When you’re ready to set up a Shopify store, follow these steps:
-
Go to the Shopify home page at
www.shopify.com, enter an e-mail address you will use for business, and click Get Started.You can also click the black Get Started button in the top right of the screen, as shown in Figure 3-1.
Shopify prompts you for an e-mail address, password, and the name of your store. Later on in the process, you will pick the plan that best suits your needs. (The standard and advanced Shopify plans are recommended for established e-commerce or offline businesses.) We discuss the prices and benefits of these packages later in this chapter, in the “Selecting a Plan” section.
 Shopify offers more packages than just its e-commerce solutions. If you want to have a Point of Sale system, simply put Buy buttons on your social media pages, or find other ways to have Shopify’s technology help power your business. Find out more at
 www.shopify.com. -
When Shopify prompts you for the address of your business, fill in the appropriate fields and then click Next.
Shopify needs to know the location of your business in order to set the proper currency and tax rate for your store.
-
Answer some additional questions about your business goals (see Figure 3-2).
Shopify will want to know whether you’re a new seller (as indicated in Figure 3-1) or an established store that’s moving over to Shopify. It also wants to know your current revenue per year, and whether you are building a store for a client rather than for yourself.
Based on your answers, other options may show up, like the section “Let us help you kickstart your business while you play around.” Based on the options you pick, Shopify will forward you videos and information to help you do online business tasks such as creating a logo or finding a product for sale. Take advantage of the library of help that Shopify has to offer.
-
Click the green Enter My Store button to finish initializing your account.
Shopify starts your free trial and takes you to your newly created Account page, as shown in Figure 3-3. The left menu contains all the major sections you will need to run your online store, so pay attention to all these options.
-
Click the green Select a Plan button to pick your Shopify plan.
You are taken to the page to select a plan for your store. You could also click Settings from the left menu and then click Account to get to the same plan page.
-
Review your options (see Figure 3-4), and click the appropriate Choose This Plan button to sign up for that particular plan.
You are prompted to provide your billing information and leave a credit card on file for when your Shopify trial ends. Fill out the prompts as labeled and then pick a billing cycle (month by month, annual payment for 10% savings, or biennial payment for 20% savings).
-
To finalize your order, scroll down to click the Submit button.
You need to select the check box to agree to Shopify’s terms of service.

FIGURE 3-1: Shopify guides you to its online sales solutions.
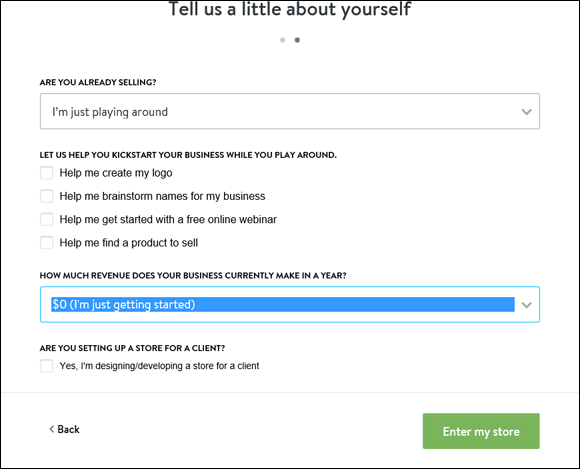
FIGURE 3-2: Tell Shopify your current business status.
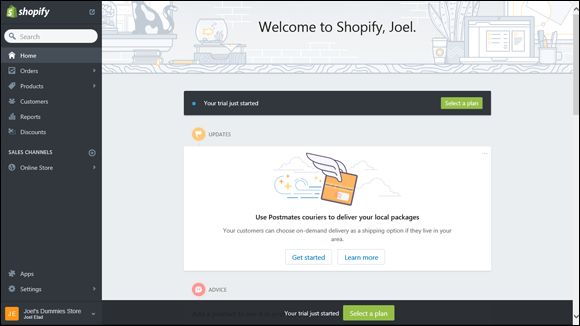
FIGURE 3-3: Shopify creates your trial account.
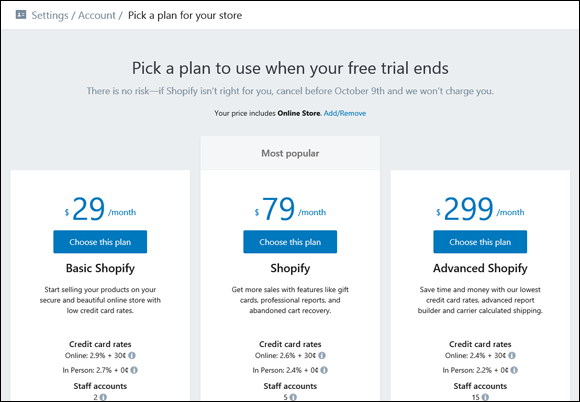
FIGURE 3-4: Review the Shopify plans offered.
Managing Your Shopify Store
After you sign up with Shopify, you can control all aspects of your account. Go to www.shopify.com and click Log In at the top right of the screen. Enter your e-mail address and password that you created when you signed up with Shopify, and that will bring you to your account home page, as shown in Figure 3-5.

FIGURE 3-5: Access all your account controls from one screen.
From the home page, you have access to the four main parts of your account:
- Orders: Review all the orders your store has received, and use the tools to fulfill those orders with steps like printing shipping labels.
- Products: Review the catalog of products you have for sale in your store. Here you can make updates, add and delete products, and review your inventory (if you set up Shopify to help keep track of your inventory count).
-
Customers: Here you get a better picture of the customers who shop at your store. Shopify stores all customers’ information when they place an order with your store. You can also add or import existing customers into your Shopify customer records.
 If you don’t want your customers to have to create accounts to use your online store, you can disable customer accounts, making this section not that helpful. You need to decide whether you want your customers to take that extra step to create accounts, and whether they (and you) will benefit more or less from this.
 - Reports: From here, you can manage all the reporting features to see how your store is performing. The standard and advanced Shopify packages offer more robust reporting features, but those are designed for well-established stores that could benefit from deep customer analysis.
The Settings page is at the bottom of the left menu and will be your most used section at the beginning as you configure many elements of your store during the entire setup process.
Constructing your catalog
Before we talk about designing your site, we want to focus on the core element of any vibrant e-commerce store, your “catalog” or list of products for sale. What’s a store without products? Shopify has a central section entitled Products, which lets you enter your products for sale and also offers you the ability to track the inventory level as people place orders. You can update your inventory at any time, organize your inventory by different product data fields, and even import your entire product catalog at one time.
When you want to add a product to your store, follow these steps:
-
From the Store home page, click the Products link.
The main Products page is displayed. The first time you go to your Products page, you see the option to add your first product or set up an import of products, as shown in Figure 3-6. For this example, we through the steps of adding a product directly.
-
Click the Add Product button to get started.
The one-page Add Product form appears.
- Complete the following information fields, as shown in Figure 3-7:
- Title: Enter the name that you want your customers to see as the name of your product.
- Description: Enter the item description in this field. Write a description for your product that you want customers to see when they’re looking at your item on your store page. Use the command buttons at the top of the text box (similar to Microsoft Word) to format your description so that it will show up on your store with specific font sizes, alignment, and so on.
- Images: Click the Upload Image link to specify the path where the digital image of your product is stored on your computer and upload it to your store.
- Product type: In this field, you select a category to assign to your product (for example, shirts, pants, socks, shoes).
- Vendor: Enter the manufacturer or brand name of the product in this field.
- (Optional) Collections: If you want to create a special collection (think custom category, for example) to assign your product to, this field is where you type in the collection name tied to the product. For example, you could create a Clearance collection, a New In Stock collection, or a themed collection like Movie Heroes.
- Tags: In this field, you can define tags, or “keywords,” to be associated with your item for search capabilities. These tags won’t be displayed to your shoppers on the product page.
- Scroll to the pricing and shipping section and enter more details about your product (see Figure 3-8):
- Price: Every product must have a numeric price.
- Compare at price: Think of this field as the “original retail price” and the price field as your sales price. When you use this field, your customers see both prices, with a line through the “Compare at price” number and the price highlighted.
- Stock Keeping Unit: This is your ID field for the product, so create a unique identifier for each product. This is an internal measure so don’t worry about the public having to decipher this field. You can enter letters, numbers, or both in this field.
- Barcode (ISBN, UPC, GTIN, and so on): This field should contain the identifier that came with the product, like a manufacturer’s UPC number, ISBN number, or a GTIN (Global Trade Identification Number). If the product doesn’t have one of these numbers, you can leave this field blank.
- Inventory policy: You can pick from a drop-down list of options. If you pick Track Inventory, a new field appears where you can assign the initial quantity of units for this product. (As orders are received, Shopify keeps track of the inventory level and decreases the quantity accordingly.) If you pick Do Not Track Inventory, no quantity information will be assigned to your product entry.
- Weight: Put the numeric weight of your item in this field. You can define the unit of measurement in the drop-down list next to this field.
- (Optional) Harmonized system code: If you ship overseas, you can assign an internationally recognized harmonized system code for your product, and Shopify will include this code when the customs paperwork is prepared.
- Fulfillment service: This option is mainly for the Advanced Shopify users, who have more real-time shipping options. For everybody else, the service is Manual as you fulfill your product sales. Make sure the “This product requires shipping” check box is selected for any product that’s a physical product you have to mail out.
- Variants: If you offer the same product in different sizes or colors or other options, don’t create individual product entries for each option. You simply click the Add Variant link and assign an option name and option values, one line at a time, like this:
Option name
Option values
Size
Small, Medium, Large
Color
Red, Blue, White, Black
Do not use any other internal punctuation, such as a colon or semicolon, between the options. Shopify is looking for a comma between each option.
-
Click Save Product to store the item.
When you save the product, Shopify takes you back to the Products page, confirms that the product was saved (see Figure 3-9), and offers you links to view (the product) in your online store or create another product.
- Repeat Steps 2 to 5 for any additional products.
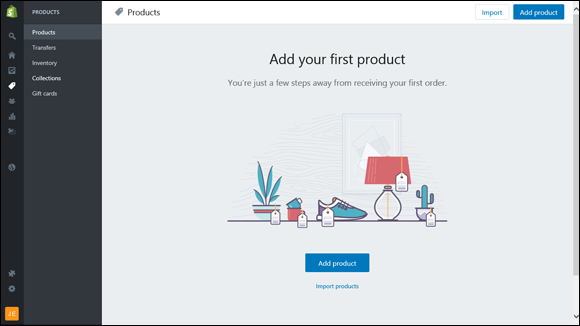
FIGURE 3-6: Shopify wants to help you add your first product to your store.

FIGURE 3-7: Enter key details about your product.
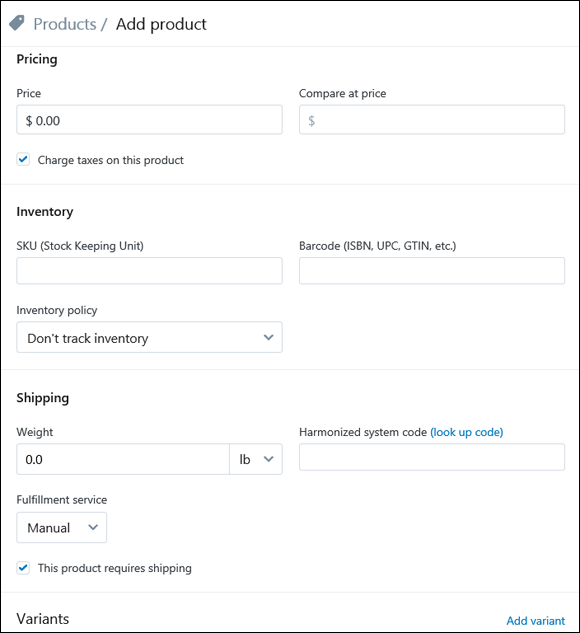
FIGURE 3-8: Complete the pricing and shipping information for your product.
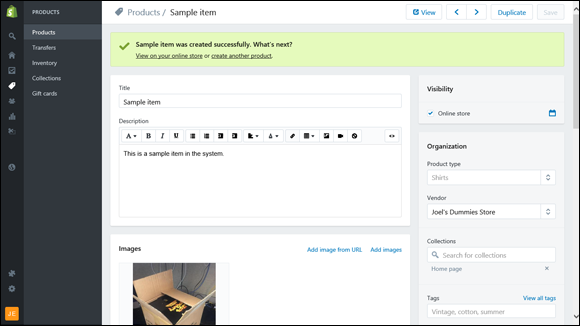
FIGURE 3-9: Your product has been added to your store.
Opening the doors
Before you decide that your store is going to go live and be open for business, we recommend that you research and plan your store first. See what you like and dislike on other websites and come up with a plan for your website. See Book 3, Chapter 2 for more information on developing a website design.
When you’re ready to open your store for business, you should first think about the following steps:
-
Design your store.
You need to create the web pages that display your products. You can add pages and then define the navigation of your store by creating a main menu and organizing the pages you create into a simple navigation structure between a main menu and a footer menu at the bottom of the screen. Building the actual store requires some design work, and Shopify provides you with hundreds of free and premium web templates that you can use to build your pages. You can also hire a Shopify Expert to create a totally custom design. These Experts are preapproved professional designers, marketers, and developers who can help build your store.
-
Add products.
We cover adding products to your catalog in the previous section, “Constructing your catalog.”
-
Set up payment methods.
You need to decide how you want to handle payment processing for your store. Shopify integrates with over 70 payment gateways around the world, from services like PayPal or iDEAL to systems like Bitcoin. Shopify also offers its own gateway, which offers competitive rates and allows you to accept credit cards. You can find more about payment processing in Book 4, Chapter 4.
-
Set up tax rates.
In today’s age of Internet sales, you need to be aware of tax-collection policies. They vary from state to state, and new legislation is being considered as this book goes to press. Currently in most states, you need to collect sales tax from customers who live in the same state as your business. And in a growing number of cases, you may need to collect sales tax from customers outside your business state. Consult your local Chamber of Commerce, accountant, or state government’s business office for specific information. At a minimum, you need to set up the tax rate for your local business area.
-
Set up shipping rules.
You need to define shipping methods and rates for your store. You can choose from vendors such as USPS, UPS, and FedEx. If you define shipping weights for each product in your store, Shopify can calculate shipping rates for each customer based on the weight of the items in the customer’s shopping cart. You can also set flat shipping rates independent of the number or weight of items in the customer’s shopping cart.
When you have gone through these five steps, you should also take a look at the other settings and capabilities Shopify offers you as a shop owner. You can set up notifications, custom domains, and even specific apps that your customers can download and use with your store. You can choose from 100 free and professional themes to make your store look great. You can add a fully functioning blog to help communicate and market to your customers. You can build a robust About Us page to let your customers know about your business and why you started this store, in order to help better connect with your customer base and distinguish yourself from the competition.
Selecting a Plan
Shopify offers different levels of its e-commerce service to coincide with the size and scope of your business. As your company grows, your plan can grow with it as you move up the scale to a more robust set of services.
With other services, you have to choose your features à la carte by cobbling together a plan. Shopify gives all its merchants a strong foundation, offering enhancements for its larger clients to fulfill the needs of a growing customer base. Shopify has years of experience in offering different tools — such as e-commerce, retail POS, even social media Buy buttons or pins for sites like Facebook, Twitter, or Pinterest — and those refined tools help make these packages that much more accessible.
Basic Shopify package: Starting out
Don’t let the name fool you — the Basic Shopify package isn’t a stripped-down, bargain-basement tool that holds only a few products. This package provides a rich set of features and is an excellent jumping-on point for new e-commerce retailers.
With the Basic package, you get the ability to build your own store, host any number of products, and design your site by using the Shopify tools. Some of the more advanced marketing and reporting techniques are reserved for more expensive packages, but most small businesses don’t need them.
Shopify package: Moving up
The medium solution is the Shopify package, which contains all the features of the Basic Shopify package, but also offers more advanced features that bigger e-commerce stores need to run their enterprises.
Some of the benefits you receive in this standard package include
- Five unique staff accounts (compared with two accounts with the Basic package)
- Better shipping label discounts
- The ability to view real-time advanced professional reporting tools
- The ability to offer gift certificates/cards for your website
- The ability to recover abandoned shopping carts
Advanced Shopify package: Building on solid ground
As e-commerce websites grew, Shopify needed a solution for its biggest customers. Although rich functions are important to bigger websites, you should care mostly about scalability — the capability to grow your website’s capability to match an increased number of customers or demand. Therefore, Shopify created the Advanced Shopify package.
The Advanced Shopify package focuses on providing the right amount of capabilities to make sure that the customer’s website brings in lots in sales just as smoothly as they were bringing in their first few orders. This is enhanced with an advanced report builder option and real-time carrier shipping options.
Breaking Down the Fees
With Shopify, you incur fees the moment you sign up and decide to use the system, after your free trial. Whereas some companies charge a one-time fee for creating an e-commerce site or provide free tools in exchange for ad placements or ownership, Shopify works on a subscription model with no setup fee. You pay every month that you use its solution. Your payment to Shopify consists of only two types of fees:
- Monthly fee: Shopify charges a fixed monthly subscription fee for using its solution. You can save 10% on an annual plan or 20% on a biennial plan, if you pay for that term up front. The month-by-month price varies by plans:
- Basic Shopify: $29 per month (10% discount when you sign up and pay for 12 months)
- Shopify: $79 per month (10% discount when you sign up and pay for 12 months)
- Advanced Shopify: $299 per month (10% discount when you sign up and pay for 12 months)
- Transaction fee: Shopify offers you the choice of using its built-in Shopify Payments gateway system, or using an external payments gateway system to handle your online payments. There is no additional fee for using Shopify Payments, and its online credit card processing rates are reasonable. If you use an external payment gateway (such as Stripe or PayPal), Shopify charges you a transaction fee. The transaction fee is a percentage of your sales, depending on the package you select. As your sales go up, the percentage goes down:
- Basic Shopify: 2.0 percent
- Shopify: 1.0 percent
- Advanced Shopify: 0.5 percent
Shopify provides a number of functions with its e-commerce packages, but the company charges extra for some added services. Check out the various options at www.shopify.com to see if they make sense for the business you are planning to operate.
Growing with Your New Business Partner
After you use Shopify to build and run your web store, you’re probably ready to expand and grow your business further. That’s why Shopify offers you tools to help your online business grow.
Marketing programs
You can spread the message of your business in many ways through the Internet and in the physical world. Most people find that their biggest limitation is time because there are many more programs than there are hours in the day. That’s where technology comes in. Shopify provides several ways to improve important merchandising features, such as the following:
- Built-in search engine optimization: Shopify provides total support for a lot of SEO best practices, like making sure your title and meta tags get filled in correctly for your website pages. They also update your sitemap.xml files so the search engines can detect any website updates automatically.
- Discounts and coupons: Shopify builds in functionality where you can provide specific discount codes as well as coupon codes to appeal to different customer bases and encourage repeat business.
- Social media integration: Shopify builds in buttons and functionality into its themes to allow your customers to share your products and store with their friend networks.
Customer-relationship management
You can build connections with your customers in lots of ways. The power of an online business is that you can reach your customers directly, one by one, rather than rely on a network of distributors, middlemen, and retailers to connect products with customers.
Shopify’s Standard and Advanced packages allow you to offer features on your store such as gift certificates. You can also provide automatic discounts to your customers, whether it’s a one-time promotion, a reward for their first purchase, or an incentive to come back for a new order. Shopify keeps track of the logistics so that you can provide a simple code to your customers that acts as a gift certificate or discount coupon and also update your customers’ orders when needed.
After you get to know your customers, you can follow up with Shopify’s built-in e-mail marketing tools from MailChimp (www.mailchimp.com). You can easily view your customer history with Shopify and organize customers into specific groups that you can market to directly. You can have the ability for customers to buy gift cards for your store to give to other people, and encourage those customers to write product reviews that would be stored and displayed on your store.
Some of these features are available only with the Standard and Advanced Shopify packages.
Sales reports
You must think that we love reports, the way we talk about them repeatedly in this book. We are fans of reports for one basic reason: You don’t know where you can go if you don’t understand where you’ve been. Shopify offers a number of sales reports to help you track what’s succeeding and what isn’t, so pay attention to these reports and make smart decisions about how to increase your business.
Simply click the Reports link from the main Shopify menu to see the different reports. Your sales reports give you a useful picture of how your website is doing overall. You can analyze sales by a number of factors, including time of day, customer, channel, and where the traffic is coming from. You can also analyze your visitors by location, landing page, or advertising campaign. You can use these reports if you subscribe to the Standard or Advanced Shopify subscription plan. You can even export that data to Microsoft Excel if you want to do further number crunching.
If you’re interested in doing your own data analysis with Excel, check out Excel Data Analysis For Dummies, 3rd Edition, by Stephen L. Nelson and Elizabeth C. Nelson.
After you see your customers’ orders, you can then see how they found you in the first place. There is a report that analyzes sales based on the traffic referral source of the customer. For each visit, you see the referring URL of that customer, which is the web address your customer was viewing before coming to your website. Shopify even ties together the orders that came from these links so that you can see the revenue per visit. This information gives you an idea of how valuable a new customer can be — so that you know how much to spend to get that new customer to return.
If the referral URL is from a search engine, pay attention to the URL closely. You see the exact search terms the visitor typed in the search engine to find you. Knowing these words should definitely influence your SEO marketing campaigns.
Finally, let’s talk about information you can learn that isn’t actual sales or visits. Your customers can type search words and try to go directly to the product page they need. To track this type of customer, Shopify also shows the most frequent words in your own website’s search engine. You see a ranked list of the top search terms your customers use every day to find your specific products. You can then compare this list with your inventory. Investigating the search terms used by customers can help you match the right product with the right customer. More important, you see a report of top search terms with no product results. This indicates a list of products your customers are looking for that you don’t currently stock, which shows you what new products you should consider carrying in your store.