
CHAPTER 6 Fundamental File Tweaks
Psst! Want to know a productivity secret? Who doesn’t these days? It’s simple: Spend less time on routine, day-to-day tasks so that you can spend more time on tasks that are interesting and enjoyable. How do you do that in Windows? You figure out how to minimize the amount of time you spend performing file maintenance chores, such as selecting files, deleting files, searching for files, and so on. No one enjoys that kind of routine-but-necessary stuff, so reducing the time you spend on it lets you increase the time you spend on more engaging pursuits. This chapter shows you a few file tweaks that will help you do just that.
Easily Select Files and Folders Using Check Boxes
![]()
The buzz about Windows Vista before it launched centered around new features such as the Aero interface, desktop search, metadata, grouping and stacking, Flip 3D, and live icons. This strikes me as odd, now, because if I was ever forced to return to using Windows XP, I wouldn’t miss any of those features. What would I miss? The first feature that comes to mind is Vista’s new capability to let you select files and folders using check boxes.
That may seem a bit strange, so let me explain. As you know, selecting a single file or folder is easy as pie: Just click it. Selecting several files or folders in a row is a bit harder, but it’s still not a big whoop: You either click and drag the mouse to “lasso” the items, or you click the first item, hold down Shift, and then click the last item.
Things start to get trickier when you need to select multiple files or folders that aren’t together (that are noncontiguous, as the geeks say). The technique itself isn’t hard: The easiest method is to hold down the Ctrl key and click each item you want to select. However, when you use this technique to select more than a few files, sometimes things can go wrong:
• You might accidentally select one or more files that you don’t want. To fix the problem, you need to keep Ctrl held down and click the unwanted item to deselect it. Sure, it’s not a big deal to deselect these extra files, but it’s one of those small drains on productivity that bugs me (and many other users).
• You might accidentally double-click a file. For example, if you click the wrong file and then immediately click it again to deselect it, Windows might interpret this as a double-click. That’s bad news, because it means that Windows will not only open the file you just “double-clicked,” but it will also open every other file that’s currently selected! Now your productivity is pretty much toast for a while because you not only have to wait while all those files (and their associated applications) open, but you must then waste even more precious time shutting everything back down again.
Vista’s new check box-based file-selection technique promises to eliminate accidental selections and double-clicks, and to me that’s a big deal because sometimes it’s the small, incremental changes that make your life with an operating system easier and more efficient.
Follow these steps to configure Windows Vista for check box file and folder selecting:
1. In any folder window, select Organize, Folder and Search Options to open the Folder and Search Options dialog box. (You can also open this dialog box by selecting Start, Control Panel, Appearance and Personalization, Folder Options.)
2. Click the View tab.
3. Activate the Use Check Boxes to Select Items check box.
4. Click OK.
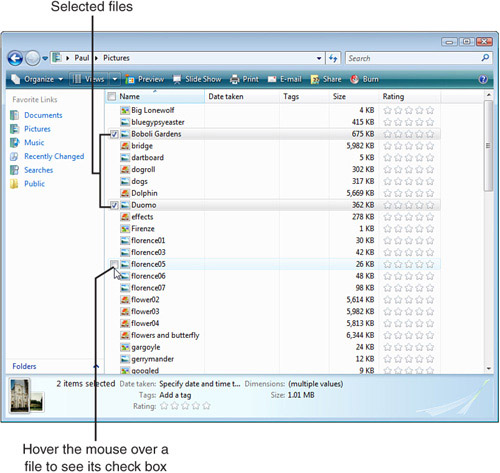
As you can see in Figure 6.1, when you turn on this feature, Windows Explorer creates a column to the left of the folder contents. If you’re in Details view, when you point at a file or folder, a check box appears in this column, and you select an item by activating its check box. (In List view, the check boxes also appear beside each file or folder.) You don’t need to hold down Ctrl or use the keyboard at all. Just activate the check boxes for the files and folders you want to select. Bonus technique: You can also select all the items in the folder quickly by clicking the check box that appears in the Name column.
FIGURE 6.1 In Windows Vista, you can select files and folders using check boxes.
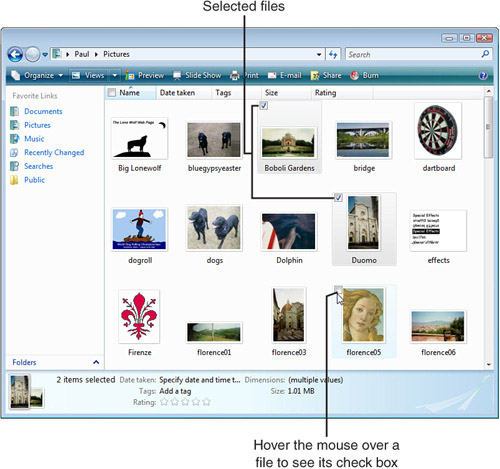
In the various icon views—Extra Large Icons, Large Icons, Medium Icons, Small Icons, and Tiles—the check boxes appear in the upper-left corner of the imaginary box that surrounds each item, as shown in Figure 6.2.
FIGURE 6.2 In the icon views, the check boxes appear in the upper-left corner of each file’s box.
Save Time by Stopping Delete Confirmations
![]()
My biggest Windows pet peeves center around tasks that require you to jump through extra hoops that are totally unnecessary. In Windows XP, for example, clicking the Shut Down command on the Start menu doesn’t shut down your computer, at least not right away. Instead, a dialog box shows up and you need to click Shut Down yet again. Dumb! Windows Vista improves upon this sorry state by putting an honest-to-gosh Shut Down button on the Start menu. (Other options such as Restart and Log Off are another couple of clicks away, but you’re not pestered by any dialog boxes.)
Another unnecessary dialog box is the “Are you sure you want to move this file to the Recycle Bin?” prompt that pops up when you press Delete. Now you either need to move your hand to the mouse to click Yes, or you can keep your hands on the keyboard by pressing Alt+Y. Either way, it’s an extra step that just slows you down.
One way to avoid this confirmation dialog box is to click and drag the file you want to delete and then drop it on the desktop’s Recycle Bin icon. That’s nice to know, but most of us rarely see our desktops these days, so this method is not very practical.
A much better solution is to configure Recycle Bin to not display the confirmation dialog box at all. Here’s how it’s done:
1. Right-click the desktop’s Recycle Bin icon and then click Properties. Windows Vista displays the Recycle Bin’s property sheet.
2. Click to deactivate the Display Delete Confirmation Dialog check box.
3. Click OK to put the new setting into effect.
Now let’s consider this tweak from the opposite point of view. The reason Windows displays the delete confirmation dialog box by default is to prevent you from accidentally deleting a file. You and I are savvy, knowledgeable users, so we know when we want to delete something, but not everyone falls into this boat. If you have young kids or old parents who use Windows, you know that the delete confirmation dialog box is an excellent safeguard for these and other inexperienced users.
In that case, you might be wondering if there’s a Windows tweak that ensures a novice user can’t turn off the delete confirmation dialog box. Yes, in fact, there is, although it’s a bit harder to implement because it involves changing a policy setting on the user’s computer. A policy setting is a kind of rule that an administrator applies to a Windows system, and that rule can’t be overridden except by another administrator. To apply a policy setting you use the Group Policy Editor, which I discuss in detail in Chapter 35, “Controlling Windows with the Group Policy Editor.”
• See “Controlling Windows with the Group Policy Editor,” p. 419.
You can use two ways to prevent a user from turning off delete confirmations:
• Disable the Display Delete Confirmation Dialog check box that appears in the Recycle Bin’s property sheet.
• Disable the Recycle Bin’s Properties command so the user can’t display the Recycle Bin’s property sheet.
Follow these steps to implement one of these policies:
1. On the other user’s computer, open the Run dialog box, type gpedit.msc, and then click OK. (In Windows Vista, you need to enter your administrator’s credentials to continue.) The Group Policy Editor appears.
2. Open the User Configuration branch.
3. Open the Administrative Templates branch.
4. Display the property sheet of the policy you want to use, as follows:
• If you want to disable the Display Delete Confirmation Dialog check box, open the Windows Components branch and then click Windows Explorer. Double-click the policy named Display Confirmation Dialog When Deleting Files. If you don’t have access to the Group Policy Editor, open the Registry Editor and create a DWORD setting named ConfirmFileDelete with the value 1 in the following key:
HKCUSoftwareMicrosoftWindowsCurrentVersionPoliciesExplorer
• If you want to disable the Recycle Bin’s Properties command, click Desktop and then double-click the policy named Remove Properties from the Recycle Bin Context Menu. If you don’t have access to the Group Policy Editor, open the Registry Editor and create a DWORD setting named NoPropertiesRecycleBin with the value 1 in the following key:
HKCUSoftwareMicrosoftWindowsCurrentVersionPoliciesExplorer
5. Click the Enabled option.
6. Click OK to put the policy into effect.
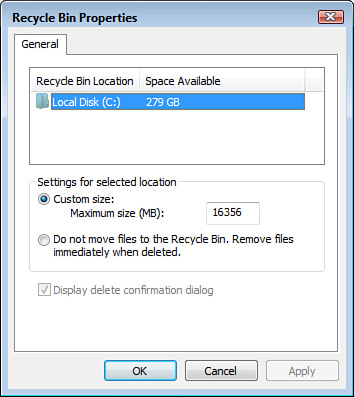
Figure 6.3 shows the Recycle Bin property sheet with the Display Confirmation Dialog When Deleting Files policy in effect. As you can see, the Display Delete Confirmation Dialog check box is activated and disabled, so the setting can’t be changed.
FIGURE 6.3 With the Display Confirmation Dialog When Deleting Files policy in effect, the Display Delete Confirmation Dialog check box is activated and disabled.
Search Smarter with Customized Start Menu Searching

Vista’s desktop search capabilities are underwhelming right out of the box, although later in this book I show you a few tweaks that can elevate searching to a higher plane.
• See Chapter 25, “Super Searching,” p. 285.
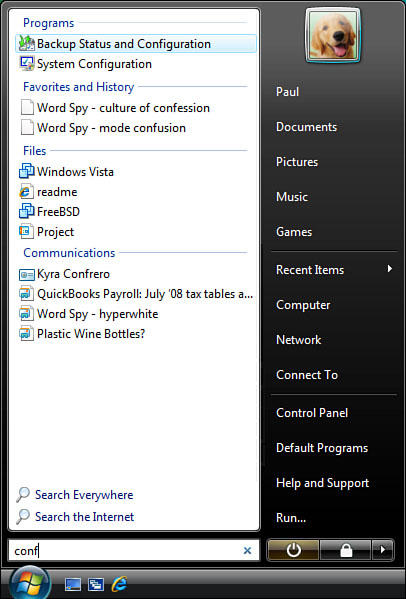
However, the one search feature that I’ve grown quite fond of is the on-the-fly searches you can perform using the Start menu’s Search box. As shown in Figure 6.4, as you type characters into the Search box, the Start menu replaces the list of pinned and recently used programs with a new list that displays the following search links:
• A list of programs with names that include the typed characters
• A list of files (documents) with content or metadata that include the typed characters
• Other data—contacts, email messages, and sites from Internet Explorer’s Favorites and History lists—with content or metadata that includes the typed characters
• A Search Everywhere link
• A Search the Internet link
FIGURE 6.4 As-you-type searching using the Start menu’s Search box.
If you see the program or file you want, click it to open it. Otherwise, you can click Search Everywhere to see the complete list of matches from the files in your user profile. If you prefer to search the Web for your text, click the Search the Internet link instead.
All in all, the Start menu’s as-you-type searching is a pretty decent feature. However, many people find that these on-the-fly searches aren’t all that useful because there’s only so much room on the Start menu to display results, so they often don’t get the match they’re looking for. The problem in most of these cases is that the Start menu search feature looks for matches in a large number of file types—a half dozen in all (programs, favorites, history, documents, contacts, and email). That’s convenient most of the time, but if you’re getting back tons of results, you might be thinking that it would be nice if Windows Vista could dial things back a bit and not search so many file types.
Fortunately, you can tweak the Start menu to do just that. Each of the four main Start menu search categories—Programs, Favorites and History, Files, and Communications—can be toggled on or off, so you can customize searches to suit the way you work. Here are the steps to follow to customize Start menu searching in Vista:
1. Right-click the Start button and then click Properties. The Taskbar and Start Menu Properties dialog box appears with the Start Menu tab displayed.
2. Click the Customize button beside the Start Menu option. The Customize Start Menu dialog box appears.
3. In the list of Start menu features, scroll down until you see the following controls:
• Search Communications—Click to deactivate this check box to prevent contacts and email messages from appearing in the Start menu search results.
• Search Favorites and History—Click to deactivate this check box to prevent Internet Explorer favorites and history items from appearing in the Start menu search results.
• Search Files—Click to activate the Don’t Search for Files option to prevent documents from appearing in the Start menu search results.
• Search Programs—Click to deactivate this check box to prevent programs from appearing in the Start menu search results.
4. Click OK in the open dialog box to put the new search settings into effect.
After you remove a file type from the Start menu search results, you may find that you need to search for that particular type. Rather than add it back, in most cases Vista offers search alternatives. Here’s a rundown for each file type:
• Documents—Click Start and then click your username to open your user profile folder. Use the Search box in the folder window to search your documents.
• Favorites—Click Start, click your username to open your user profile folder, and then double-click Favorites. Use the Search box in the folder window to search your documents.
• History—In Internet Explorer, press Alt+C (or click the Favorites Center icon) to open the Favorites Center. Pull down the History and then click Search History.
• Contacts—Click Start, click your username to open your user profile folder, and then double-click Contacts. Use the Search box in the folder window to search your documents.
• Email—Click Start, E-mail to open Windows Mail. Use the Search box to search your messages.
• Programs—Unfortunately, Vista doesn’t offer an alternative method for searching for programs. Even if you use the Start menu’s program-searching feature only once in a while (it’s my favorite and most-used aspect of Start menu searches), I suggest leaving the Search Program check box activated.
Open a Document Using a Different Application
![]()
In Chapter 3, “Indispensable Interface Tweaks,” you learned how Windows relies on file extensions to determine not only the file type (Text Document, Bitmap Image, and so on), but also the application associated with that file type (that is, the program that runs when you double-click a file of that type).
• See “Make Files Make Sense by Showing Extensions,” p. 31.
Having an application associated with a file type is convenient because it means you don’t have to think about what program to use. Just double-click the file you want to open and Windows takes care of the behind-the-scenes details. However, on occasion you might not want to open a particular file in the associated application. For example, you might prefer to open a text file in WordPad instead of Notepad. Similarly, you might want to open an HTML file in Notepad or some other text editor rather than Internet Explorer.
One easy way to go about this is to launch the unassociated application and open the document from there. To do so, you run the application’s File, Open command (or whatever) and, in the Open dialog box, select All Files in the Files of Type list. That will work, but it defeats the convenience of being able to launch a file directly from Windows Explorer.
Another possibility is to right-click the file you want to work with and then examine the various “verbs” that appear at the top of the shortcut menu. These verbs—Open, Edit, Print, and Preview, for example—represent the default actions associated with the file type, and the verbs you see depend on the type. For instance, a document might show actions such as Open and Print, whereas an image might show actions such as Preview and Edit.
The verb in bold type is the default action, which most often means it opens the file using its associated application. However, in some cases you can use the other verbs to open a file using a different application. For example, the default action for a Bitmap Image (.bmp file) is Preview, which opens the image using Windows Photo Gallery (in Vista) or Windows Picture and Fax Viewer (in XP). However, if you click the Edit action, Windows opens the file in Paint.
What happens if none of a file type’s default actions open the file using the application you want? Your next best bet is to see if Windows has set up multiple associations for that file type. With a Text Document type, for example, Windows sets up Notepad as the default application, but Windows also sets up WordPad as a kind of secondary application. To see if a file has one or more secondary applications, right-click the file you want to open (you can also pull down the File menu; in Vista, press Alt to see the menu bar), and then examine the Open With command:
• If you see Open With..., it means that the file type has no secondary applications associated with it.
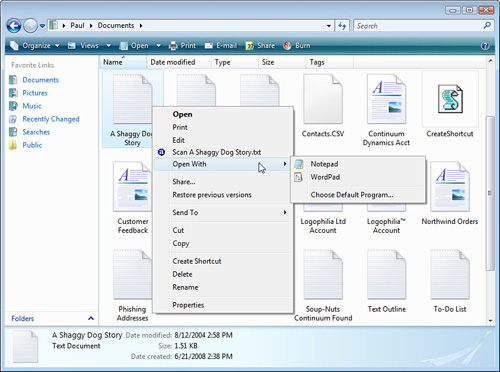
• If, instead, you see an arrow beside Open With, then it means that the file type does have one or more secondary applications associated with it. Click Open With to see the applications. In Figure 6.5, you can see that the text document’s Open With command displays two applications: Notepad and WordPad. If you see the application you want to use, click it to open the file using that program.
FIGURE 6.5 Click the Open With command to see the applications associated with the file type.
Still don’t see the program you want to use to open the file? Okay, in that case, you need to take matters into your own hands. You have two choices:
• One-time only change—This means that you open the file using a different application this time only, so you preserve the association with the default application.
• Permanent change—This means that you configure Windows to always open the file type using the different application. To do this, you need to associate the file extension with the application you want to use instead of Windows’ default association.
For both of these methods, you use the Open With dialog box to select the application you want to use and, optionally, to change the associated application. Windows gives you various ways to display this dialog box:
• Open With command—With this method, right-click the file you want to open and then click Open With. If the file type already has multiple programs associated with it, you’ll see a menu of those programs. In this case, click Choose Default Program (in Vista) or Choose Program (in XP) from the menu that appears.
• Task pane (Windows Vista)—When you click a file, Windows Explorer’s Task pane displays a button that represents the default action for the file type. For example, if you click an image, a Preview button appears in the Task pane; if you click an audio file, you see a Play button in the Task pane. In most cases, this default action button also doubles as a drop-down list. Display the list and click Choose Default Program.
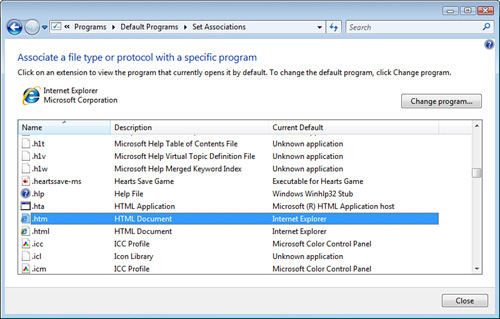
• Set Associations (Windows Vista)—Select Start, Default Programs, and then click Associate a File Type or Protocol With a Program. This displays the Set Associations window, shown in Figure 6.6, which displays a list of file extensions. Click the file type you want to work with and then click Change Program.
FIGURE 6.6 Use the Set Associations dialog box to change the application associated with any of the displayed file extensions.
In the Open With dialog box that appears, the icons in the Recommended Programs section are the applications associated with the file type, and the icons in the Other Programs section are applications suggested by Windows. (If you don’t see anything in the Other Programs section, double-click the Other Programs heading.)
Follow these steps to select the application you want to use to open your file:
1. Choose the application:
• Other Programs—If you see an icon for the application in the Other Programs area, click that icon, as shown in Figure 6.7.
FIGURE 6.7 Use the Open With dialog box to choose which application you want to use to open the document.
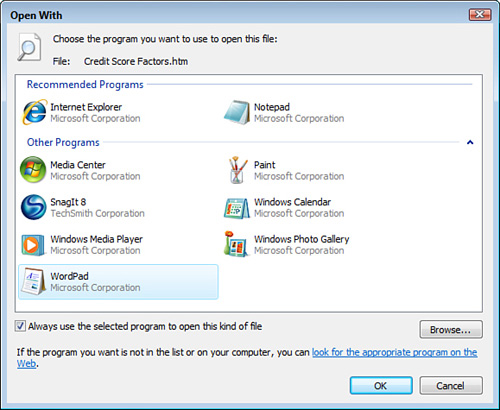
• Browse—If you don’t see an icon for the application, click Browse, use the dialog box to select the application’s executable file, and then click Open.
2. If you want Windows to associate the file type with this new application, click to activate the Always Use the Selected Program to Open this Kind of File check box. (If this is a one-time only association, be sure this check box is deactivated.)
3. Click OK to open the document in the selected application.
Note that Windows remembers the unassociated applications that you choose in the Open With dialog box. When you next select the Open With command for the file type, Windows displays a menu that includes both the associated program and the unassociated program you chose earlier.
• To learn how to tweak the Open With list, see “Customize the Open With List,” p. 317.